The Ultimate Classic Peanut Butter Blossoms Crinkly Cookies with a Chocolate Crown
- The Nostalgic Charm: Why These Peanut Butter Blossoms Reign Supreme
- Unpacking the Magic: A Truly Classic American Cookie
- Assembling Your Cookie Canvas: Essential Components
- Mastering the Measurements for Flawless Peanut Butter Blossoms
- Step-by-Step Guide to Crafting the Dough Base
- The Finishing Touch: Adding the Iconic Chocolate Kiss
- Troubleshooting Common Baking Hiccups
- Elevating Your Peanut Butter Blossoms: Tips and Twists
- Recipe FAQs
- 📝 Recipe Card
The Nostalgic Charm: Why These Peanut Butter Blossoms Reign Supreme
There are certain recipes that transcend mere dessert status; they become touchstones of memory, instantly transporting you back to childhood kitchens and bustling holiday preparations. The Peanut Butter Blossoms are undeniably one of these treasures.
Often the first cookie children learn to make, their signature look a perfectly crinkled peanut butter base crowned with a melting chocolate kiss is iconic. This article isn't just about delivering a recipe; it’s about honoring a baking legacy.
We are diving deep into how to create the Best Peanut Butter Blossoms that boast superior chewiness, the perfect salty sweet balance, and that sought after crinkled surface every time you bake them.
Unpacking the Magic: A Truly Classic American Cookie
Originating in the mid-20th century, these delightful treats are a masterclass in flavour contrast. They brilliantly marry the rich, slightly salty chewiness of a classic Peanut Butter Cookie Recipe with the smooth, indulgent melt of a Hershey’s Kiss pressed right into the warm centre.
They are wonderfully simple to execute, making them accessible to every home baker, yet look impressively festive perfect for afternoon tea or a grand holiday display. This Peanut Butter Blossoms Recipe focuses on nailing that foundational texture first.
Why Every Holiday Tray Needs This Salty Sweet Staple
When assembling your annual Christmas Cookie Recipes platter, utility matters as much as flavour. These cookies are robust enough for transport, freeze beautifully, and appeal across generations.
They offer a savoury depth that prevents them from being overly sweet, making them the designated "must have" on any sharing platter. If you are looking for foolproof Holiday Baking Cookies that disappear first, look no further than these chocolate crowned beauties.
A Quick Look at the Perfect Cookie Texture
The ideal Peanut Butter Blossoms have three distinct textural components working in harmony. First, the edges should be slightly crisp, offering resistance. Second, the main body of the cookie must be chewy and soft, achieved through the right ratio of brown sugar to white sugar.
Finally, the centre, housing the chocolate kiss, should yield softly when pressed. We are aiming for an "Easy Peanut Butter Blossoms" result that tastes like it took all day, yielding approximately 30 to 36 cookies from one batch.
Setting the Stage for Baking Success
Baking is chemistry, and timing is everything, particularly with this Hershey Kiss Cookies Recipe . We schedule a short 20 minutes for active preparation, including mixing the dough and rolling the balls.
Since these cookies don’t require chilling (though you certainly can if you prefer a thicker cookie), you can move from pantry gathering to oven preheating at 375° F ( 190° C) in minutes.
The total active time hovers around 40 minutes, making this a fantastic weeknight baking project.
Assembling Your Cookie Canvas: Essential Components
The magic here lies in utilizing ingredients you likely already have, but using them correctly is non-negotiable for success. For the cookie dough base, you will require 2 ¼ cups of all-purpose flour, alongside leavening provided by 1 teaspoon of baking soda and ½ teaspoon of fine salt.
The richness comes from ½ cup (one stick) of softened, unsalted butter, paired with ½ cup of creamy peanut butter. For sweetness and structure, we call for ¾ cup of granulated sugar and ¾ cup of packed light brown sugar.
Finally, bind it all together with one large egg and 1 teaspoon of vanilla extract. For finishing, you’ll need about ½ cup of extra granulated sugar for rolling and one standard 12 oz package of chocolate Kisses, meticulously unwrapped before baking commences.
Mastering the Measurements for Flawless Peanut Butter Blossoms
Precision in measuring the dry ingredients spooning the flour into the measuring cup and leveling it is vital to prevent a dense, cakey texture in what should be a rich, dense Peanut Butter Cookie .
Choosing the Right Peanut Butter for Optimal Chewiness
When selecting your spread, resist the urge to use natural, oil-separated peanut butter. For the classic, chewy texture that defines these cookies, standard commercial creamy peanut butter (the kind that doesn't require stirring) works best.
Its stabilizers ensure the cookie dough maintains the correct consistency, preventing it from becoming greasy or overly crumbly during the creaming process.
Required Baking Hardware: Tools for Perfection
While a stand mixer or electric hand mixer is ideal for achieving the necessary aeration when creaming the fats and sugars, the essential tools are simple: large mixing bowls, spatulas for scraping down the sides, and your trusted baking sheets.
Lining these sheets with parchment paper or silicone baking mats is highly recommended; it guarantees easy release and helps the bottom of the cookies brown evenly without scorching.
A small cookie scoop (or a tablespoon measure) is handy for creating uniformly sized dough balls, which ensures even baking across the batch.
Related Recipes Worth Trying
- The Best Moist White Velvet Cake Recipe with Silky Buttercream — Forget dry sponges This Simple Moist White Velvet Cake Recipe creates an incredibly tender crumb using buttermilk Perfect for a stunning White Buttercream...
- Buttery Pecan Snowballs The Ultimate Mexican Wedding Cookie — Whip up these foolproof buttery Mexican Wedding Cookies Polvorones that practically melt in your mouth The secret is the double sugar dusting Get the easy...
- Easy Authentic German Butter Cookies Recipe MeltinYourMouth Biscuits — Master the classic Butterplätzchen recipe These easy German Butter Cookies are deeply buttery and tenderperfect for your holiday tin or just a cuppa
Step-by-step Guide to Crafting the Dough Base
We begin by combining the dry ingredients flour, baking soda, and salt in a separate bowl and whisking them together thoroughly. This disperses the leavening agent evenly.
Next, turn to your mixer and cream the softened butter, peanut butter, granulated sugar, and brown sugar together on medium speed until the mixture is noticeably light and fluffy, usually taking about two to three minutes. This step incorporates air, which gives the final cookie its lift.
Next, add the lightly beaten egg and vanilla extract, mixing just until they are incorporated. Finally, introduce the dry mixture gradually to the wet ingredients, mixing only on low speed until the flour streaks have just disappeared. Overmixing at this stage develops gluten, leading to a tough, less tender cookie.
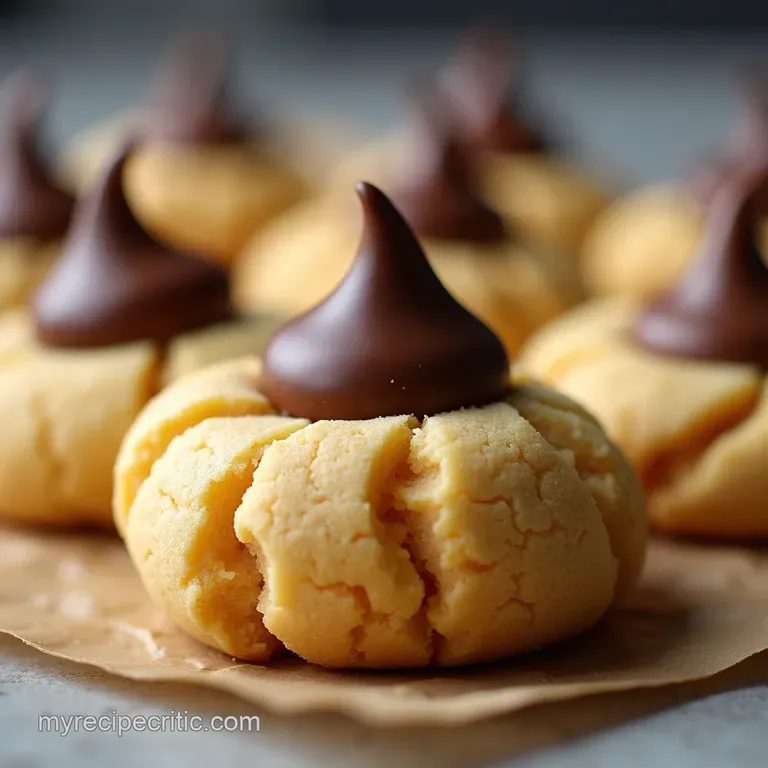
The Finishing Touch: Adding the Iconic Chocolate Kiss
The transformation into Peanut Butter Blossoms happens in the final few minutes. Once the dough is mixed, pour the reserved ½ cup of granulated sugar into a shallow dish.
Roll the dough into 1 inch balls roughly one tablespoon each and ensure each sphere is thoroughly and generously coated in the sugar before placing them two inches apart on your prepared baking sheets.
These cookies bake quickly, requiring only 8 to 10 minutes at 375° F ( 190° C). You are looking for edges that are just starting to turn a pale golden brown, while the centres still appear slightly puffy and soft.
Mixing Secrets for Maximum Crinkle Effect
The characteristic crinkled surface is partially achieved by the sugar coating interacting with the rising dough, but also by the immediate heat shock of the chocolate kiss. Rolling the dough balls generously in that exterior layer of coarse sugar helps promote the visual fissures as the cookie spreads slightly in the oven.
Achieving the Ideal Dough Ball Size and Sugar Coating
Uniformity is key to managing the baking time. Using a one-tablespoon measure ensures every cookie hits that 8-to-10-minute mark simultaneously. Don’t skimp on the sugar roll; a thick, even coating is what provides that necessary contrast against the soft interior.
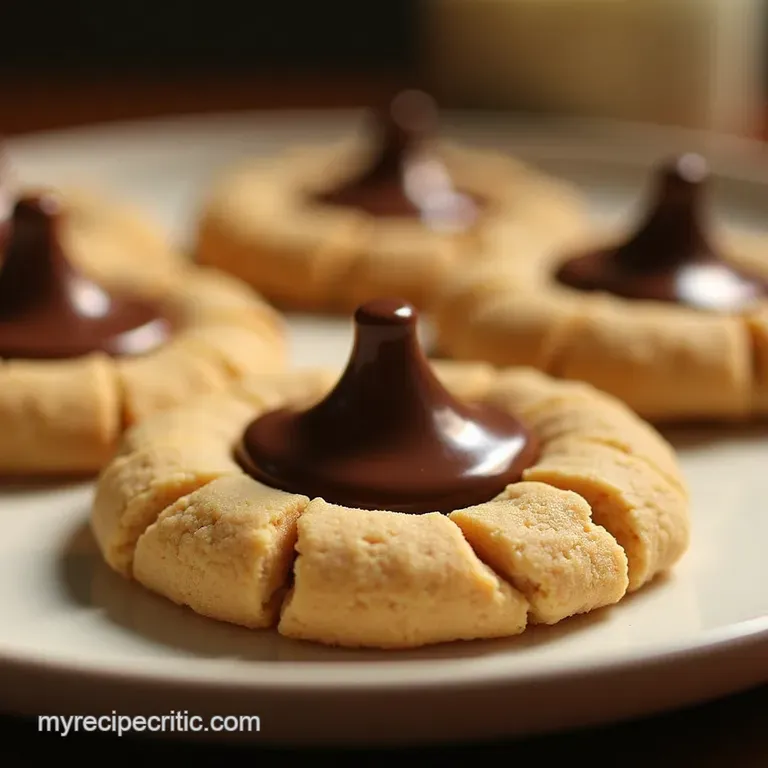
The Critical Second Bake: Setting the Chocolate Without Melting It
This is the moment that separates an amateur attempt from a perfect Peanut Butter Blossoms Recipe . Immediately upon pulling the hot tray from the oven, you must gently press one unwrapped chocolate Kiss into the centre of each cookie.
The residual heat from the cookie is enough to slightly soften the base of the chocolate, allowing it to adhere securely and sink just slightly into the dough, creating that signature indentation.
Cooling Techniques for Structural Integrity
Resist the urge to move the cookies immediately! Let them rest on the hot baking sheet for a crucial 5 minutes. This brief pause allows the soft cookie structure to firm up slightly around the base of the chocolate candy.
After those five minutes, carefully transfer the cookies to a wire rack to finish cooling completely. This prevents the bottoms from steaming and ensures they hold their shape beautifully.
Troubleshooting Common Baking Hiccups
If your chocolate Kisses are sliding off, it almost always means you waited too long after removing the cookies from the oven; the surface cooled too much to grip the candy. If your cookies spread too thinly, your butter was likely too soft or even partially melted during the creaming stage, or you may have skipped the optional, but recommended, chilling time.
Conversely, if the cookies are dry and crumbly, they were overbaked pull them out a minute sooner next time!
Elevating Your Peanut Butter Blossoms: Tips and Twists
While the Classic Peanut Butter Blossoms are perfect as they are, there’s always room for subtle refinement. For a richer flavour, consider substituting half the creamy peanut butter with natural peanut butter, provided you chill the dough for at least 30 minutes beforehand to firm it up.
Storage Solutions to Maintain Freshness
These Holiday Baking Cookies store beautifully. Once completely cool, place them in an airtight container layered with parchment paper between rows. They maintain peak freshness at room temperature for up to five days.
If you need to store them longer, they freeze exceptionally well for up to three months; just thaw them at room temperature before serving.
Variations: Exploring Different Candy Toppings
While the Hershey's Kiss is traditional, don’t limit your creativity. Swapping the milk chocolate for dark chocolate Kisses adds a sophisticated bitterness. Alternatively, peanut butter chips or even festive foiled holiday mint candies can be pressed into the warm dough for a fun twist on this well loved cookie.
Pro Baker Secrets for Superior Crinkles
If you want maximum crinkle effect, try chilling the sugared dough balls for 15 minutes before baking. The contrast between the cold dough and the hot oven causes a more dramatic, rapid spread and subsequent wrinkling across the surface.
Nutritional Snapshot of This Beloved Treat
As a comforting classic, these cookies are certainly an indulgence. Expect approximately 140 to 160 calories per cookie, with a notable amount of sugar and fat inherent in the rich peanut butter and butter base. They are best enjoyed in moderation alongside a tall glass of cold milk!
Recipe FAQs
Why are my Peanut Butter Blossoms spreading out flat instead of staying puffy?
More often than not, this is due to the butter being too soft, or perhaps over creaming the butter and sugar mixture. Make sure your butter is just softened at room temperature, but still cool to the touch. Also, avoid the temptation to overmix the flour; mix only until just combined.
Can I chill the dough for these cookies before baking, and how long should I leave the chocolate kisses off for?
Yes, chilling the dough (for 30 minutes to an hour) can help prevent spreading if you're worried, but it’s not strictly necessary for this classic recipe. If you do chill, you might need to add a minute or two to the baking time.
Crucially, you must press the chocolate kiss into the cookie immediately upon removing it from the oven if you wait even two minutes, the cookie cools too much, and the chocolate won't sink in properly!
I don't have Hershey’s Kisses; what's a good substitute for the topping on these Peanut Butter Blossoms?
No worries, we've all been there when the pantry looks a bit sparse! You can substitute the traditional Kisses with peanut butter baking chips, small rosettes of milk chocolate ganache piped on top after cooling, or even a dollop of chocolate frosting once the cookies have fully set.
Just make sure whatever you use melts nicely or holds its shape.
How should I store Peanut Butter Blossoms to keep them fresh and soft?
Store them in an airtight container at room temperature, ideally layered with parchment paper between the layers so the chocolate doesn't stick to the next cookie. They are best eaten within the first three days, but they should keep quite nicely for up to a week. Avoid the fridge, as this can often dry out cookies!
My cookies come out dry every time. What am I doing wrong in the baking process?
Dryness usually means they've been overbaked or you skimped on the fat/sugar ratio. The secret to these cookies staying soft is to pull them out of the oven when they look slightly underdone they are still cooking slightly on the hot baking sheet.
Aim for edges that are just barely set and a centre that still looks a touch doughy.
Classic Pb Kiss Cookies

