Grandmas Secret the Perfect Fudgy Peanut Butter Blossom
- Beyond the Holiday Rush: Why These Peanut Butter Blossoms Deserve Year-Round Fame
- Decoding the Signature Crinkle: The Science Behind the Perfect Top
- The Essential Pantry Assembly for Signature Flavor
- Precision Measurements: What Makes the Dough Thrive
- Step-by-Step Mastery: Forging Flawless Cookie Discs
- The Moment of Truth: Embedding the Chocolate Center Correctly
- Troubleshooting Common Pitfalls in Your Peanut Butter Blossoms Bake
- Elevating the Classic: Creative Touches and Substitutions
- Recipe FAQs
- 📝 Recipe Card
Beyond the Holiday Rush: Why These Peanut Butter Blossoms Deserve Year Round Fame
There is a specific kind of nostalgia baked into every bite of a Peanut Butter Blossom . While traditionally heralded as the quintessential Christmas cookie a star player on any holiday platter I firmly believe these magnificent creations deserve to be celebrated 365 days a year.
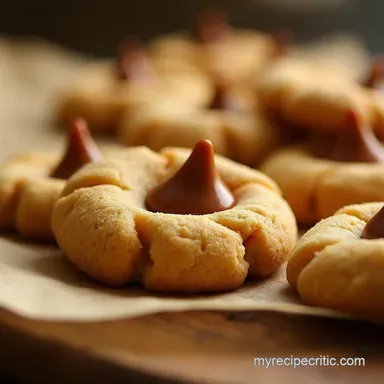
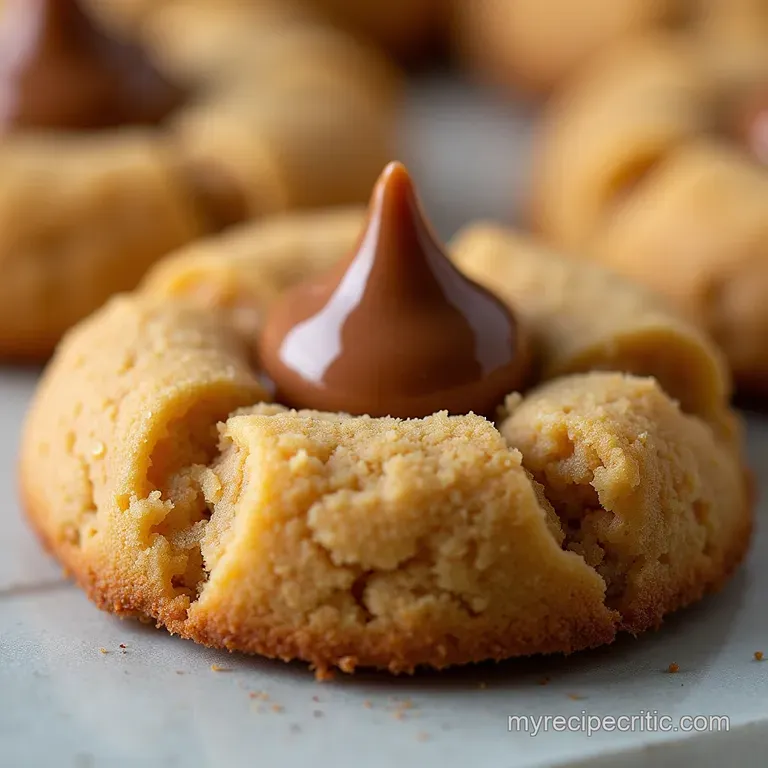
That iconic topography of soft, crinkled peanut butter dough cradling a perfectly melted chocolate peak is simply too good to restrict to December. If you’ve ever felt intimidated by achieving that famous crackle, fear not.
Mastering the Peanut Butter Blossoms Recipe is remarkably straightforward, relying more on technique and timing than complex ingredients. This guide will walk you through crafting the ultimate batch, ensuring every single cookie has that sought after, fudgy centre and gorgeous texture.
These aren't just cookies; they are edible hugs, and we’re going to make them perfectly soft, chewy, and utterly foolproof.
Decoding the Signature Crinkle: The Science Behind the Perfect Top
The magic of the Hershey Kiss Cookies Recipe Peanut Butter Blossoms lies entirely in the cracked surface. This isn't accidental; it’s the result of a delicate balance between the dough's structure and the baking heat.
We are aiming for a cookie that spreads slightly to form a wide, tender base, then immediately sets up, causing the surface to fracture as the interior continues to puff slightly.
The Cookie That Defined Christmas Comfort
The history of this treat is fascinating, originating in the mid-20th century when this simple, powerful combination was introduced. It quickly captured the hearts and stomachs of bakers everywhere, solidifying its place as a beloved staple.
The beauty of this recipe is its inherent simplicity; we use standard pantry staples to achieve a texture that belies the ease of its creation. These Peanut Butter Thumbprint Cookies are so satisfying precisely because they deliver such a huge flavour payoff with minimal fuss.
Setting Expectations: Softness vs. Crisp Edges in Your Batch
When you approach this bake, understand that the ideal Peanut Butter Blossoms Cookies are soft and wonderfully chewy through the centre, with perhaps the slightest hint of crispness right around the very edge.
We achieve this through careful ingredient ratios specifically the balance of sugars and fats and precise baking times. We want richness without oiliness, and structure without toughness. Our goal is that melt-in-your mouth interior that perfectly complements the melting chocolate cap.
Chef's Promise: Zero Spreading Guaranteed
The biggest fear bakers have when making Easy Peanut Butter Blossoms is the dreaded "cookie puddle" the flat, greasy disc that spreads uncontrollably across the baking sheet. I guarantee that if you follow the precise chilling steps outlined below, spreading will be virtually eliminated.
The chilling process stiffens the butter and peanut butter mixture, requiring more energy for the fats to melt in the oven, thus locking in the dough ball's shape long enough for the flour structure to set firm.
The Essential Pantry Assembly for Signature Flavor
To craft truly authentic and flavourful cookies, ingredient quality and type matter significantly. For this particular Peanut Butter Kiss Cookies Recipe , we are calling for specific components that ensure that classic flavour profile sings.
Remember, the dominant flavour here is that rich, salty peanut butter, so choose wisely.
Precision Measurements: What Makes the Dough Thrive

The foundation of these treats starts with flour, leavening, and fats. For the dough, you will begin by whisking together one and three quarter cups of all-purpose flour with one teaspoon of baking soda and a half teaspoon of fine sea salt. This dry mix needs to be ready to go before we tackle the wet ingredients.
Unpacking the Peanut Butter Dilemma: Creamy vs. Crunchy
This is perhaps the most critical decision you will make. For the perfect Peanut Butter Blossoms Betty Crocker -style texture soft, slightly dense, and structurally sound you must use standard, commercial, stabilized creamy peanut butter (think brands like Jif or Skippy).
Natural peanut butter, the kind that separates and requires stirring, is too oily and often too thin. It lacks the necessary stabilizers to hold the cookie shape, guaranteeing excessive spreading.
Beyond the Standard: Must Have Enhancers for Richness
Once your base fats are creamed, you need a mixture of sugars: a half cup of granulated sugar paired with a quarter cup of packed light brown sugar. The brown sugar is crucial; its molasses content adds necessary moisture, resulting in that delightful chewiness we are chasing.
After creaming the fats and sugars until light and fluffy about two to three minutes incorporate one large egg and one teaspoon of vanilla extract. These binders lock the dough together.
The Critical Role of Chilling: Tools for Success
Once the dry ingredients are gently mixed into the wet until just combined (stop mixing the second the flour streaks disappear!), the dough must chill. Cover the entire bowl and refrigerate for a minimum of 30 minutes.
This resting period is your best tool against flatness, ensuring the dough balls maintain their structure when they hit the heat. While the dough chills, preheat your oven to 375° F ( 190° C) and prepare your baking sheets with parchment paper.
Related Recipes Worth Trying
- Best Classic Peanut Butter Blossoms Recipe Easy Hershey Kiss Cookies — Master the ultimate classic Peanut Butter Blossoms This easy recipe yields perfectly crinkly cookies topped with a melting chocolate crowna musthave for...
- The Best Moist White Velvet Cake Recipe with Silky Buttercream — Forget dry sponges This Simple Moist White Velvet Cake Recipe creates an incredibly tender crumb using buttermilk Perfect for a stunning White Buttercream...
- Buttery Pecan Snowballs The Ultimate Mexican Wedding Cookie — Whip up these foolproof buttery Mexican Wedding Cookies Polvorones that practically melt in your mouth The secret is the double sugar dusting Get the easy...
Step-by-step Mastery: Forging Flawless Cookie Discs
With the dough suitably chilled, we move into shaping. Take the time now to make your cookies uniform. I highly recommend using a 1.5-tablespoon cookie scoop. Roll each portion of dough firmly between your palms until you have a perfectly smooth sphere.
This rolling action tightens the exterior, which aids in the eventual cracking pattern.
Next, prepare a shallow dish filled with a half cup of granulated sugar this is for the final coating. Roll each smooth ball thoroughly in this sugar until it is completely encased.
This final sugar coating doesn't just add sparkle; it creates a barrier that helps wick moisture away from the surface during baking, promoting that classic, fissured top. Place these coated balls onto your prepared sheets, spaced about two inches apart, ready for their initial bake.
The Moment of Truth: Embedding the Chocolate Center Correctly
The baking time for these cookies is short and precise typically 9 to 11 minutes. You want the edges to look visibly set and lightly golden, but the very centre should still appear slightly soft and puffy.
This residual heat is what we rely on for the next critical step in crafting the Peanut Butter Thumbprint Cookies .
Mixing Protocol: Avoiding Over Development of Gluten
When incorporating the dry ingredients into the creamed butter and sugar mixture, always mix on the lowest speed possible and stop immediately once the flour streaks disappear. Overmixing develops gluten, leading to tougher, cakier cookies rather than the desired soft, tender crumb essential for the best Peanut Butter Blossoms Recipe .
Uniformity Achieved: Achieving Equal Sizing for Even Baking
Unevenly sized dough balls are the downfall of many cookie batches. If some balls are large and others small, the small ones will burn while the large ones remain raw. Employing a consistent scooping mechanism guarantees that all Peanut Butter Kiss Cookies Recipe units spend the exact same amount of time in the oven, resulting in an even bake across the entire tray.
The Press and Place Technique for Optimal Cracking
As soon as the cookies emerge from the oven, work swiftly. Take one unwrapped milk chocolate Kiss about 30 to 36 Kisses are needed for a full batch and gently press it directly into the centre of each hot cookie. Use gentle, steady pressure.
If you press too hard, the cookie will flatten completely, and you will defeat the purpose of the chilling step. The residual heat from the cookie will gently melt the base of the chocolate, securing it in place.
Baking Temperature Secrets: Preventing Flat Disasters
Baking at 375° F ( 190° C) is key. A lower temperature allows the butter to melt too quickly before the cookie structure has a chance to solidify, leading to excessive spreading.
A moderate, slightly higher temperature ensures a fast set on the outside, encouraging the cracking we desire.
Troubleshooting Common Pitfalls in Your Peanut Butter Blossoms Bake
Even with the best blueprint, issues can arise. If your Peanut Butter Blossoms came out flat, the most likely culprit was skipping the dough chilling step, or perhaps your peanut butter was too oily.
If the chocolate Kiss fell off once cooled, it means you waited too long after pulling the cookies from the oven to press it in, giving the cookie surface too much time to cool and harden before the chocolate could adhere properly.
Remember that five minute cool down period on the baking sheet before transferring them to the rack is essential for setting that chocolate bond.
Elevating the Classic: Creative Touches and Substitutions
While the classic chocolate topped version is perfection, these versatile Peanut Butter Thumbprint Cookies welcome creative adjustments.
Storage Solutions: Keeping Freshness Locked In Post Cooling
Once fully cooled, store your Peanut Butter Blossoms in an airtight container at room temperature for up to five days. If you are making them far in advance, they freeze beautifully! Place them in a single layer on a tray to freeze solid, then transfer them to a freezer safe bag.
Thaw at room temperature before serving.
Why Did My Cookie Tops Crack Before I Added the Chocolate?
If the tops cracked significantly before you pressed in the Kiss, it usually means the oven temperature was too high, or the dough was overmixed, creating too brittle a surface structure. This is generally not a fatal flaw, but it means you won't get that beautiful, classic "blossom" pattern around the chocolate piece.
Flavor Twists: Adding Espresso Powder or Citrus Zest
For a deeper flavour profile that complements the chocolate, dissolve a half teaspoon of instant espresso powder into the vanilla extract before adding it to the dough. Alternatively, adding the zest of one orange during the creaming stage introduces a bright, surprising note to the rich peanut butter base.
Nut-Free Alternative Considerations for Allergy Safe Baking
If you need to adapt this Peanut Butter Blossoms Recipe for nut allergies, switching to a high-quality sunflower seed butter (like SunButter) is the standard substitution.
You may find the dough needs slightly less chilling time, as seed butters can sometimes be thinner than commercial peanut butter, so keep an eye on its consistency before rolling.
Serving these cookies alongside a strong, hot cup of tea or a tall glass of cold milk ensures that everyone appreciates the wonderful balance of salty peanut butter and sweet, smooth chocolate. Enjoy baking these icons!
Recipe FAQs
Why are my Peanut Butter Blossoms spreading flat instead of staying puffy?
This is a common kerfuffle! Usually, it means your dough wasn't cold enough. Make sure you chill the dough for at least 30 minutes; the colder the dough, the slower it melts in the oven, keeping that lovely shape.
Also, resist the urge to use natural, runny peanut butter stick to the standard kind for best structural results!
When is the best time to stick the chocolate Kiss onto the Peanut Butter Blossoms?
Timing is everything here, much like waiting for the kettle to boil! You must press the Kiss into the centre immediately within 30 seconds of pulling the cookies out of the oven.
The residual heat is just enough to slightly melt the base of the chocolate, securing it perfectly without melting the whole thing into a puddle.
Can I make these Peanut Butter Blossoms ahead of time for a party?
Absolutely, you can prep the dough a day or two ahead; just make sure it's wrapped up tight in the fridge. You can even bake them a day early, but here's the kicker: store the baked, un-Kissed cookies in an airtight tin. Only press in the chocolate Kisses just before serving, or the chocolate might bloom or get soft.
I’m allergic to peanuts; what’s a good swap for the peanut butter in this recipe?
Not to worry, a delicious swap is easily done! You can substitute the peanut butter with an equal amount of sunflower seed butter (SunButter) or another creamy seed butter. Just be aware that seed butters can sometimes be runnier, so you might need an extra 15 minutes of chilling time for the dough to firm up properly.
How should I store leftover Peanut Butter Blossoms to keep them fresh?
Once the chocolate has completely set, treat them like any good biscuit: store them in a single layer (or with parchment paper between layers) inside an airtight container at room temperature.
They’ll keep well for about five days, though honestly, they rarely last that long in our house they’re usually scoffed down with a nice cuppa!
Perfect Peanut Butter Blossoms