The Ultimate No Fuss All Flavour Chocolate Silk Cream Pie
- Elevating the Classic: Why This Chocolate Cream Pie Outshines the Rest
- The Secret to Velvety Smoothness: Setting Expectations for Dessert Perfection
- Assembling the Arsenal: Essential Components for Richness
- The Building Blocks: From Crust Integrity to Silky Filling
- Mastering the Bake: Crafting the Foundation Crust
- The Alchemy of the Filling: Achieving Perfect Thickness and Texture
- Final Assembly: Layering and Chilling for Structural Integrity
- Troubleshooting Common Cream Pie Pitfalls
- Extending the Joy: Storage and Make-Ahead Strategies
- Recipe FAQs
- 📝 Recipe Card
Elevating the Classic: Why This Chocolate Cream Pie Outshines the Rest
Right then, pull up a stool! As a chef, I find that a truly cracking Chocolate Cream Pie is the sort of dessert that separates the casual baker from the showstopper. We’re not just slapping some instant pudding into a tin here, oh no.
We’re aiming for that rich, velvety dark chocolate filling, perfectly set, nestled in a crisp, buttery crust the sort that makes you want to put your feet up after a Sunday roast. Forget the faff; we’re making a showstopper that’s genuinely achievable for the home cook.
This outline will get you there, step-by-step, resulting in what I confidently call the Best Chocolate Cream Pie Recipe you'll ever attempt.
The Secret to Velvety Smoothness: Setting Expectations for Dessert Perfection
Achieving that flawless, almost unbelievable texture requires respect for technique, not just a long list of ingredients. This Velvety Chocolate Cream Pie is built on the foundation of a proper stovetop custard, which demands patience and precise temperature control.
It’s a brief journey that transforms simple milk and starch into something extraordinary.
Defining the 'Showstopper' Status of Our Cream Filling
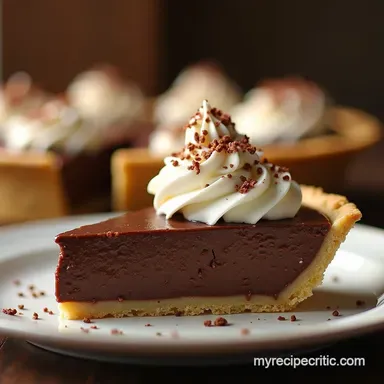
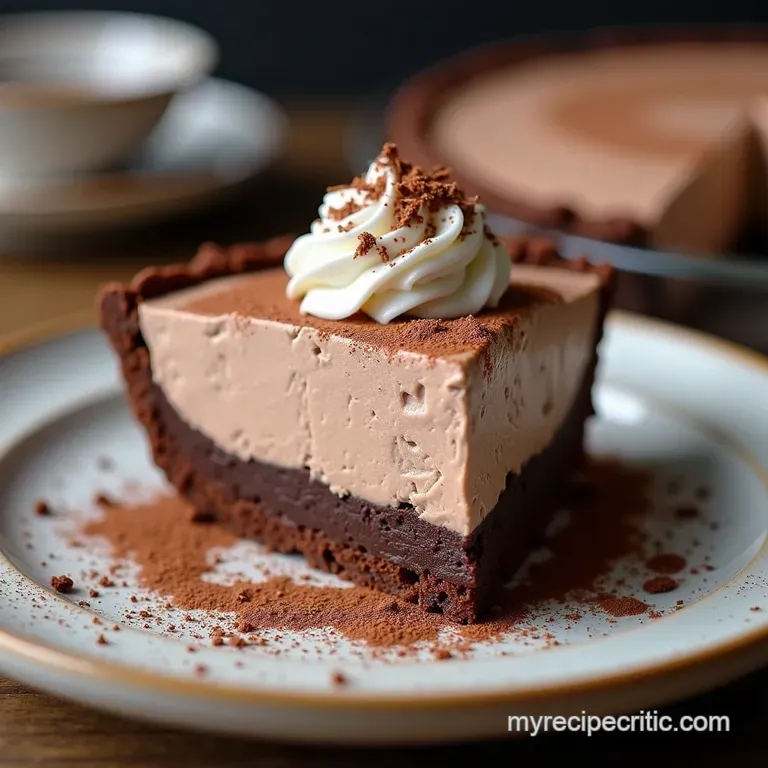
The hallmark of a superior dessert like this Homemade Chocolate Pie lies squarely in its filling. We are targeting a consistency that holds its shape cleanly when sliced but melts like silk on the tongue.
This isn't a dense, heavy filling; it's lightened by the combination of cooked starches and the final enrichment from cold butter and high-quality melted chocolate, making it profoundly decadent without being heavy.
Beyond Basic Pudding: The Depth of Dark Chocolate Flavor Achieved
To move beyond standard boxed pudding territory, we rely on two key flavour amplifiers. First off,, we use a significant amount of chopped dark chocolate (60-70% cacao), which melts directly into the hot custard base, guaranteeing a deep, authentic cocoa note.
Next,, our little secret weapon: a teaspoon of instant espresso powder dissolved in a tiny splash of hot water. This doesn't make the pie taste like coffee; rather, it deepens and intensifies the natural bitterness and complexity of the dark chocolate, creating a truly Rich Chocolate Pie Filling .
A Simple Path to Achieving Professional Grade Decadence
While we are crafting a complex flavour profile, the method itself is surprisingly manageable. This Easy Cream Pie Recipe relies on careful tempering to ensure we don't scramble the egg yolks, and consistent stirring while cooking the starch base.
Follow those stages diligently, and you’ll find this luxurious Chocolate Cream Pie Recipe yields results far beyond its required skill level.
Assembling the Arsenal: Essential Components for Richness
Every great pie starts with meticulously chosen parts. Before we turn on the stove or preheat the oven, gathering our specific components the crust foundation, the dairy elements, and the cocoa itself is crucial for success in creating this remarkable Chocolate Cream Pie .
The Building Blocks: From Crust Integrity to Silky Filling
A perfect filling needs a fortress to hold it. We must ensure our base offers a crisp textural contrast to the smooth interior, meaning we’re focusing on a meticulously prepared pastry crust that stands up to the moisture of the filling.
Sourcing the Ideal Butter for a Flaky Pie Shell Foundation
For the shortcrust pastry, the temperature of the butter is non-negotiable. We demand very cold , cubed unsalted butter. When this cold fat is cut into the flour, it creates small pockets.
During baking, these pockets release steam, which puffs up the dough, resulting in that desirable flakiness. If the butter warms up, it mixes too thoroughly with the flour, leading to a tough, pastry that merges unpleasantly with the filling.
This commitment to cold butter is fundamental for a crisp Chocolate Cream Pie Graham Cracker Crust substitute though we are using a traditional pâte brisée here for superior structure.
Navigating the Dairy Aisle: Choosing the Right Cream for Whipped Topping
The topping is where lightness reigns supreme. For the whipped cream, you must select heavy cream, often labelled double cream, with a high fat content (ideally 35% or higher). This high fat content is essential because it allows the fat globules to whip up efficiently and hold their form firmly, creating those beautiful, stiff peaks that won't deflate into a puddle before the Chocolate Cream Pie reaches the table.
The Crucial Role of Quality Cocoa Powder in Our Chocolate Cream Pie
While we enrich the filling with chopped dark chocolate, the cocoa powder forms the base flavour scaffolding. Avoid standard, lower fat baking cocoa if possible; seek out a high-quality, Dutch processed cocoa.
Dutch processing neutralizes some of the acidity, leading to a deeper, smoother, almost fudgy chocolate backdrop that supports the intensity of the chopped dark chocolate beautifully in our Rich Chocolate Pie Filling .
Related Recipes Worth Trying
- The Best Homemade Chocolate Cream Pie Recipe Velvety Rich — Discover the ultimate Chocolate Cream Pie recipe featuring a deep velvety filling and a flaky homemade crust This is the best chocolate cream pie youll ever...
- The Best Moist White Velvet Cake Recipe with Silky Buttercream — Forget dry sponges This Simple Moist White Velvet Cake Recipe creates an incredibly tender crumb using buttermilk Perfect for a stunning White Buttercream...
- The Best Strawberry Rhubarb Pie Recipe with Flaky Crust — Achieve the perfect Strawberry Rhubarb Pie with this detailed foolproof recipe featuring a rich flaky allbutter crust and a secret pepper zing
Mastering the Bake: Crafting the Foundation Crust

Before any cream touches the shell, that base must be structurally sound. We are creating a Pâte Brisée foundation, a rich, shortcrust pastry that offers the perfect snap.
After mixing the dry ingredients, we incorporate the very cold butter until the mixture resembles coarse crumbs, ensuring we don't overwork the dough before slowly adding ice water until it just barely holds together. After chilling to relax the gluten, the dough is rolled and fitted into the 9 inch pie dish.
This preparation sets the stage for the necessary blind baking procedure to follow.
The Alchemy of the Filling: Achieving Perfect Thickness and Texture
The actual magic happens on the stovetop. We begin by whisking together the dry elements sugar, cornstarch, and salt before carefully incorporating the milk and heavy cream. Heating this base over medium heat allows the starches to hydrate and thicken the liquid.
Once it reaches a gentle simmer, we cook it for precisely one minute to ensure any raw starch flavour cooks out, yielding that perfect foundation for our Velvety Chocolate Cream Pie .
Final Assembly: Layering and Chilling for Structural Integrity
The integration of the eggs and the final chocolate melting defines the texture of this Homemade Chocolate Pie . Once the hot base is tempered with the egg yolks and returned to the heat, the mixture thickens rapidly; constant stirring is essential here to prevent scorching or curdling.
Blind Baking Secrets: Preventing a Soggy Bottom on Your Pastry
Crucially, the crust must be completely cool before the hot filling goes in. However, to truly guarantee a non-soggy base the perennial downfall of any Easy Cream Pie Recipe —we employ a double barrier.
After the initial bake with weights, removing the paper and weights allows the bottom crust to fully dry out and crisp up. Some bakers even apply a thin layer of melted white chocolate immediately after the first bake to create a waterproof seal against the moist custard.
Tempering Techniques for a Lump Free, Glossy Chocolate Base
Tempering the yolks is the bridge between the hot liquid and the delicate eggs. By whisking a small amount of hot milk into the beaten yolks before adding the yolks back to the saucepan, we slowly raise their temperature without shocking them.
Once combined, we finish the cooking gently, remove from heat, and immediately stir in the cubed butter and chopped dark chocolate. This addition, along with the hint of espresso, emulsifies into a beautifully glossy, rich base ready for pouring.
Whipping the Topping: Peaks That Hold Their Shape Through Serving
While the pie chills, we prepare the crowning glory. The heavy cream, confectioners' sugar, and vanilla must be whipped in a very cold bowl. The goal is stiff peaks; this whipped cream needs to be robust enough to sit proudly on top of the chilled custard without weeping or collapsing, ensuring your Chocolate Cream Pie looks as spectacular as it tastes when you bring it to the table.
Troubleshooting Common Cream Pie Pitfalls
When tackling this Chocolate Cream Pie Easy project, a few hiccups might occur. If your filling seems thin, remember that it thickens significantly upon cooling but if it’s worryingly runny, don't panic; the solution often lies in gentle reheating or adding a small slurry of cornstarch dissolved in cold milk.
Fixing a Runny Filling: Quick Corrective Measures for Success
If the filling has cooled significantly and remains too liquid, gently reheat about one-third of the cooled filling in a small saucepan. Whisk in an additional teaspoon of cornstarch mixed with two teaspoons of cold water until it boils lightly.
Stir this thickened portion back into the main batch and stir constantly until it thickens up again. Let it cool slightly before pouring into the crust.
Optimal Cooling Times: When is This Dessert Truly Ready to Slice?
Patience is essential for structural success. While the minimum chilling time is four hours, for the cleanest slices the kind that make people gasp aim for overnight chilling.
This allows the starches and chocolate matrix to fully stabilize, ensuring you can admire your perfect cross section without the filling slumping out onto the plate.
Flavor Infusions: Incorporating Coffee or Liqueur Notes
The espresso powder is a booster, but for true complexity, consider introducing liqueur during the final flavouring stage. A tablespoon of dark rum or a quality coffee liqueur, stirred in along with the vanilla and chocolate, adds a sophisticated, adult counterpoint to the sweetness.
This small addition truly elevates the entire Velvety Chocolate Cream Pie experience.
Presentation Power: Garnishing Ideas That Impress Guests
Once topped with the stiffly whipped cream, presentation finishes the job. Simple is often best: a dusting of high-quality cocoa powder using a fine mesh sieve, or delicate curls of grated dark chocolate look professionally executed.
For added visual height, consider piping the topping using a star tip rather than simply spreading it flat.
Extending the Joy: Storage and make-ahead Strategies
This Chocolate Cream Pie keeps beautifully, provided you protect that lovely topping. Always store leftovers tightly covered in the refrigerator. Because the filling sets so well, you can safely prepare the crust and the filling a full day in advance.
Wait until just a few hours before serving to apply the fresh whipped cream topping; this prevents the cream from weeping or absorbing moisture from the chilled filling.
Recipe FAQs
Why is my Chocolate Cream Pie filling runny instead of setting up properly?
This usually comes down to one of two things: either you didn't cook the cornstarch long enough, or you didn't chill it for the full recommended time. Remember, cornstarch needs to boil briefly to fully activate its thickening power, and the pie needs at least four hours in the fridge to become firm enough to slice cleanly.
How do I stop a skin forming on top of my chocolate cream filling while it cools?
Ah, the dreaded skin it’s a right nuisance! The simplest trick, which we've included in the instructions, is to press a piece of plastic wrap directly onto the surface of the hot filling before it goes into the fridge.
This prevents air contact, meaning no rubbery skin will form on your lovely smooth chocolate.
Can I use pre-made graham cracker crust instead of baking the shortcrust pastry?
Absolutely, you can save yourself a good chunk of time! If you opt for a graham cracker (or digestive biscuit) crust, simply press it firmly into the pie plate and bake it for about 10 minutes just to set it before you add the filling.
Just be aware that the buttery flavour of the shortcrust really complements this rich filling, so you're trading depth of flavour for convenience.
My custard mixture got lumpy while cooking; is the whole batch ruined?
Don't panic; lumps are common when tempering eggs, but it’s usually salvageable! If the lumps are small, pour the entire mixture through a fine mesh sieve (or a tea strainer) immediately after you remove it from the heat and before adding the butter and chocolate.
This will strain out any cooked bits of egg, leaving you with a silky texture.
How long will a homemade Chocolate Cream Pie last in the fridge?
Because this recipe uses fresh dairy and egg-based pastry cream, it’s best enjoyed within three to four days. Keep it covered tightly in the refrigerator. If you've added fresh whipped cream, aim to eat it within the first 48 hours for the best texture on the topping.
I don't have heavy cream for the topping; what’s the best substitute for the whipped finish?
If you’re in a pinch and don't have heavy or double cream, your best bet for a similar structure is using a chilled, chilled can of full fat coconut milk that has been sitting undisturbed in the fridge overnight.
Scoop out the thick solid cream layer from the top (leaving the watery liquid behind) and whip that up with your icing sugar.
Velvety Chocolate Cream Pie