Moist Chocolate Cake Recipe
- Time: Active 15 minutes, Passive 35 minutes, Total 50 minutes
- Flavor/Texture Hook: Fudgy, velvety crumb with a glossy ganache
- Perfect for: Milestone celebrations, late night cravings, or beginner bakers
- Baking a Truly Moist Chocolate Cake
- Why This Rich Texture Behaves
- Essential Recipe Details and Times
- Sourcing Your Chocolate Pantry Elements
- Gear for Better Baking Results
- Mixing the Batter Step by Step
- Common Baking Pitfalls to Avoid
- Scaling for Different Pan Sizes
- Debunking Cocoa Powder Beliefs
- Storing Cake to Maintain Moisture
- Finishing Touches for Visual Appeal
- Recipe FAQs
- 📝 Recipe Card
Baking a Truly Moist Chocolate Cake
Ever pulled a cake out of the oven only to have it taste like sweet sawdust? I've been there, more times than I'd like to admit. It’s frustrating when you spend money on good cocoa and time on prep, only to end up with something that needs a gallon of milk just to swallow.
This Moist Chocolate Cake is the answer to those dry cake blues, offering a texture so lush it almost melts as soon as it hits your tongue.
The secret lies in the contrast between the heat of the coffee and the cool tang of the buttermilk. When that boiling liquid hits the cocoa powder, the kitchen fills with an aroma that is downright intoxicating. It's a deep, earthy scent that promises a serious chocolate experience.
This isn't just a sweet treat, it's a rich, dark masterpiece that behaves perfectly every time you bake it.
We’ve all had those "Pinterest fail" moments, but I promise this batter is forgiving. It’s quite thin, almost like a heavy cream, so don’t panic when it doesn’t look like a thick dough texture. That high hydration is exactly what ensures the final result is anything but dry.
Right then, let's get into the details so you can get this in the oven.
Why This Rich Texture Behaves
Understanding the mechanics of your batter helps you avoid the heartbreak of a sunken center or a tough crumb. We aren't just tossing things in a bowl, we're managing a specific set of reactions that define how the cake will feel on your fork.
The Science of Why it Works: Starch Gelatinization occurs when the boiling coffee hits the flour, pre setting the structure for a softer crumb. Fat Suspension from the vegetable oil ensures moisture stays locked in even after the cake cools, unlike butter which can feel firm at room temperature.
Fat Coating: The oil coats the flour proteins, which limits gluten development and keeps the cake tender.
- Acidic Lift: Buttermilk reacts with the baking soda to create carbon dioxide bubbles, making the dense chocolate feel light.
- Sugar Hydration: The high sugar content holds onto water molecules, preventing the cake from drying out in the oven.
- Bloom Effect: Boiling liquid dissolves cocoa solids, releasing flavor compounds that stay trapped in cold liquids.
| Method | Prep Time | Resulting Texture | Best Use |
|---|---|---|---|
| The Fast Method | 10 minutes | Very tender, slightly fragile | Family weeknight dessert |
| Classic Creaming | 25 minutes | Sturdier, tighter crumb | Tiered wedding cakes |
| This Recipe | 15 minutes | Fudgy, velvety, and rich | The ultimate birthday cake |
This specific approach is much faster than the traditional creaming of butter and sugar, making it ideal for when you need a high impact dessert without the workout. If you enjoy this balance of flavors, you might also find the technique similar to what I use in The Moist Coffee recipe.
Essential Recipe Details and Times
When you're aiming for that specific fudgy interior, the clock is your best friend. Overbaking is the number one enemy of a moist chocolate cake. Because this batter is so thin, it needs a steady, moderate heat to rise without burning the edges.
| Ingredient | Science Role | Pro Secret |
|---|---|---|
| Cocoa Powder | Provides structure and flavor | Sift it twice to avoid bitter lumps. |
| Buttermilk | Tenderizes gluten and adds tang | Use full fat for the best mouthfeel. |
| Boiling Coffee | Dissolves cocoa and hydrates starch | Must be truly boiling to "bloom" the chocolate. |
| Vegetable Oil | Prevents staling and adds moisture | Use a neutral oil like canola or grapeseed. |
Before you start, make sure your eggs and buttermilk are at room temperature. Cold ingredients can cause the oil to seize up or prevent the batter from emulsifying properly. It's a small step, but it makes a massive difference in how the batter will behave during the bake.
Sourcing Your Chocolate Pantry Elements
Quality matters here. Since chocolate is the star, don't settle for the dusty tin of cocoa that's been in the back of your cupboard since the last decade. Fresh cocoa powder has a more vibrant, acidic profile that plays beautifully with the sugar.
- 2 cups all purpose flour (250g): Provides the essential protein structure.
- 2 cups granulated sugar (400g): Sweetens and keeps the crumb soft.
- 3/4 cup unsweetened cocoa powder (75g): Use a high-quality natural cocoa. Why this? Natural cocoa is more acidic, which reacts better with the baking soda.
- 2 tsp baking powder: Helps the cake rise evenly.
- 1.5 tsp baking soda: Reacts with buttermilk for a soft texture.
- 1 tsp salt: Sharpens the chocolate flavor.
- 1 cup buttermilk (240ml): Use room temperature for a smooth emulsion. Why this? The acid breaks down gluten for a tender bite.
- 1/2 cup vegetable oil (120ml): Ensures the cake stays moist for days.
- 2 large eggs: Room temperature helps them incorporate without streaks.
- 2 tsp vanilla extract: Rounds out the earthy cocoa notes.
- 1 cup boiling coffee (240ml): Deepens the chocolate without tasting like coffee.
- 1.5 cups semi sweet chocolate chips (250g): For the velvety ganache.
- 1 cup heavy cream (240ml): Creates a glossy, pourable frosting.
- 1 pinch sea salt: For that final flavor pop.
| Original Ingredient | Substitute | Why It Works |
|---|---|---|
| Buttermilk | 1 cup milk + 1 tbsp lemon juice | Mimics the acidity needed for the leavening. |
| Vegetable Oil | Melted Coconut Oil | Similar fat content. Note: Adds a slight tropical scent. |
| Boiling Coffee | Boiling Water | Provides the heat for blooming without caffeine. |
Gear for Better Baking Results
You don't need a professional kitchen, but a few specific tools will make your life much easier. A good set of round cake pans (8 inch or 9 inch) is essential. I prefer light colored aluminum pans because they distribute heat more evenly than dark, non stick ones, which can cause the edges to overcook before the center is set.
A sturdy whisk or a stand mixer like a KitchenAid will help you aerate the dry ingredients. However, because this is an oil based cake, you can actually do the whole thing by hand if you’re feeling up to it. Just make sure you have a fine mesh sieve for the cocoa powder.
Cocoa is notorious for having small, stubborn lumps that won't disappear during mixing, and biting into a dry clump of cocoa is never a good experience.
Chef Tip: Line the bottom of your pans with parchment paper. Even with the best "non stick" spray, chocolate cakes are delicate and prone to sticking. The parchment acts as an insurance policy for a clean release.
Mixing the Batter step-by-step

Components for the Batter
- Preheat your oven to 350°F (175°C). Grease two 9 inch round cake pans and line the bottoms with parchment paper.
- Sift the 2 cups all purpose flour, 2 cups sugar, 3/4 cup cocoa, 2 tsp baking powder, 1.5 tsp baking soda, and 1 tsp salt into a large bowl. Note: Sifting aerates the mixture and ensures no cocoa lumps remain.
- Whisk the dry ingredients until they are a uniform pale brown color.
- Add the 2 eggs, 1 cup buttermilk, 1/2 cup vegetable oil, and 2 tsp vanilla extract to the dry mix.
- Beat on medium speed for about 2 minutes. The batter will look thick and dark at this stage.
- Pour in the 1 cup boiling coffee slowly while whisking by hand. Note: This "blooms" the cocoa and thins the batter significantly.
- Divide the batter evenly between the two prepared pans.
- Bake for 30 to 35 minutes until a toothpick inserted in the center comes out clean or with just a few moist crumbs.
- Cool in the pans for 10 minutes before transferring to a wire rack to cool completely.
The Ganache Topping Parts
- Place 1.5 cups semi sweet chocolate chips in a heat proof bowl.
- Heat 1 cup heavy cream in a small saucepan until it just begins to simmer. Look for small bubbles around the edges but do not let it reach a rolling boil.
- Pour the hot cream over the chocolate chips and let it sit undisturbed for 5 minutes.
- Whisk gently starting from the center until the mixture is velvety and glossy.
- Let the ganache sit for 20-30 minutes to thicken slightly before pouring over the cooled cake. This is a great time to prep for your next project, perhaps using a similar technique for a Birthday Cake recipe.
Common Baking Pitfalls to Avoid
Why Your Cake Sank
If your cake looks like a crater in the middle, it usually comes down to one of two things: opening the oven door too early or expired leavening agents. That rush of cold air can collapse the delicate structure before it has set. Also, check your baking soda.
If it's been open for more than six months, it might not have the strength to lift this heavy, cocoa rich batter.
Dry and Crumbly Edges
This happens when the pans are too close to the oven walls or if you've used a dark colored pan. Dark metal absorbs more heat, causing the sides to cook at a much faster rate than the middle.
If you must use dark pans, try reducing the oven temperature by 25°F and checking for doneness 5 minutes earlier.
| Problem | Root Cause | Solution |
|---|---|---|
| Greasy Texture | Oil not fully emulsified | Ensure eggs and buttermilk are at room temperature. |
| Bitter Aftertaste | Lumps of cocoa powder | Always sift cocoa through a fine mesh sieve. |
| Dense/Heavy Crumb | Overmixing after adding flour | Mix only until no streaks of flour remain. |
Common Mistakes Checklist
- ✓ Use a kitchen scale for the flour; scooping with a cup can pack it down, adding up to 30% more flour than needed.
- ✓ Tap the pans firmly on the counter before baking to release any large air bubbles.
- ✓ Ensure the coffee is truly boiling; lukewarm coffee won't bloom the cocoa properly.
- ✓ Don't skip the salt; it's the contrast that makes the chocolate flavor "sing."
- ✓ Let the cake cool completely before frosting, or the ganache will slide right off.
Scaling for Different Pan Sizes
If you want to turn this into a sheet cake for a crowd, it’s a breeze. A standard 9x13 inch pan works perfectly for a single batch. You'll need to increase the bake time to about 40 to 45 minutes. The center should feel springy to the touch and not jiggle when you gently move the pan.
For a towering layer cake, you can double the recipe. When doubling, I recommend keeping the spices and leavening (baking powder/soda) to about 1.75x rather than a full 2x to avoid a soapy metallic taste. Work in batches if your mixer isn't large enough; overfilling a bowl leads to uneven mixing and a messy kitchen. If you find yourself with extra ganache, it makes a fantastic filling for a Homemade Chocolate Cream recipe.
| Target Size | Batch Multiplier | Pan Size | Bake Time |
|---|---|---|---|
| Cupcakes | 1x | 24 standard liners | 18-22 minutes |
| Half Batch | 0.5x | 8 inch square pan | 25-30 minutes |
| Sheet Cake | 1x | 9x13 inch pan | 40-45 minutes |
Debunking Cocoa Powder Beliefs
There's a common misconception that you should only use Dutch processed cocoa for a dark cake. While Dutch cocoa is alkalized and darker, natural cocoa (the kind usually found in the baking aisle) is actually better for this specific recipe.
Because we use a significant amount of baking soda, the natural acidity of the cocoa is required to trigger the leavening reaction. If you use Dutch processed cocoa, the cake might not rise as well and could have a slightly soapy flavor.
Another myth is that you can taste the coffee. I promise you, you won't. The coffee serves as a flavor enhancer, much like salt. It brings out the fruitier, deeper notes of the chocolate without adding a "latte" flavor.
If you're strictly avoiding caffeine, just use boiling water or decaf; the heat is the most important factor for the texture.
Storing Cake to Maintain Moisture
This cake actually tastes better on the second day. The moisture from the oil and the ganache seeps into the crumb, making it even more fudgy. You can store the frosted cake at room temperature in an airtight container for up to 3 days.
If your kitchen is very warm, keep it in the fridge, but let it sit out for 20 minutes before serving so the ganache regains its velvety texture.
For zero waste, save any domes you trim off the layers. Crumble them up and mix with a spoonful of leftover ganache to make quick cake balls, or toast them in the oven to make "chocolate croutons" for ice cream. To freeze, wrap the unfrosted layers tightly in plastic wrap and then foil.
They will stay fresh for up to 3 months. Thaw them overnight in the fridge before frosting.
Finishing Touches for Visual Appeal
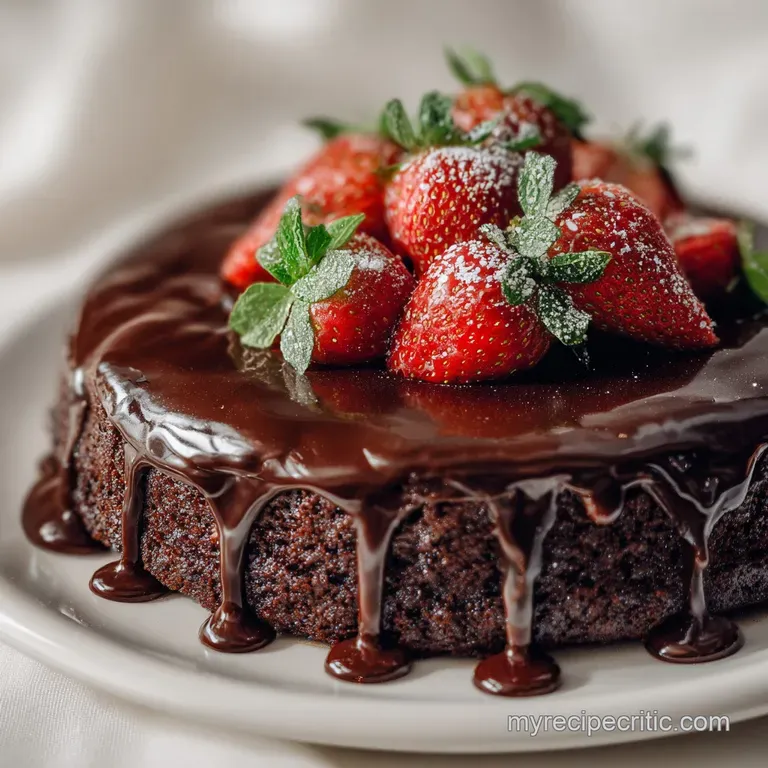
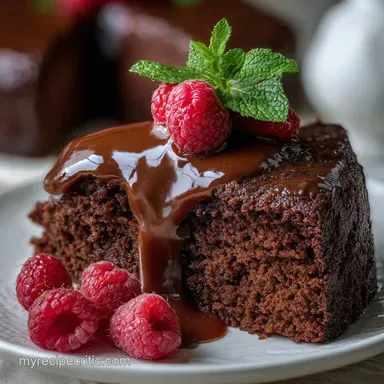
The ganache is beautiful on its own, but you can add some textural contrast to make it look professional. A light sprinkle of flaky sea salt on top of the wet ganache creates a beautiful sparkle and cuts through the sweetness. It's that sweet and salty hit that keeps people coming back for a second slice.
If you want a more rustic look, use a spatula to create deep swirls in the ganache as it sets. You can also add fresh berries raspberries or halved strawberries look stunning against the dark chocolate backdrop. The brightness of the fruit provides a lovely visual and flavor contrast to the rich, dark cake.
Right then, you're ready to bake. This recipe is a staple in my house for a reason it's reliable, it's chocolatey, and it never fails to impress. Just remember to watch that timer and enjoy the crackle of the parchment as you peel it off those perfect layers.
Trust me, your kitchen is about to smell like a dream.

Recipe FAQs
What is the trick to a moist cake?
Use oil and don't overbake. Oil coats flour proteins, limiting gluten development for tenderness, while boiling liquids hydrate starches for a moist crumb. Always bake until just done; overbaking is the biggest culprit of dryness.
What is the secret to moist chocolate cake?
The secret is incorporating both oil and a hot liquid. Vegetable oil ensures lasting moisture, and adding boiling coffee "blooms" the cocoa powder, intensifying flavor and contributing to a tender texture. For a similar texture focus, see how we achieve richness in the Best Moist White Velvet Cake Recipe with Silky Buttercream.
What is a secret ingredient to moisten cakes?
Vegetable oil is a fantastic secret ingredient for moisture. Unlike butter, oil remains liquid at room temperature, keeping the cake tender and moist for days. Another powerful addition is boiling coffee, which helps bloom the cocoa and hydrate starches.
What to add to cakes to make them more moist?
Add ingredients that add fat and moisture. Vegetable oil, buttermilk, and sour cream are excellent choices. For chocolate cakes, hot coffee or hot water is crucial; it dissolves cocoa solids and helps hydrate the flour for a deeply moist crumb.
Can I substitute milk for buttermilk in chocolate cake?
Yes, but you should add an acid. Mix 1 cup of milk with 1 tablespoon of lemon juice or white vinegar and let it sit for 5-10 minutes to create a buttermilk substitute. This acidity is key for reacting with baking soda to provide lift and tenderness.
Why is my chocolate cake dry and crumbly?
Likely culprits are overbaking or too much flour. Overbaking is the most common reason for a dry cake. Also, ensure you're measuring flour correctly; scooping directly from the bag can pack too much flour, resulting in a dry texture. If you enjoyed mastering texture control here, see how the same principle applies to controlling spread in our Strawberry Crunch Cake Good Humor Bar Magic at Home.
How do I make my chocolate cake more fudgy?
Use more fat and less flour, and don't overmix. Increasing the oil content and using ingredients like sour cream or mayonnaise can add richness. Also, ensuring your cocoa is "bloomed" with hot liquid, as in our recipe, contributes to a fudgy texture. If you love rich, decadent chocolate, you'll also enjoy the intensity of The Proper Cuppa Rich Creamy Homemade Hot Chocolate.
Moist Chocolate Cake
Ingredients:
Instructions:
Nutrition Facts:
| Calories | 487 kcal |
|---|---|
| Protein | 6.3 g |
| Fat | 24.1 g |
| Carbs | 67.8 g |
| Fiber | 3.2 g |
| Sugar | 48.2 g |
| Sodium | 315 mg |
