The Snap Crackle Pop Perfect Homemade English Toffee

- The Secret to Truly Snappy Homemade Toffee
- Why This Recipe Outperforms Store-Bought Confections
- Gathering Your Golden Components for Perfect Homemade Toffee
- Essential Equipment: Tools That Guarantee Success
- The Step-by-Step Alchemy of Boiling and Blending
- Transitioning from Liquid Gold to Solid Perfection
- Troubleshooting Common Toffee Pitfalls and Fixes
- Creative Twists: Elevating Your Classic Homemade Toffee
- Recipe FAQs
- 📝 Recipe Card
The Secret to Truly Snappy Homemade Toffee
There is a distinct, resonant snap that separates mediocre, chewy candy from truly spectacular homemade toffee. That sound the auditory signature of perfectly cooked sugar is what we are chasing today.
Making this deeply satisfying confection, often referred to as English Toffee , might seem intimidating, but I promise, with a bit of focused attention, you can achieve a flawless, shatteringly crisp result every single time.
This Homemade Toffee Recipe guides you through creating a rich, buttery base that rivals any professional confectioner’s offering.
Why This Recipe Outperforms store-bought Confections
Store-bought varieties often prioritize shelf life over texture, frequently resulting in something that's either too brittle or frustratingly soft. Our goal is a rich, amber hued slab that boasts incredible depth of flavor, thanks to high-quality butter and precise temperature management.
When you master this Homemade Toffee Candy , you unlock the ability to customize every element, from the type of nuts folded in to the thickness of the eventual chocolate coating. This recipe isn't just a set of instructions; it's a foundational lesson in sugar science.
Dispelling the Myth: Candy Making Isn't Just for Pros
Many home bakers shy away from candy making, believing it requires specialized training. While precision is necessary, the ingredients list for our Foolproof Homemade Toffee is delightfully short: sugar, butter, water, and corn syrup.
The difficulty doesn't lie in complex technique you aren't whipping egg whites or kneading dough but rather in dedication to monitoring the heat. Think of it as a precise science experiment where the reward is edible gold.
Success hinges entirely on patience during the cooking phase, not complicated mixing methods.
Understanding the 'Hard Crack' Stage: Our Key Temperature Focus
The magic threshold in this process is the "hard crack" stage, where the boiling syrup reaches 300° F ( 149° C) . At this temperature, the water has evaporated sufficiently, and when cooled, the sugar structure will be rigid and glassy, producing that coveted snap.
Going even slightly past this point say, to 305° F can result in scorched, bitter toffee. Too low, and you end up with a sticky, soft mess. This is why a reliable candy thermometer is your single most important tool when developing your Homemade Toffee Bits .
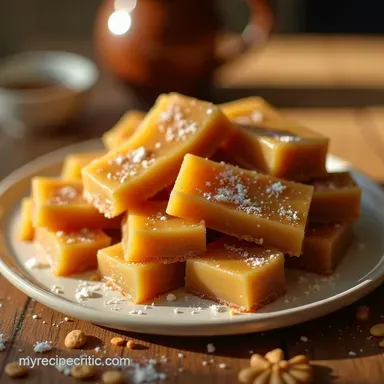
A Glimpse into the Glorious Results: Amber Gold Perfection
Imagine a slab of rich, deep amber, fragrant with caramelized butter notes. We are aiming for a confection that shatters under a gentle tap. This base is robust enough to stand alone, or it can be draped in high-quality dark chocolate and finished with a sprinkle of flaky sea salt.
Whether you use it to make magnificent Homemade Toffee Bars or simply enjoy chunks broken straight from the pan, the flavor profile is deeply satisfying, a true testament to simple ingredients handled with care.
Gathering Your Golden Components for Perfect Homemade Toffee
The quality of your starting materials directly impacts the final flavor profile of your Homemade Candies . Since this Toffee Recipe relies on so few ingredients, choosing the best available options will pay dividends in the final taste.
We need two cups of rich, unsalted butter this provides the necessary fat content for texture and flavor, and ensures we aren't introducing excess salt prematurely. For sweetness, we rely on standard granulated white sugar, balanced perfectly with a touch of light corn syrup, which plays a crucial role in texture stability.
Essential Equipment: Tools That Guarantee Success

Before you even turn on the burner, ensure your workspace is organized. Because the cooking phase moves quickly once it gets hot, having everything prepared mise en place is non-negotiable.
You absolutely must have a heavy bottomed, 2-quart saucepan; a thin pan will develop hot spots and scorch the butter and sugar mixture, resulting in an uneven, burnt batch of what should have been beautiful Homemade Toffee Sauce .
Butter vs. Margarine: The Uncompromising Ingredient Choice
We insist on using high-quality, unsalted butter for this process. Margarine, while sometimes a good substitute in baking, often contains too much water and stabilizers that interfere with the sugar crystallization required for a clean break.
The rich milk solids in real butter brown slightly during the boil, lending a wonderful, nutty depth that defines excellent Homemade Toffee .
Selecting Granulated Sugar and Brown Sugar Ratios
While the base calls for pure white granulated sugar to achieve the clearest color and the snappiest texture, you might opt to substitute a small portion with dark brown sugar. If you do this, understand that you are intentionally introducing molasses flavors, which will darken the final color and soften the snap slightly.
For the purest, most traditional English Toffee , stick to the white sugar ratio outlined in the foundational recipe.
Prepping Your Pan: The Non-Stick Surface Strategy
Success in cooling requires a flawlessly prepared surface. Line your 8x8 inch baking pan completely with parchment paper, ensuring there is ample overhang on two sides. This paper acts as a handle later for easily lifting the hardened slab out for breaking.
Lightly greasing this parchment is an optional extra step, but it ensures no area of the molten sugar adheres stubbornly to the paper once it cools and sets.
Related Recipes Worth Trying
- The Best Homemade Garlic Aioli Sauce Recipe Foolproof Creamy — Ditch the jar Learn how to make authentic punchy Garlic Aioli Sauce from scratch This easy garlic aioli recipe relies on a secret ingredient for the best...
- Foolproof Homemade Garlic Aioli Recipe Ready in 10 Mins — Ditch the bottle This easy Garlic Aioli Recipe delivers that creamy punchy flavour essential for burgers chips Follow the slow oil rule for perfect emulsion
- The Ultimate Homemade Gravy from Pan Drippings No Lumps — Ditch the awful powder Learn how to make a truly classic rich brown gravy from scratch using roasting pan drippings This simple homemade gravy recipe...
The step-by-step Alchemy of Boiling and Blending
The process begins by combining the butter, sugar, water, and corn syrup in your heavy bottomed pot over medium low heat. The initial stage is all about patience: you must gently stir until the butter is fully incorporated and the sugar has completely dissolved.
You’ll know the sugar is dissolved when the mixture looks clear and smooth, without any visible sugar grains clinging to the sides of the pan near the liquid line. This gentle start prevents premature crystallization before the main cooking phase begins.
Transitioning from Liquid Gold to Solid Perfection
Once the sugar is fully dissolved, it’s time to unleash the heat. Increase the temperature to medium high and insert your candy thermometer. This is the point where all stirring must cease.
Phase One: Gentle Heating Before the Vigorous Boil
Allow the mixture to come to a rolling, vigorous boil. Once it is boiling steadily, do not touch the mixture or stir it. Any agitation at this stage can cause sugar crystals to form on the sides of the pot, which will then seed the entire batch, leading to graininess instead of a smooth texture.
Keep your focus solely on the thermometer reading.
Tracking Temperature: When to Trust the Thermometer Over the Clock
While recipes provide time estimates (typically 15– 25 minutes), temperature is the only reliable indicator. Continue boiling until the thermometer reads precisely 300° F ( 149° C) .
As the temperature climbs past 280° F, watch it like a hawk; the temperature rise accelerates dramatically in the last few degrees, and the difference between perfect toffee and burnt sugar can be less than thirty seconds.
The Critical Pour: Achieving an Even Slab Thickness
The moment the thermometer hits 300° F, immediately remove the pan from the heat source. Allow the most aggressive bubbling to subside for just a few moments perhaps thirty seconds. If you are adding toasted pecans or almonds, stir them in quickly now.
Carefully and steadily pour the molten liquid into your prepared pan. Avoid aggressively scraping the bottom of the saucepan, as crystallized remnants there could contaminate your smooth pour.
Cooling Protocols: Patience Before the Satisfying Break
Allow the toffee to cool completely and undisturbed at room temperature for at least one hour. Resist the urge to touch it or place it in the refrigerator too soon, as rapid temperature shifts can sometimes compromise the final texture.
Once it is stone cold and firm to the touch, you can begin the satisfying work of breaking it into rustic pieces.
Troubleshooting Common Toffee Pitfalls and Fixes
If your final product turns out sticky or chewy rather than snappy, the most common culprit is that the syrup did not reach the correct temperature it likely peaked around 290° F instead of 300° F.
If the toffee tastes burnt, you overheated it past 305° F. Should you notice crystallization forming on the sides of your pot during the boil, quickly dip a clean pastry brush in warm water and gently brush the sides down to wash the rogue crystals back into the syrup before they spread.
Creative Twists: Elevating Your Classic Homemade Toffee
Once you’ve mastered the base recipe, experimentation becomes the fun part. Creating Homemade Toffee Syrup is as simple as stopping the cooking process earlier, around 230° F, and thinning the resulting mixture slightly after it cools.
Preventing Graininess: Avoiding Early Crystallization
The primary defense against graininess is using the corn syrup, which acts as an "interfering agent," blocking the sucrose molecules from bonding together too quickly. Plus,, ensure your pot and spatula are completely clean before starting; any trace of sugar left over from a previous batch can act as a seed crystal and ruin the texture of this new batch of Homemade Toffee .
Optimal Storage Conditions to Maintain That Signature Snap
Toffee is highly hygroscopic, meaning it loves to absorb moisture from the air, which is the enemy of crispness. Store your finished pieces in a cool, dry location. An airtight container is essential.
If you live in a very humid climate, consider adding a few food safe silica gel packets to the storage container to wick away ambient moisture and preserve that perfect snap.
Adding Nuts or Chocolate Drizzle Enhancements
For an incredibly decadent finish, melt 4 ounces of high-quality dark or milk chocolate chips in a double boiler. Once the toffee slab is fully cooled, spread the chocolate evenly over the top. Before the chocolate sets, sprinkle liberally with flaky sea salt.
This combination of bitter chocolate, sweet, buttery toffee, and salt makes for an unforgettable treat, perfect for making gifts of Homemade Toffee Bars .
A Quick Nutrition Snapshot of Your Decadent Creation
While this is certainly a treat, knowing what you're indulging in helps manage expectations. As a concentrated sugar and fat confection, a standard square of this toffee contains significant calories, primarily from the butter and sugar content.
Enjoy this rich creation in moderation, perhaps paired with a sharp digestif or a robust cup of coffee.
Recipe FAQs
Why is my Homemade Toffee grainy instead of smooth and snappy?
That's usually down to sugar crystallization, a bit like when sugar clumps in your jam jar! The main culprit is stirring the mixture once it starts boiling vigorously, or having sugar crystals clinging to the sides of the pan above the liquid line.
Make sure to brush down the sides with a wet pastry brush if you see any stray sugar crystals clinging on.
My toffee didn't harden up properly; it's sticky! What went wrong?
Ah, the dreaded sticky situation! This almost always means the toffee mixture didn't reach the correct temperature, settling somewhere between the 'soft ball' and 'hard crack' stages you need to hit 300°F (149°C).
Also, check the weather forecast; high humidity is the sworn enemy of perfect candy, so perhaps save your toffee making for a dry day!
Can I make this Foolproof Homemade Toffee without a candy thermometer?
While we strongly advise against it, if you’re in a real pinch, you can try the 'cold water test,' but it's fiddly. Drop small amounts of the syrup into ice-cold water to see if it forms a hard, brittle thread that snaps easily.
Honestly though, for consistent, top-tier toffee, a thermometer is non-negotiable; it’s cheaper than wasting ingredients!
How should I store my Homemade Toffee to keep it fresh and crunchy?
Treat it like a precious jewel! Once the toffee is completely cooled and set (especially if you’ve added chocolate), wrap the pieces tightly in plastic wrap or wax paper. Store it in an airtight container at cool room temperature, away from any heat source.
It should keep beautifully for several weeks if it lasts that long, mind you!
I want to use nuts; when is the best time to add them to the toffee?
You want the nuts distributed but you don't want to risk knocking the temperature down or stirring too much. The ideal time is immediately after you've removed the saucepan from the heat and the rolling boil has subsided.
Stir them in quickly and pour the mixture into the prepared pan right away before it starts to set in the pan itself.
Foolproof Homemade Toffee