The Ultimate Heritage Sage Onion Stuffing Crispy on Top Buttery Soft Inside

- Why This Recipe Defines The Quintessential Holiday Centrepiece
- Setting The Standard: Achieving The Perfect Stuffing Texture
- The Essential Building Blocks for Superior Flavour Integration
- Sourcing Your Staples: Bread Quality Matters Most
- Step-by-Step Alchemy: Transforming Dry Bread Into Golden Goodness
- The Crucial Baking Phase: Ensuring Edge Crispness
- Advanced Techniques and Flavor Twists for Your Stuffing
- Storing Your Superior Holiday Side Dish
- Recipe FAQs
- 📝 Recipe Card
Why This Recipe Defines The Quintessential Holiday Centrepiece
Few preparations hold as much nostalgic weight as a truly exceptional stuffing. This is more than just a side dish; it’s a textural and aromatic anchor for any grand celebration.
When you achieve that perfect equilibrium a yielding, buttery interior encased by a shatteringly crisp, golden crust you’ve mastered one of the most beloved elements of holiday fare.
This recipe, the Ultimate Heritage Sage & Onion Stuffing , aims precisely for that benchmark. It’s a traditional construction, drawing on centuries of savoury baking knowledge, ensuring that every forkful delivers comfort, depth, and that irreplaceable holiday aroma.
This is the foundation upon which memorable Holiday Side Dishes are built, easily adapted for everything from a simple Sunday Dinner Recipes staple to the star attraction alongside a Thanksgiving centerpiece.
Setting The Standard: Achieving The Perfect Stuffing Texture
The biggest pitfall in creating Classic Stuffing lies entirely in texture management. We are not aiming for a loaf of bread soaked in liquid; we are aiming for something that holds its shape while remaining tender.
Texture dictates flavour perception, and achieving the right balance requires attention to two key areas: bread preparation and liquid management.
Bidding Farewell to Dry, Disappointing Bread Fillings
The secret weapon against dryness, ironically, starts with dry bread. If you use soft, fresh bread, it will collapse into a heavy paste when combined with liquid, regardless of how much broth you add.
The goal of drying the bread cubes whether through air-drying overnight or a quick, gentle oven stint is to create little sponges capable of absorbing the rich, savoury liquids without dissolving. This ensures that when baked, the exterior sets beautifully while the core retains its moisture.
The Herbaceous Profile: Why Sage and Onion Reign Supreme
While many variations exist, the core of superior flavour resides in the classic pairing of sage and onion. This Herbaceous Stuffing sings because these elements caramelise slightly during the sauté process, releasing deep, earthy notes that complement rich roasted meats perfectly.
The intensity of fresh sage, balanced by the sweetness of deeply softened yellow onions, forms the backbone of this flavour profile.
A Nod to Tradition: Mastering This Classic Stuffing Base
This iteration focuses on building flavour layers intentionally. We start by melting butter and gently softening the aromatics rather than just dumping raw ingredients onto dry bread.
By cooking the onions and celery until translucent and then "blooming" the herbs in that same fat for a final minute, we unlock their full aromatic potential before they ever meet the bread.
This foundational work is what separates a good stuffing from a truly great one, making it the essential Thanksgiving Stuffing Recipe your family will request repeatedly.
The Essential Building Blocks for Superior Flavour Integration
Creating this Homemade Stuffing From Scratch requires selecting components that contribute maximal flavour, as the final baking time is relatively short. Every ingredient must pull its weight in delivering that signature savoury punch.
Sourcing Your Staples: Bread Quality Matters Most
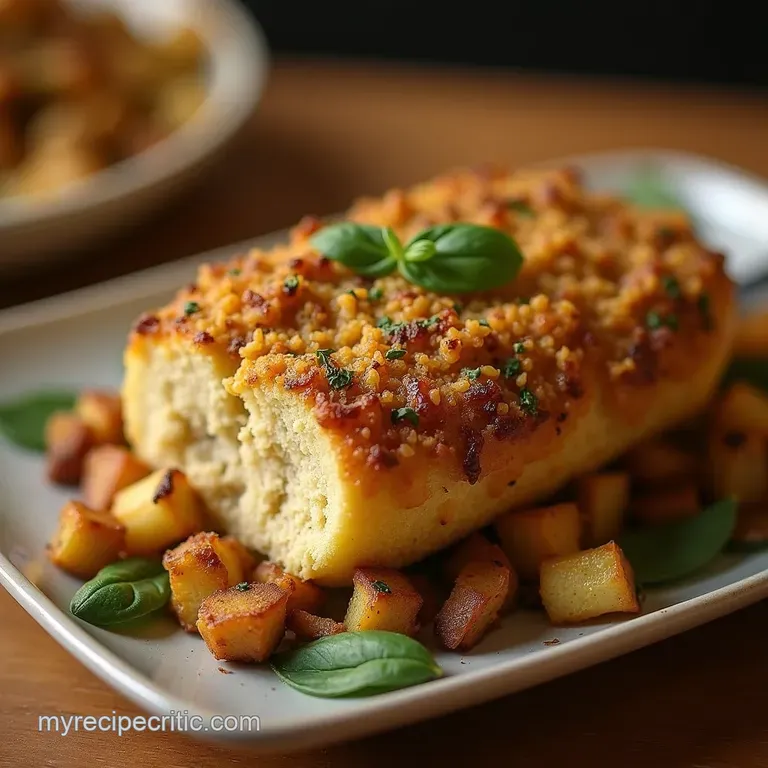
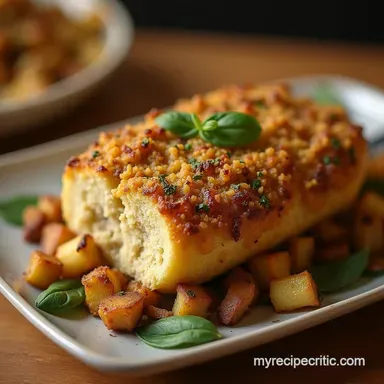
For the base, aim for a sturdy, slightly rustic white loaf sourdough works wonderfully, but a standard, day-old sandwich loaf is perfectly acceptable. You need about 8 cups of cubed bread for this recipe, which yields around 8 generous side servings.
The key is density; you want enough structure so the cubes maintain their shape after soaking up the stock and egg mixture.
Mise en Place: Measuring Out The Aromatics
Precision matters when dealing with potent fresh herbs. For the aromatic core, we finely dice one large yellow onion and two medium celery stalks. Crucially, these must be sautéed slowly until they are sweet and yielding we are aiming for caramelisation rather than browning.
Combine this base with 3 tablespoons of finely chopped fresh sage, 1 tablespoon of thyme leaves, and a quarter cup of fresh parsley. The salt and freshly ground black pepper are added during this sautéing phase to help draw out the vegetable moisture and season the herbs directly.
Choosing The Right Fat: Butter vs. Broth Saturation Point
Fat is the delivery mechanism for richness. We use 6 tablespoons of high-quality unsalted butter, divided. Half is used to sweat down the onions and celery, while the remaining half is melted and drizzled over the top before baking to encourage that desirable golden crust.
The liquid component is equally vital: a blend of 1 ¼ cups of warmed, low-sodium chicken or vegetable stock, whisked lightly with two large eggs, provides the necessary binding and moisture without drowning the bread.
Recommended Tools for Optimal Mixing and Baking
While sophisticated equipment isn’t required, efficiency demands a large, heavy bottomed skillet for the sautéing phase and a large mixing bowl for combining everything.
For baking, a shallower 9x9 inch dish is preferable to a deep one, as it maximizes the surface area exposed to the dry oven heat, ensuring you get ample crispy edges for your Moist Stuffing Recipe .
Related Recipes Worth Trying
- Easy Tomato Soup with Canned Tomatoes Silky Smooth Classic — Forget watery soup This Easy Tomato Soup with Canned Tomatoes recipe delivers a velvety Classic Tomato Soup Recipe in under an hour Perfect with a cheese...
- The Best Classic Scottish Shortbread Recipe MeltInYourMouth — Learn how to master this simple shortbread cookie recipe using only three ingredients for a truly buttery crumbly biscuit perfect for your biscuit tin
- The Best Classic Shortbread Cookies Recipe Buttery Easy — Looking for the best Traditional Shortbread Cookies recipe This easy method yields crunchy meltinyourmouth Scottish shortbread perfect for any occasion
Step-by-step Alchemy: Transforming Dry Bread Into Golden Goodness
The process is straightforward, relying on sequential layering of preparation. First, ensure your 8 cups of bread cubes are thoroughly dried; if they aren't already stale, bake them in a 300° F ( 150° C) oven for about 15 minutes until completely dehydrated but not browned, then set them aside in your mixing bowl.
Next, melt half the butter in your skillet and gently cook the diced onion and celery for a full 8 to 10 minutes. Once softened, introduce the chopped sage, thyme, salt, and pepper, cooking for one more minute until intensely fragrant.
This cooked aromatic mixture is then transferred directly over the dry bread cubes. Finally, the liquid binder the slightly warmed stock whisked with the eggs is poured evenly over the mixture. Toss gently, ensuring everything is coated but not mashed.
Allowing this assembly to rest for 10 minutes is a key, subtle step, permitting the bread to absorb the moisture uniformly before it hits the heat.
The Crucial Baking Phase: Ensuring Edge Crispness
The final transformation requires controlled heat to achieve the desired dual texture.
Prepping The Bread Cubes: Drying Techniques That Work
As mentioned, the dryness of the bread dictates the final outcome. If you have time, air-drying on a baking sheet for 24 hours is ideal. If time is short, the low-and-slow toasting method mentioned above works perfectly to create those essential hard edges that prevent the stuffing from becoming gluey.
Sautéing Aromatics: Building The Flavour Foundation
This stage should never be rushed. The onions and celery must release their inherent sweetness through gentle cooking in butter. This soft, flavour infused base integrates far better into the bread than sharp, raw vegetables would, establishing that deep, foundational taste characteristic of a superior Stuffing Recipe for Turkey .
Binding The Mixture: Achieving Moistness Without Soggy Results
The key here is restraint. Add the stock/egg mixture slowly, tossing just until no dry pockets of bread remain. Over mixing activates the starches and breaks down the structure, leading to heaviness.
The addition of the remaining melted butter drizzled over the top surface before baking contributes significantly to the eventual crust formation.
Baking Methods: Inside The Bird vs. Dedicated Casserole
While cooking stuffing inside the cavity of a roasting bird infuses it with drippings, modern culinary advice generally favours baking it separately in a casserole dish. This allows for more even cooking and temperature control, ensuring the stuffing reaches a safe internal temperature ( 165° F/ 74° C) without overcooking the surrounding poultry.
Bake at 375° F ( 190° C) for 40– 45 minutes, uncovered, until that signature golden crust forms.
Advanced Techniques and Flavor Twists for Your Stuffing
While the beauty of this recipe lies in its simplicity, expanding on the core framework allows for exciting seasonal variation. Consider this recipe the base for your Sausage Stuffing Recipe experiments.
By browning half a pound of quality breakfast sausage meat (draining most of the rendered fat, but leaving some behind to sauté the onions in) you add significant savoury depth.
Another popular refinement involves introducing texture and tang: add half a cup of toasted pecans or walnuts along with half a cup of dried tart cherries or apricots during the final mixing stage. These additions transform the profile, moving it toward a richer, more complex offering perfect for a holiday feast.
Storing Your Superior Holiday Side Dish
The good news about this robust Classic Stuffing is that it stores and reheats exceptionally well, making holiday prep significantly easier.
Elevating Your Classic Stuffing: Beyond Sage and Onion
For a touch of brightness, try incorporating finely grated orange zest (about 1 teaspoon) along with the herbs this lifts the earthiness of the sage beautifully. Alternatively, a tablespoon of Worcestershire sauce stirred into the stock mixture adds a deep, umami background note that complements roast poultry exceptionally well.
Freezing Protocols: Preserving That Freshly Baked Quality
You can freeze the stuffing either before baking or after. If freezing baked stuffing, allow it to cool completely, portion it into freezer safe containers, and cover tightly. When ready to reheat, thaw overnight in the refrigerator and bake at 350° F ( 175° C) until heated through.
If freezing unbaked, assemble everything through Step 6 (the liquid absorption phase), transfer to the baking dish, cover tightly with plastic wrap and foil, and freeze. Thaw overnight, then proceed with the final butter drizzle and baking instructions.
Serving Suggestions That Complement This Rich Side
This stuffing is inherently rich due to the butter and eggs, meaning it pairs best with vibrant, slightly acidic accompaniments. A sharp cranberry relish or a side of balsamic glazed root vegetables cuts through the richness perfectly.
Naturally, it demands a generous ladle of homemade gravy, soaking into the crisp edges just before serving.
Troubleshooting Common Stuffing Errors
If your stuffing turns out too dry, it usually means the bread wasn't absorbent enough or you skimped on the liquid ratio; next time, ensure your bread is thoroughly dried out. Conversely, if the final product is heavy or gluey, you likely over mixed the binder into the bread, disrupting the structure.
The other common error is not cooking it long enough if baking inside the bird always use a meat thermometer to check the centre reaches 165° F ( 74° C).
Recipe FAQs
Can I make this Classic Stuffing ahead of time? I’m all hands on deck on the big day!
Absolutely, planning ahead is the key to a stress free Christmas dinner! You can mix all the ingredients together up to the point of baking and store it covered in the fridge for up to 24 hours.
Just remember to pull it out about 30 minutes before baking so it’s not ice cold, and add an extra 5 10 minutes to the cooking time if baking from cold.
My stuffing always comes out dry and crumbly. What’s the secret to keeping the inside moist?
That’s a common woe, but we can sort it out! The secret lies in the bread-to-liquid ratio and ensuring your bread is properly stale, not rock hard. Make sure you use the exact amount of stock specified, and never squeeze the bread after moistening it.
Also, if you’re baking it inside a bird, aim to finish cooking the stuffing outside the bird for a few minutes to ensure the top gets crispy.
Can I swap out the sage and onion for something different? I fancy a bit of a twist.
Of course! If you fancy something a bit more contemporary, try swapping the herbs for chopped rosemary and a grating of fresh orange zest for a brighter flavour profile. Alternatively, for a really hearty change, try the sausage variation mentioned in the recipe notes; it turns it into a complete main event!
Is it better to cook the stuffing inside the turkey or separately in a dish?
For the very best texture and safety, cooking it separately is generally recommended, especially if you're aiming for that ‘Golden Crust’ texture. Stuffing cooked inside the bird takes longer to reach a safe internal temperature, potentially leading to overcooked poultry.
Baking it separately ensures you get that lovely crispy top layer we’re after!
How long will leftovers of this stuffing keep, and can it be frozen?
Leftovers should be stored in an airtight container in the fridge and are best eaten within 3 days it’s never quite the same the day after, is it? Yes, it freezes beautifully; allow it to cool completely, wrap it well, and freeze for up to three months.
To reheat, thaw fully and bake until piping hot throughout.
Classic Herb Stuffing Recipe