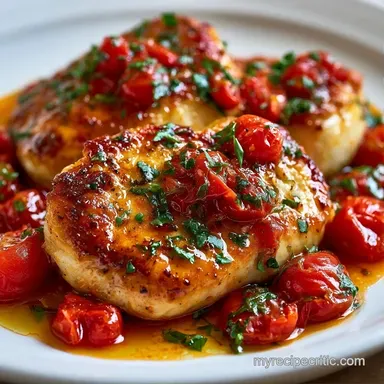
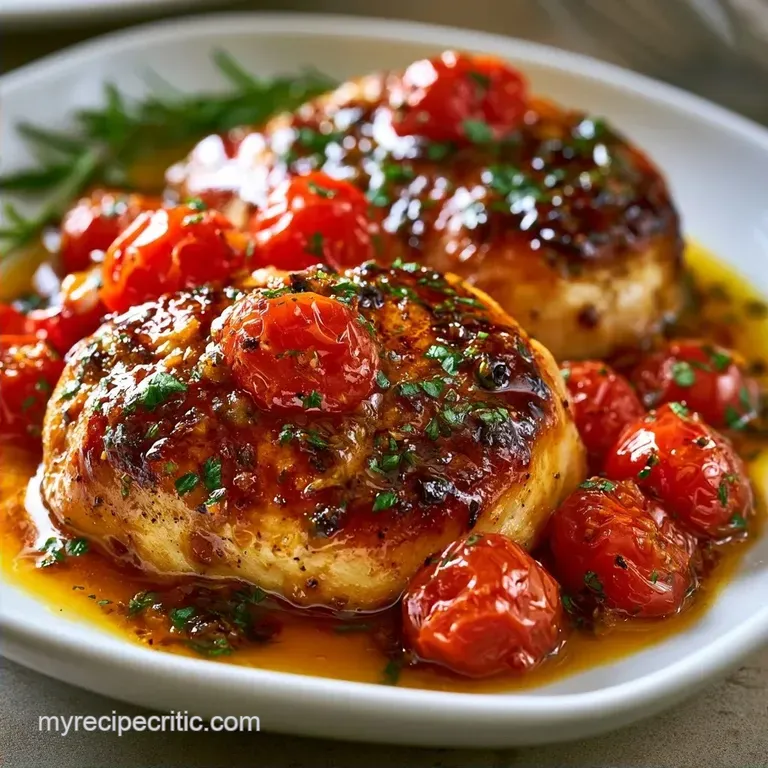
Pan-Seared Chicken Cherry Tomato Sauce
- Time: 15 min active + 10 min cooking
- Flavor/Texture Hook: Mahogany crust with bursting, tangy tomatoes
- Perfect for: Weeknight dinner or low carb meal prep
- Chicken Cherry Tomato Sauce
- Why the Texture Works
- What Each Ingredient Does
- My Cooking Setup
- Minimal Tools for This
- The Cooking Process
- Troubleshooting Common Issues
- Adjusting Your Portion Size
- Kitchen Myths Debunked
- Storage and Zero Waste
- Best Side Pairings
- Easy Flavor Variations
- Recipe FAQs
- 📝 Recipe Card
Chicken Cherry Tomato Sauce
I can't tell you how many times I've ended up with chicken breasts that felt like chewing on a pencil eraser. It usually happens when the meat simmers too long in the sauce, losing all its juice and turning a weird, pale grey. It's frustrating when a dish looks great but the texture is totally off.
The fix is actually pretty simple. I stopped cooking the chicken and the sauce as one single unit from start to finish. Instead, I treat the sear as its own event, remove the meat, and build the sauce in the leftover browned bits.
You'll get a Chicken Cherry Tomato Sauce that stays juicy on the inside while the sauce stays bright and fresh. It's a one pan move that saves a ton of cleanup and actually tastes like something from a bistro.
Why the Texture Works
- over High heat Searing: Getting a mahogany crust on the chicken first locks in the look and flavor. Removing it from the pan prevents the meat from overcooking while the tomatoes break down.
- Cold Butter Finish: Stirring in chilled butter at the end creates a glossy emulsion. This is a trick often used in French cooking to thicken a sauce without adding flour.
- Controlled Tomato Burst: Cooking the tomatoes undisturbed for a few minutes lets the skins blister and pop. This releases the natural pectin, which thickens the sauce naturally.
If you love this style of sauce, you might also like my Burst Cherry Tomato Sauce for pasta.
| Fresh Tomatoes | Canned/Shortcut | Impact | Savings |
|---|---|---|---|
| Fresh Cherry | Canned Diced | Less acidity, thinner sauce | 1-2 Euros |
| Fresh Basil | Dried Basil | More muted, less "green" taste | 2 Euros |
| Fresh Lemon | Bottled Juice | Sharper, more metallic note | 1 Euro |
What Each Ingredient Does
| Ingredient | What It Does | Best Swap |
|---|---|---|
| Chicken Breasts | Main protein, absorbs sauce | Chicken thighs for more fat |
| Cherry Tomatoes | Provides acid and body | Grape tomatoes |
| White Wine | Deglazes pan, adds depth | Chicken broth |
| Cold Butter | Creates a glossy finish | Olive oil (less rich) |
My Cooking Setup
Since we're keeping tools to a minimum, you only need a few basics. A 12 inch stainless steel or cast iron skillet is the best choice here. These pans hold heat better than non stick, which is what gives the chicken that deep brown color.
I also recommend using a wooden spoon or a silicone spatula. You'll need something that can scrape the bottom of the pan effectively during the deglazing step to get all those flavor packed bits into the sauce.
Minimal Tools for This
- 12 inch stainless steel or cast iron skillet
- Tongs for flipping chicken
- Small bowl for lemon juice and wine
- Paper towels for drying the meat
The Cooking Process

Phase 1: Achieving the Golden Sear
Pat the chicken medallions completely dry with paper towels. Note: Wet meat steams instead of searing. Season them with 1 tsp kosher salt, ½ tsp cracked black pepper, and 1 tsp dried oregano.
Heat 2 tbsp extra virgin olive oil in your skillet over medium high heat until it shimmers. Add the chicken in a single layer and sear 3 mins per side until a mahogany colored crust forms. Remove the chicken to a plate.
Phase 2: The Tomato Burst
Reduce the heat to medium. Toss in 2 cups of whole cherry tomatoes. Cook them undisturbed for 2 mins until the skins blister and pop.
Add 4 cloves of minced garlic to the pan. Sauté for 60 seconds until it smells fragrant but hasn't turned brown.
Phase 3: The Final Emulsion
Pour in ¼ cup dry white wine (or chicken broth) and 1 tbsp fresh lemon juice. Scrape the bottom of the pan with your spoon to release the fond.
Return the chicken and any juices from the plate to the pan. Simmer for 1 min until the sauce thickens slightly and the chicken reaches an internal temperature of 165°F (74°C), as recommended by USDA food safety guidelines.
Turn off the heat. Stir in 2 tbsp chilled unsalted butter and ¼ cup fresh basil chiffonade for a velvety finish.
Troubleshooting Common Issues
| Issue | Solution |
|---|---|
| Why Your Chicken is Dry | If the meat feels rubbery, it usually means it stayed in the pan too long during the final simmer. Chicken breast cooks fast. Use a meat thermometer to pull it the second it hits 165°F (74°C). |
| Why Your Sauce is Watery | This happens if the tomatoes didn't pop or the wine didn't reduce enough. Make sure you don't stir the tomatoes too much at first. |
| Why Your Garlic is Bitter | Garlic burns in seconds over medium high heat. Only add it after the tomatoes have released some moisture, which lowers the pan temperature and protects the garlic from scorching. |
Adjusting Your Portion Size
If you're cooking for just one or two, you can halve the recipe. Use a smaller 8 inch skillet so the tomatoes don't spread out too thin and evaporate too quickly. Reduce the searing time by about 20% since smaller medallions cook faster.
For a crowd (double or triple), don't crowd the pan. If you put too much chicken in at once, the temperature drops and you'll get grey meat instead of a sear. Work in batches, searing the meat first, then removing it all before starting the sauce.
For the liquids, only increase the wine and broth by 1.5x, otherwise, the sauce will take too long to reduce.
Kitchen Myths Debunked
Searing meat doesn't "lock in" the juices. That's an old myth. Searing actually removes moisture from the surface, but it creates a massive amount of flavor through browning. The reason the meat stays juicy here is that we remove it from the pan during the over high heat phase.
Adding butter at the end isn't just for flavor. It's a technique called monter au beurre. It binds the water and fat in the sauce, giving it a cohesive texture rather than a broken, oily look.
Storage and Zero Waste
Store leftovers in an airtight container in the fridge for up to 3 days. When you reheat it, do it slowly on the stove over low heat with a splash of water or broth. This prevents the butter from separating and keeps the chicken tender.
Don't toss the tomato stems or the bits of garlic skin. I keep a bag in the freezer for veggie scraps. Once the bag is full, I boil them with water and a bay leaf to make a quick stock for other recipes.
Best Side Pairings
This dish has a lot of acidity, so it pairs well with something that can soak up the sauce. A bed of buttery mashed potatoes or some fluffy quinoa works great.
For a lighter option, try some sautéed spinach or roasted asparagus. The lemon in the sauce complements green vegetables perfectly. If you're feeling fancy, a piece of crusty sourdough bread is a must for cleaning the plate.
Easy Flavor Variations
If you want something heartier, try a Cherry Tomato Sauce (60m) recipe approach by roasting the tomatoes first for a deeper, sweeter taste.
- For a Creamier Finish: Swap the butter for 2 tbsp of heavy cream or a dollop of mascarpone.
- For a Bold Mediterranean Twist: Add 1 tbsp of capers and 5-6 pitted kalamata olives during the tomato burst phase.
- For a Whole30/Paleo Swap: Replace the butter with a teaspoon of ghee or extra olive oil.
- For a Different Protein: This same method works for shrimp or scallops. Just sear them for 2 mins per side and add them back at the very end.
Decision Shortcut: If you want it richer, use chicken thighs. If you want it tangier, add an extra squeeze of lemon. If you want it thicker, simmer the sauce for 2 more minutes before adding the chicken back.
Recipe FAQs
How to make this chicken cherry tomato sauce?
Sear seasoned chicken medallions for 3 4 minutes per side, then sauté whole cherry tomatoes until they blister. Deglaze the pan with white wine and lemon juice before simmering the chicken to 165°F and finishing with butter and basil.
How do you prepare the cherry tomatoes for this sauce?
Leave them whole and toss them into the skillet over medium heat. Cook them undisturbed for 2 3 minutes to allow the skins to blister and pop naturally.
Can I substitute the cherry tomatoes with sun-dried tomatoes?
No, stick with fresh cherry tomatoes. Sun-dried tomatoes have a concentrated, chewy texture that won't create the same juicy, velvety sauce. If you prefer a richer, slow cooked tomato base, try our traditional Bolognese.
Why is my chicken breast dry or rubbery?
It stayed in the pan too long during the final simmer. Use a meat thermometer to remove the chicken the moment it hits 165°F (74°C).
Why did my sauce turn out watery?
The tomatoes didn't pop or the wine didn't reduce enough. Avoid stirring the tomatoes too frequently at first to ensure they blister and release their juices properly.
Is it true that garlic should be added at the start with the oil?
No, this is a common misconception. Garlic burns quickly over medium high heat, so add it only after the tomatoes have released moisture to protect it from scorching.
How to store and reheat leftovers?
Place in an airtight container in the fridge for up to 3 days. Reheat slowly on the stove over low heat with a splash of water or broth to keep the chicken tender and the butter emulsified.
Chicken Cherry Tomato Sauce