The Ultimate Nostalgic Peanut Butter Lunch Lady Bars Buttery Shortbread Perfection
- Unlocking the Magic: Why These Peanut Butter Lunch Lady Bars Are Essential
- A Nostalgic Bake Elevated: Mastering the Classic Canteen Treat
- Assembling Your Pantry for Perfect Peanut Butter Lunch Lady Bars
- Crucial Components: Notes on Ingredient Selection
- Step-by-Step Construction: Crafting the Iconic Three Layers
- Baking Precision: Achieving Golden-Brown Perfection
- Troubleshooting & Customization for Your Bar Variations
- Maximizing Enjoyment: Storage and Serving Suggestions
- Recipe FAQs
- 📝 Recipe Card
Unlocking the Magic: Why These Peanut Butter Lunch Lady Bars Are Essential
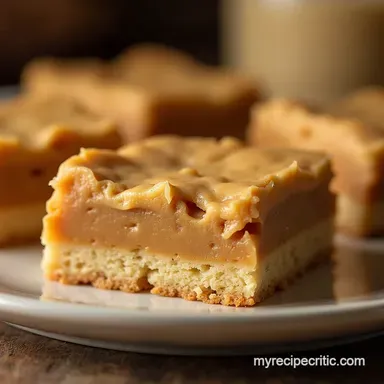
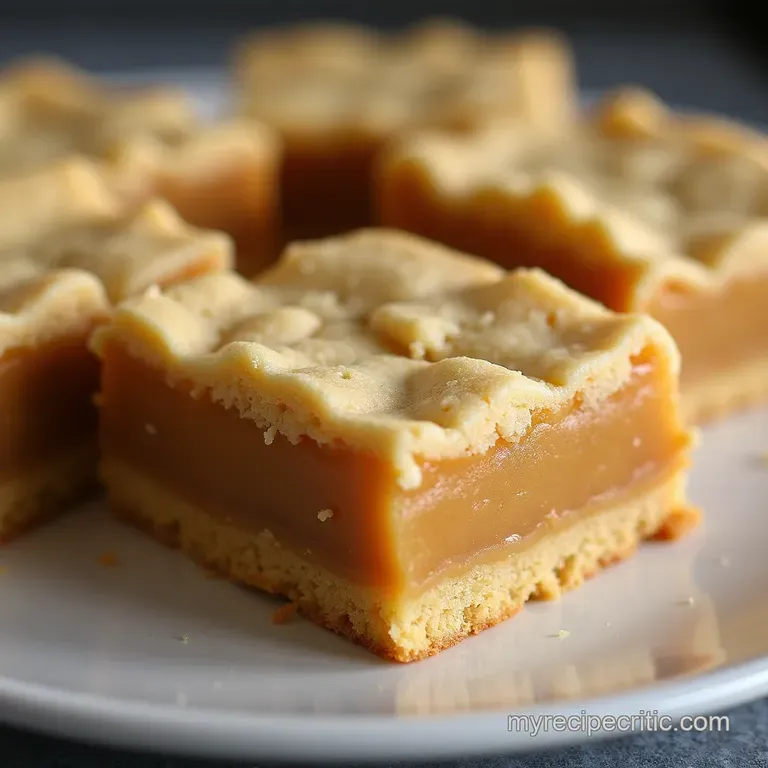
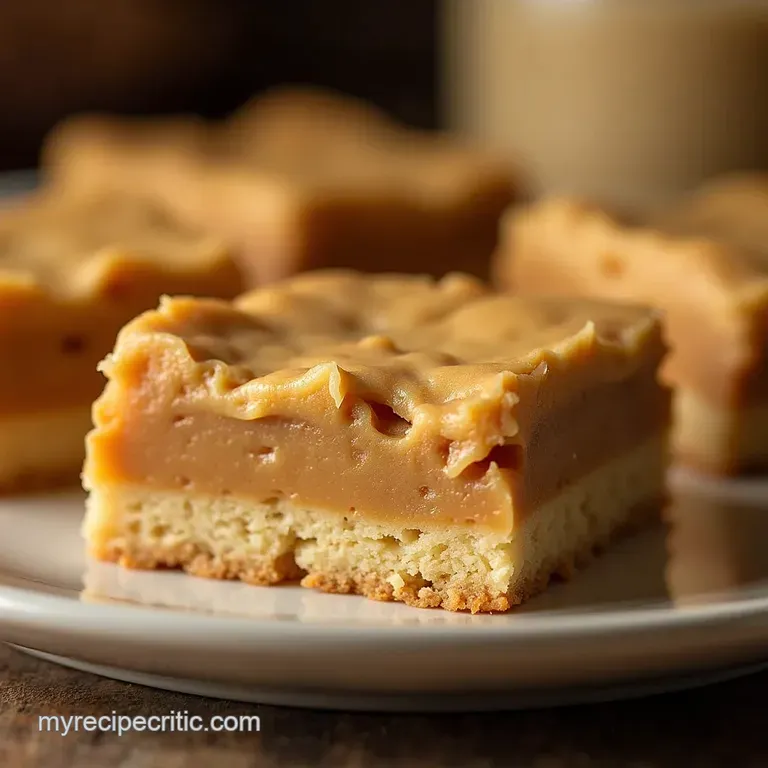
Ah, the Lunch Lady Bar! This is baking royalty from the school cafeteria days a simple, three layer treat that hits that sweet spot between a cookie and a fudge bar. We're layering a rich, slightly crumbly shortbread base, a thick, chewy layer of sweet peanut butter filling, and topping it all off with a smooth chocolate glaze.
They are incredibly simple to throw together, requiring minimal fuss but delivering maximum nostalgic flavour. Perfect for packed lunches (if you can resist eating them all first!) or afternoon tea. These Peanut Butter Lunch Lady Bars are a testament to simple baking done right.
A Nostalgic Bake Elevated: Mastering the Classic Canteen Treat
If your memories of school lunch involve a slightly squishy, perfectly sweet square of something wonderful, you’re remembering these bars. While the Lunch Lady Peanut Butter Bars were historically straightforward, this elevated Peanut Butter Lunch Lady Bars Recipe respects the tradition while ensuring structural integrity and superior flavour payoff in your home kitchen.
We are aiming for that ideal texture: firm enough to hold its shape but tender enough to practically melt in your mouth. This recipe yields a wonderful batch of 16 generous squares when baked in a standard 9x13 inch pan, taking about 25 minutes of active prep time.
The Irresistible Allure of Creamy Peanut Butter Layers
The heart of this confection is unquestionably the peanut butter centre. It’s not just peanut butter; it’s a magical combination of creamy nut spread, rich brown sugar, and eggs, which bake up into a dense, chewy matrix that sings against the buttery base.
Because we are focusing on achieving that authentic texture, using standard, shelf stable creamy peanut butter is crucial the natural varieties often contain too much oil and can result in a runny, disappointing middle layer, something we absolutely want to avoid when crafting the perfect Peanut Butter Cookie Bars .
Why This Recipe Beats Any store-bought Version
Store-bought options rarely capture the balance achieved here. Commercial bars often rely on stabilizers and artificial flavours. Our version, however, uses real, softened unsalted butter in the base and the filling, providing a depth of flavour that’s impossible to replicate artificially.
On top of that,, the simplicity of the construction means you can manage the quality of every single component, from the shortbread crust to the final chocolate coating, ensuring these Old Fashioned Peanut Butter Lunch Lady Bars taste exactly like the best version you remember.
Setting the Scene: The Comfort of School Cafeteria Desserts
There is a unique joy in recreating these familiar, unpretentious desserts. They don't demand fancy techniques or obscure ingredients. In fact, if you’re looking for something truly quick, you might find yourself searching for No Bake Peanut Butter Lunch Lady Bars , but trust me, the slight baking time here yields a superior, set texture that holds up beautifully, making them superior Peanut Butter Lunch Box Bars .
The aroma that fills your kitchen while the base bakes is pure, unadulterated comfort.
Assembling Your Pantry for Perfect Peanut Butter Lunch Lady Bars
To ensure success, proper preparation of your ingredients is key before you even turn on the oven. We want everything ready to go so we can transition smoothly between the three distinct layers.
For the best results, preheat your oven to 350° F ( 175° C) and line your 9x13 inch baking pan meticulously with parchment paper, leaving an overhang on two sides this acts as a handy sling to lift the entire finished slab out later for clean slicing.
Crucial Components: Notes on Ingredient Selection
The ingredients for these bars are delightfully straightforward, but a few specific choices will guarantee success in replicating the ideal Peanut Butter Lunch Lady Bars Recipe .
The Buttery Foundation: Essential Ratios for the Shortbread Base
The base requires 3 cups of all-purpose flour combined with 1 cup (two full sticks) of softened unsalted butter and 1 cup of granulated sugar, plus vanilla and salt. The ratio here is designed to create a shortbread that is sturdy enough to support the filling but tender enough to crumble delightfully.
The key is ensuring that butter is truly softened not melted so it can properly cream with the sugar, incorporating the necessary air before the flour is added.
Peanut Butter Filling Secrets: Creamy vs. Crunchy Dilemma
For the filling, we rely on 1 ½ cups of standard, creamy peanut butter. I cannot stress enough: avoid natural peanut butter where the oil separates. Those types will often leak oil during baking.
We need the stabilizers found in the classic jarred spread to help bind the brown sugar, two eggs, melted butter, and vanilla into that signature smooth, dense layer.
Tools of the Trade: Essential Baking Equipment You'll Need
While you can certainly manage with a sturdy whisk and arm power, an electric mixer (handheld or stand) will make creaming the butter and sugar for the base significantly easier. Beyond the mixer, you’ll need a large bowl, a rubber spatula for careful spreading, and a small saucepan dedicated solely to melting the chocolate topping.
Related Recipes Worth Trying
- The Ultimate BrownButter Banana Nut Loaf Recipe — Forget dry loaves This easy banana nut bread gets incredible depth from browned butter for the moist banana bread recipe youll keep forever
- Classic Strawberry Shortcake Recipe Fluffy Buttermilk Biscuits — Stop settling for dry biscuits Learn how to make truly light buttery shortcakes with perfectly macerated strawberries Your new favourite summer dessert...
- The Ultimate GoldenCrusted Garlic Butter Rolls Recipe — Forget dry dinner rolls These Homemade Garlic Butter Dinner Rolls are pillowy soft and packed with Parmesan herbs Easy recipe for the best bread buns
Step-by-step Construction: Crafting the Iconic Three Layers
Building these bars is a methodical process that demands patience during the cooling stages, but the active assembly moves quickly.
Baking Precision: Achieving Golden Brown Perfection
Phase One: Pressing the Resilient Shortbread Crust
After creaming the butter and sugar, gradually incorporate the flour, salt, and vanilla until coarse crumbs form. You will use about two-thirds of this mixture to press firmly and evenly across the bottom of your prepared 9x13 pan.
Now comes the most crucial, yet inactive, step: chilling this base in the refrigerator for a minimum of one hour. This chilling prevents the buttery dough from shrinking drastically while baking, keeping your Peanut Butter Chocolate Lunch Lady Bars perfectly squared.
Building the Heart: Spreading the Smooth Peanut Butter Layer
While the base is firming up, whisk together the peanut butter filling components: peanut butter, brown sugar, eggs, melted butter, and vanilla until the mixture is completely uniform. Once the crust is chilled, carefully spread the peanut butter filling evenly over the firm base.
Next, take the remaining one-third of your shortbread dough and crumble it evenly over the top of the peanut butter layer this creates a delightful contrast in texture when baked.
The Grand Finale: Melting and Pouring the Chocolate Topping
After baking for 25 to 30 minutes at 350° F ( 175° C), remove the bars and let them cool completely on a wire rack. Do not attempt to top them warm!
For the topping, gently melt 1 cup of semi sweet chocolate chips with ½ cup of unsalted butter over low heat until smooth. Remove from the heat and quickly whisk in 1 cup of powdered sugar until the glaze is glossy.
Pour this warm glaze over the now completely cooled bars and spread quickly to create an even surface.
Cooling Protocols for Clean Slicing
The final, non-negotiable step is setting the chocolate. Place the entire pan in the refrigerator for at least one hour, or until the chocolate topping is firm to the touch. Rushing this cooling process leads to messy, smeared edges when you try to cut them.
Troubleshooting & Customization for Your Bar Variations
Even with such an Easy Peanut Butter Lunch Lady Bars recipe, minor hiccups can occur. If your base seems crumbly when pressed, ensure your butter was soft enough to incorporate properly.
If your filling baked up with cracks, you likely over baked the bars slightly; remember, a slight wobble in the centre is a good sign.
Flavor Twists: Incorporating Mix-ins into the Peanut Butter Core
To add complexity, consider folding ½ cup of mini chocolate chips directly into the peanut butter filling before spreading it over the base. This enhances the inherent Peanut Butter Chocolate Lunch Lady Bars profile beautifully.
For a crunchier texture, swap the creamy peanut butter for crunchy peanut butter in the middle layer.
Preventing Crumbly Edges: Advanced Cutting Techniques
Once fully chilled, use the parchment paper sling to lift the whole dessert out of the pan and onto a cutting board. Use a large, sharp knife that has been heated slightly under hot water (then wiped dry) for the absolute cleanest cuts through the chocolate layer.
Shelf Life Assessment: Keeping Your Bars Fresh for Days
These bars are remarkably stable. Store them in an airtight container at room temperature for up to four days. If you opt to refrigerate them to keep the chocolate very firm, allow them to sit on the counter for about 15 minutes before serving for the best texture.
Nutritional Snapshot: Understanding the Indulgence
While undeniably a treat, understanding what goes into these squares provides context. A single square, yielding 1/16th of the pan, averages between 350 to 400 calories, largely derived from the rich butter, sugar, and peanut butter content. These are decadent squares meant for enjoyment, not daily consumption!
Maximizing Enjoyment: Storage and Serving Suggestions
The ultimate way to enjoy these Lunch Lady Peanut Butter Bars is, of course, alongside a tall glass of ice-cold milk the classic pairing that transports you straight back to the school cafeteria line.
For a slightly more sophisticated presentation, dust the finished, sliced squares with a tiny pinch of flaky sea salt just after the chocolate sets; this small addition beautifully counteracts the intense sweetness.
If you find yourself with leftovers that you want to keep pristine, wrapping individual squares tightly in plastic wrap before placing them in an airtight container will preserve their texture perfectly for up to four days.
Recipe FAQs
Why do my Peanut Butter Lunch Lady Bars seem too crumbly after baking?
This usually happens if you didn't press the shortbread base firmly enough, or if you skipped the mandatory chilling step. The chill time allows the butter in the base to firm up, ensuring it holds its structure when the wet filling is layered on top and baked.
Can I use natural, runny peanut butter in this recipe? I’m watching my sugar intake.
For the best structural results, we strongly advise sticking to standard, shelf stable, creamy peanut butter for the filling, as the oils in natural varieties can separate and make the filling greasy. If you must use a natural one, try draining off excess oil first, or perhaps look into our SunButter variation!
How long do I need to let these Peanut Butter Lunch Lady Bars cool before slicing, or will they be a gooey mess?
Patience, dear baker! You need two cooling periods: the initial 1.5 hours to set the filling, and then another hour (or more in the fridge) after the chocolate topping is applied. If you try to cut them warm, the layers will just smear together think of it like waiting for a proper cup of tea to cool down before you can properly enjoy it.
What’s the secret to getting that perfectly smooth chocolate top without cracking when I slice the bars?
The secret lies in balancing the temperature of the glaze and the bars underneath. Ensure the bars are completely cool before topping, and melt the chocolate topping gently until it’s just liquid and glossy, not scorching hot.
A quick chill in the fridge after topping will firm it up nicely for clean, professional looking slices.
How should I store these bars to keep them tasting fresh?
These keep surprisingly well! Store them in an airtight container at room temperature for up to four days; they often taste even better the next day once the flavours have fully settled. If you need them to last longer, they freeze beautifully for up to three months just ensure they are wrapped tightly first.
Peanut Butter Lunch Lady Bars