The Ultimate Goldencrusted Garlic Butter Rolls So Good Theyll Be Gone Before the Roast is Ready
- The Siren Song of Savory Baking: Why These Rolls Reign Supreme
- Assembling the Arsenal: Essential Components for Peak Flavor
- The Star of the Show: Crafting the Ultimate Garlic-Herb Infusion
- The Dough Development Phase: From Shaggy Mass to Silky Smoothness
- Shaping and Second Rise: Preparing the Rolls for Their Golden Destiny
- Baking Mastery: Achieving That Irresistible, Laminated Crust
- Elevating Your Experience: Creative Twists on Classic Garlic Butter Bread Rolls
- Post-Bake Protocols: Storage, Reheating, and Keeping Them Fresh
- Recipe FAQs
- 📝 Recipe Card
The Siren Song of Savory Baking: Why These Rolls Reign Supreme
There are few aromas that capture the essence of home and culinary delight quite like freshly baked bread mingling with the sharp, intoxicating scent of garlic. If you’ve ever found yourself mesmerized by the golden, glistening tops of restaurant quality bread basket offerings, you’re in the right place.
We are embarking on the journey to create the ultimate Garlic Butter Bread Rolls —puffy, tender pockets of heaven that demand to be pulled apart and devoured moments after they leave the oven.
This isn’t just a side dish; it’s the centerpiece your gravy or soup has been waiting for.
Beyond Basic Buns: The Magic Behind Our Flavor Bomb Dough
When tackling something as fundamental as a dinner roll, the goal is always to achieve maximum softness without sacrificing structure. This particular Garlic Butter Bread Rolls recipe strikes that perfect equilibrium.
We aren't just topping a simple roll; we are creating an enriched dough that benefits from the touch of milk and a little sugar, resulting in a crumb so light it practically floats.
The real magic, however, lies in how we introduce the flavor it’s layered, both inside the roll during shaping and right at the end for that glorious sheen. This is truly the definitive guide to Making Garlic Bread Rolls that will make you rethink every store-bought option.
A Comfort Food Revelation: Meet Your New Favorite Side Dish
These rolls transcend the usual supporting role. Imagine a dinner table centerpiece that yields soft, fluffy interiors capable of absorbing every drop of sauce, while the exterior boasts a savory, slightly crisp crust infused with Parmesan and herbs.
They are inherently snackable, making them irresistible additions to any meal, whether you are serving a hearty stew or a light pasta dish. These Homemade Garlic Butter Dinner Rolls redefine comfort food by marrying the tender texture of milk bread with robust, savory aromatics.
Setting the Scene: What Makes These Garlic Butter Bread Rolls Exceptional
What sets this specific iteration apart is the strategic use of the Easy Homemade Garlic Butter . Instead of simply melting butter and stirring in raw garlic, we ensure the garlic flavor is deeply infused and distributed throughout the layers of the roll.
This approach, inspired by pull apart bread concepts, guarantees that every single bite delivers that punch of garlic and sharp Parmesan cheese we crave. On top of that,, the process is surprisingly straightforward, fitting perfectly into the category of Easy Garlic Butter Bread Rolls even for those new to yeast baking.
Unpacking the Components: Yeast, Flour, and Pure Joy
A superior roll begins with a balanced foundation. Our dough relies on the tried and-true combination of all-purpose flour, activated yeast, warm milk, and a touch of sugar to feed that yeast and encourage a lofty rise.
The melted butter within the dough adds essential fat content, ensuring the final product remains moist long after baking. Achieving that perfect, soft texture requires attention to temperature the milk must be adequately warm, between 105° F and 115° F, to wake up the yeast packets efficiently, setting the stage for a successful rise later in the process.
Assembling the Arsenal: Essential Components for Peak Flavor
Before we dive into the mixing, gathering your components is key to a stress free baking experience. For the dough, you’ll need around three and a half cups of all-purpose flour, a standard packet of active dry yeast, one cup of warm milk, two tablespoons of sugar, a teaspoon of fine sea salt, a quarter cup of melted butter, and one room temperature egg.
These basic ingredients form the structure for what will become your glorious Garlic Butter Milk Bread Rolls .
The Star of the Show: Crafting the Ultimate Garlic Herb Infusion
The true soul of this dish lies in the compound butter spread. This vibrant, aromatic paste is what transforms simple bread into irresistible Garlic Butter Bread Buns .
You will need a full cup (two sticks) of very soft, unsalted butter room temperature is crucial here so it spreads easily without tearing the delicate dough.
Dry Goods and Dairy: Flour Ratios and Softening Butter Secrets
When handling the flour, remember to spoon and level it into your measuring cup rather than scooping directly; too much flour leads to dense rolls. For the butter element, ensure it is pliable enough to be whipped or stirred into the flavorings smoothly.
If your butter is too cold, it will resist incorporating the minced garlic and herbs properly, leading to uneven pockets of flavor.
What You'll Need: Essential Kitchen Gear Checklist
While this recipe is manageable without specialized equipment, a stand mixer fitted with a dough hook will certainly make your life easier during the kneading stage. Beyond that, a large mixing bowl for proofing, a 9x13 inch baking dish to house the rolls, and a sharp knife (or dental floss!) for clean slicing are your non-negotiables for success.
Prepping the Aromatic Paste: Roasting Garlic vs. Raw Intensity
For this particular Garlic Butter Dinner Rolls recipe , we lean toward raw, finely minced garlic. This delivers a sharp, pungent kick that stands up beautifully against the richness of the butter and cheese.
However, if you prefer a sweeter, mellow garlic undertone a different direction for your Garlic Butter For Bread Rolls —gently roasting a whole head of garlic until soft and then squeezing the cloves into the butter mixture is a wonderful alternative.
The Cheese Factor: Selecting the Right Parmesan Blend
Parmesan is not merely an afterthought here; it’s an essential textural and flavor component. Use freshly grated Parmesan for the best melt and sharpest flavor profile. We incorporate half a cup into the filling mixture, where it melts slightly during the bake, contributing pockets of salty richness throughout the soft dough.
The Dough Development Phase: From Shaggy Mass to Silky Smoothness

The process begins by proofing the yeast in the warm, sweetened milk until it blooms into a foamy cap a visual confirmation that your yeast is active and ready to work. Once combined with the flour, melted butter, and egg, the mixture forms a shaggy mass. This is where the dough hook earns its keep.
Mixing on low speed initially ensures everything is incorporated, followed by a dedicated 6 to 8 minutes on medium speed. The objective is elasticity; the dough should pull cleanly away from the sides of the bowl and feel smooth and resilient to the touch.
Related Recipes Worth Trying
- Easy 30Minute Dinner Rolls Buttery Soft in Under an Hour — Need quick homemade dinner rolls These easy 30 minute dinner rolls deliver maximum fluffiness with minimal rising time Perfect for any weeknight meal
- The Best Easy Texas Sheet Cake Recipe with Buttermilk Glaze — Need a showstopping dessert thats dead easy This classic Texas Sheet Cake recipe delivers a tender crumb and fudgy warm glaze Find out why its a crowd favourite
- The Best Classic Scottish Shortbread Recipe MeltInYourMouth — Learn how to master this simple shortbread cookie recipe using only three ingredients for a truly buttery crumbly biscuit perfect for your biscuit tin
Shaping and Second Rise: Preparing the Rolls for Their Golden Destiny
After the initial bulk fermentation allowing the dough to double in size in a warm environment it needs a gentle punch down to release the built-up gas. Turn the dough out and roll it into a large, manageable rectangle, approximately 12 by 18 inches.
This is where precision matters: spread exactly half of your prepared aromatic butter evenly over the dough, leaving a clean border along one long edge. Roll this rectangle tightly into a log, sealing the seam firmly. To ensure uniform, fluffy portions, use un-waxed dental floss to slice the log into 12 equal pieces.
Place these cut-side up into your prepared baking dish, leaving a finger's width between them to allow space for the final expansion.
Baking Mastery: Achieving That Irresistible, Laminated Crust
The final stretch requires attention to temperature and timing to ensure a perfect rise and that desirable golden exterior.
Activation Station: Waking Up Your Yeast Correctly
As mentioned, the initial temperature of the milk is vital. If the water is too cool, the yeast will be sluggish; too hot, and you will kill the microorganisms, resulting in dense, unrisen bread. Always verify your milk is in that sweet spot before adding the yeast.
Kneading Techniques for Maximum Tenderness
When kneading, the goal is developing gluten structure without overworking the dough to the point of toughness. A smooth, elastic dough that passes the "windowpane test" (where a small piece can be stretched thin enough to see light through it without tearing) indicates sufficient kneading for maximum tenderness in your final Garlic Butter Bread Rolls .
Folding in the Filling: Ensuring Even Distribution of Goodness
The decision to use only half the garlic butter mixture inside the roll is deliberate. This ensures the layers separate beautifully during the bake while still delivering substantial flavor.
If you were to use it all internally, the high fat content might inhibit the dough from rising as high, resulting in a flatter, oilier product. The remaining butter is the critical finishing glaze.
Temperature Tactics: The Perfect Oven Setting for Deep Color
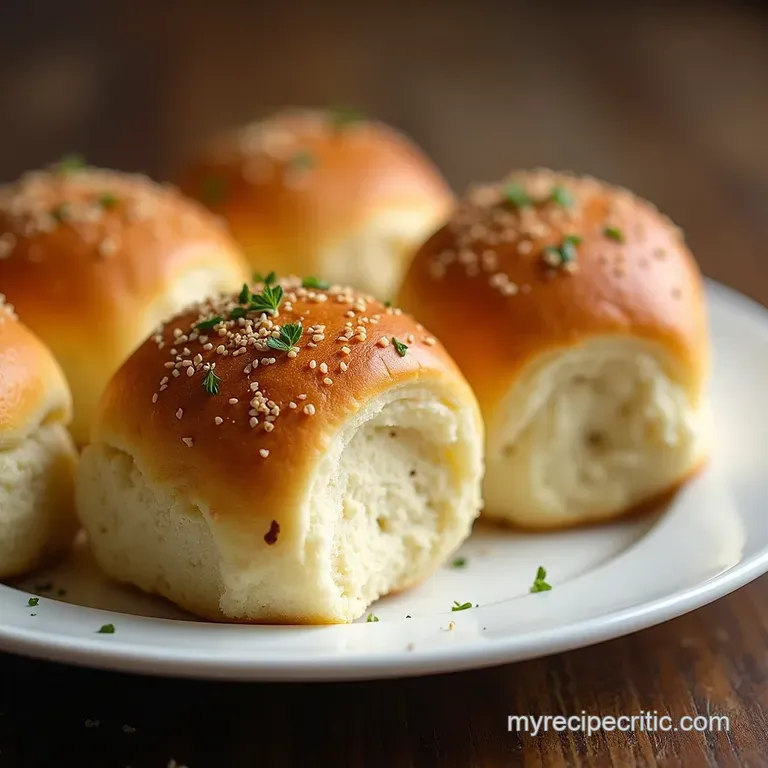
We preheat the oven to 375° F ( 190° C). This medium high heat is aggressive enough to encourage rapid oven spring that final burst of rising while giving the exterior a beautiful, deep golden brown color in approximately 18 to 22 minutes.
Monitor closely after the 15-minute mark to prevent scorching.
Elevating Your Experience: Creative Twists on Classic Garlic Butter Bread Rolls
While the classic recipe is perfection on its own, exploring variations can keep this favorite fresh. Think about adding texture or heat to your butter filling. A sprinkle of dried oregano alongside the parsley adds a beautiful Mediterranean note, or consider substituting some of the all-purpose flour with bread flour for an even chewier texture.
Post Bake Protocols: Storage, Reheating, and Keeping Them Fresh
Once these glorious rolls emerge from the oven, immediately brush them generously with the remaining reserved garlic butter while they are piping hot. This step locks in moisture and provides a vibrant surface flavor. Allow them to cool in the pan for about ten minutes before transferring them to a wire rack.
Variation Station: Adding Sun-Dried Tomatoes or Jalapeños
For a tangy and slightly savory twist, finely chop oil-packed sun-dried tomatoes and mix them directly into your soft butter component; they pair wonderfully with the Parmesan. If you prefer heat in your Garlic Butter Bread Rolls , thinly sliced pickled jalapeños, drained well, can be scattered over the dough before rolling up the log.
The Art of the Refresh: Reviving Stale Rolls to Glory
Even the best rolls will lose a bit of their initial fluffiness overnight. To revive them, wrap the rolls loosely in foil and place them in a 300° F ( 150° C) oven for about 8 to 10 minutes. The trapped steam softens the crumb beautifully.
For an extra layer of moisture, you can brush them lightly with a touch of olive oil before wrapping.
Pairing Perfection: What Meals Complement These Savory Bites?
These rolls are immensely versatile. They stand up perfectly to rich, meaty dishes like pulled pork or slow cooked pot roast, where their soft texture is ideal for sopping up juices.
Equally, they are a divine accompaniment to lighter fare, such as a creamy mushroom risotto or a robust lasagna, cutting through the richness with their herbaceous garlic notes.
Understanding Dough Hydration Levels for Future Bakes
As you gain confidence, pay attention to how the dough feels. Our recipe uses a moderate hydration level, resulting in a manageable dough. Higher hydration (more liquid relative to flour) yields a more open, airy crumb typical of ciabatta, while lower hydration results in denser, slightly sweeter textures.
Adjusting flour slightly based on your local climate’s humidity will become second nature as you bake more Easy Homemade Garlic Butter creations.
Recipe FAQs
Can I make these Garlic Butter Bread Rolls ahead of time? I want them fresh for a dinner party.
Absolutely! You can prep the dough the day before, let it rise once, then punch it down, shape the rolls, place them in the pan, cover tightly, and refrigerate overnight. Just let them sit on the counter for about 45 minutes before baking to take the chill off before putting them in the oven.
My dough isn't rising properly; what’s the usual culprit for this recipe?
If your dough is sluggish, the prime suspect is usually the milk temperature if it was too hot, it killed the yeast, and if it was too cold, the yeast is just snoozing. Make sure your milk is between 105°F and 115°F, like a nice, warm bath, and ensure your yeast packet isn't past its expiration date!
How should I store any leftover Garlic Butter Bread Rolls so they don't go hard as bricks?
These are best eaten the day of, much like a good scone, but you can store leftovers at room temperature in an airtight container for up to two days. To revive them, simply wrap them loosely in foil and pop them in a 350°F (175°C) oven for about 8 10 minutes they’ll be almost as good as new.
Is there a way to make these rolls without using fresh garlic? I’m afraid of garlic breath later!
If you’re worried about the sheer power of raw garlic, I highly recommend roasting the garlic cloves beforehand until they are soft and sweet; just mix those roasted cloves into your butter instead. This mellows the flavour considerably, turning it nutty and sweet, which is much less aggressive!
Can I freeze the Garlic Butter Bread Rolls before or after baking them?
Freezing before baking is the best bet: assemble the rolls in a freezer safe dish, cover them extremely well, and freeze. When ready to bake, remove the dish, let the rolls thaw and proof for a few hours in the fridge, then bake as directed. Baked rolls freeze okay, but the texture can sometimes suffer when reheated.
Garlic Butter Bread Rolls

