The Ultimate Brownbutter Banana Nut Loaf Moist Rich and Ready for Tea Time
Why This Brown Butter Loaf Redefines Classic Banana Nut Bread
Banana bread. The term conjures images of comforting kitchens and sweet, simple indulgence. But let’s be honest, many versions fall flat too dry, too dense, or simply lacking that oomph of deep flavour we truly crave.
This Banana Nut Bread Recipe is designed to eliminate those disappointments entirely. We are elevating the classic quick bread by infusing it with sophisticated, caramelised depth, transforming the ordinary into the truly extraordinary.
Forget everything you thought you knew about standard loaves; this is the Best Banana Nut Bread you will ever bake. It’s proof that a few small, strategic adjustments can yield monumental flavour results.
The Secret Weapon: Introducing Caramelized Depth into Your Baking
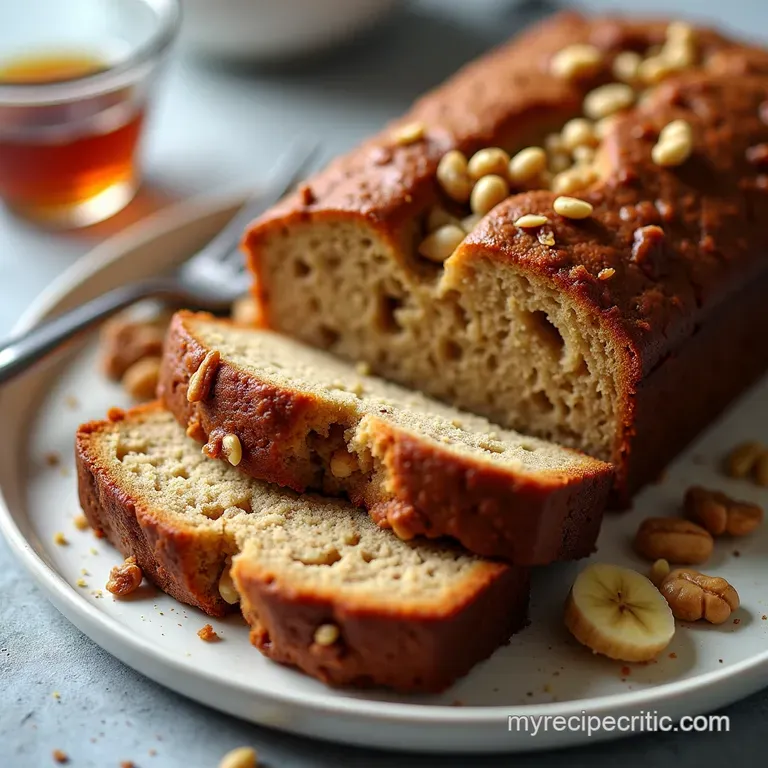
What truly sets this iteration apart from the competition is the browned butter. Melting standard butter and incorporating it into batter is fine, but heating the butter until the milk solids toast and turn a rich hazelnut brown that’s where the magic happens.
This technique transforms the fat into a carrier for complex, nutty, almost toffee like notes that marry perfectly with the sweetness of overripe bananas. It’s an easy step, yet it guarantees a superior flavour profile in every slice of this Homemade Banana Nut Bread .
Beyond Basic: Achieving Unrivaled Moisture Levels
Moisture is the holy grail of quick breads. Too little, and you might as well be eating cake that’s forgotten its sugar. We achieve unparalleled moisture through a trifecta: extremely ripe fruit, the addition of a full stick plus two tablespoons of browned butter, and a small boost from dairy specifically, ¼ cup of sour cream or full fat Greek yogurt.
This slight acidity tenderizes the crumb while keeping the interior gorgeously soft, ensuring this qualifies as a truly Moist Banana Bread Recipe .
A Warm Welcome to Your New Favorite Loaf
If you've been searching for that perfect, foolproof bake, welcome home. This Easy Banana Bread Recipe is surprisingly approachable, relying on the simple muffin method (wet into dry) which cuts down on preparation time significantly.
With just 20 minutes of prep, you can have this Banana Nut Bread with Walnuts baking away, filling your home with an aroma that is utterly irresistible.
Setting the Stage: What Makes This Recipe Stand Out
This specific loaf balances robust flavour with a fantastic texture. We utilize both granulated white sugar for structure and light brown sugar for added moisture and that familiar molasses hint.
When paired with toasted walnuts (or pecans, if you prefer!), the resulting bread has a satisfying textural contrast a tender, tight crumb punctuated by crunchy nuts. This attention to detail is why this loaf transitions seamlessly from a casual breakfast staple to a delightful accompaniment for afternoon tea.
Assembling the Essential Components for Rich Flavor

Baking is chemistry, but delicious baking is also about quality components. While this recipe simplifies the technique, choosing superior ingredients is paramount to achieving the intended richness. Remember, the goal is intense banana flavour complemented by rich, toasted nuttiness.
Sourcing Superior Ingredients for Your Banana Nut Bread
To begin, you will need standard pantry staples, but the way you treat the key flavour agents the butter and the bananas makes all the difference. For this recipe, we’ll be working with 140g (1 stick plus 2 tablespoons) of unsalted butter, two large room temperature eggs, 1 ¾ cups of all-purpose flour, and the crucial 1 ½ cups of mashed, overripe bananas (about 3 to 4 large ones).
The sugar content is a balanced ¾ cup of granulated sugar and ¼ cup of packed light brown sugar to maximize both sweetness and moisture retention.
The Dairy Dynamo: Mastering Brown Butter Technique
The technique of browning butter is essential for creating the Best Banana Nut Bread . Melt the 140g of butter gently over medium heat. As it melts, it will foam.
Keep swirling the pan; the foam will subside, and you will start to see little brown specks form at the bottom these are the milk solids caramelizing. Once the butter smells deeply nutty and turns amber brown (but crucially, before it turns black and burns!), immediately remove it from the heat and pour it into your mixing bowl to halt the cooking process.
This step alone is what moves your loaf from good to gourmet.
The Perfect Produce Pairing: Choosing Ripe Bananas
There is no substitute for truly ripe bananas here. The bananas should be heavily speckled, nearly black, and very soft to the touch. This softness ensures they mash easily into a liquid like consistency, which integrates seamlessly into the batter, delivering maximum sweetness and moisture.
If your bananas are merely yellow, the flavour will be weak, and your final bread may turn out slightly drier.
Tools of the Trade: Essential Baking Gear Checklist
While complex baking often demands specialized equipment, this Banana Nut Bread keeps things simple. You will need a standard 9x5 inch loaf pan, ideally one you grease and flour well or line with a parchment paper sling for effortless removal later.
A medium saucepan for the butter, two mixing bowls (a large one for the wet ingredients), a sturdy whisk, and a flexible rubber spatula for careful folding are all that is required to successfully execute this bake.
Balancing Sweetness and Crunch: Nuts and Sugars Defined
For the nuts, 1 cup of chopped walnuts or pecans works perfectly. Crucially, toast them lightly in a dry skillet before adding them to the batter. Toasting unlocks their essential oils, deepening their flavour profile to match the brown butter.
Combine the sugars white for structure, brown for inherent moisture and mix these thoroughly with the dry flour, cinnamon (½ tsp), baking soda (1 tsp), and salt (½ tsp).
Related Recipes Worth Trying
- The Ultimate Sticky Toffee Banana Loaf Recipe — Forget dry loaves This easy banana bread recipe uses sour cream for a supremely moist crumb with subtle sticky toffee notes Perfect for Sunday baking
- Velvety 30Minute Creamy Chicken Fettuccine Alfredo — This easy Fettuccine Alfredo recipe guarantees a thick restaurantquality sauce without the fuss Learn the secret to incredible Creamy Chicken Fettuccine...
- 15Minute Cucumber Strawberry Salad with Lime Vinaigrette — Meet your new favourite Light Summer Salad Recipe This Cucumber Strawberry Salad uses a bright lime dressing that makes it utterly smashing for BBQs Easy prep
Step-by-step Guide to Baking the Ultimate Loaf
Once your ingredients are measured and your technique understood, the assembly is swift and satisfying. We are aiming for minimal mixing to ensure that tender crumb we are striving for.
Phase One: Creaming and Browning the Fats
Begin by preheating your oven to 350° F ( 175° C) and preparing your loaf pan. While the oven warms, execute the butter browning process as described above, transferring the hot, fragrant fat to a large bowl.
Allow it to cool for about 5 minutes so it doesn't scramble the eggs later. Next, mash your ripe bananas well a few small lumps are acceptable if you enjoy texture.
Whisk the two room temperature eggs into the slightly cooled brown butter, followed by the sour cream (or yogurt) and 1 teaspoon of vanilla extract. Mix until homogenous; this is your core wet mixture.
Gently Integrating Wet and Dry Elements
In your secondary bowl, thoroughly whisk together all the dry components: flour, both sugars, cinnamon, baking soda, and salt. Now, pour the entire wet mixture into the dry mixture. Using your rubber spatula, gently fold them together. The key here is restraint.
Stop mixing the moment you see no large streaks of dry flour remaining. A few small pockets of flour are preferable to over mixing, which leads to gluten development and toughness. Finally, fold in about two-thirds of your toasted nuts.
The Oven Dance: Optimal Baking Time and Temperature
Pour the batter into your prepared loaf pan and smooth the top gently. Sprinkle the remaining toasted nuts over the surface for a beautiful finish. Slide the pan into the preheated 350° F oven. The baking time typically spans 55 to 65 minutes.
Resist the urge to open the oven door prematurely, as a rush of cool air can cause your beautiful loaf to sink in the centre.
Cooling Correctly for That Perfect Crumb
When you suspect the Banana Nut Bread is nearing completion, perform the skewer test: insert a thin wooden skewer into the centre. If it comes out clean or with only a few dry crumbs attached, it’s ready.
If wet batter clings to it, return it to the oven for five more minutes and test again. Allow the loaf to rest in the pan for 15 minutes before carefully turning it out onto a wire rack.
This initial cooling period allows the structure to firm up before the final, complete cooling, which is crucial for clean slicing.
Troubleshooting and Enhancing Your Baking Success
Even the most straightforward recipes can encounter hiccups. Knowing how to adjust mid-bake or how to innovate post bake will ensure every attempt at this loaf is a triumph.
Fantastic Flavor Twists and Mix-In Suggestions
This Banana Nut Bread is wonderful on its own, but it’s also an incredible base for experimentation. For a spiced autumn note, add ¼ teaspoon of ground nutmeg and a pinch of cloves along with the cinnamon.
If chocolate calls to you, swap out half the nuts for ¾ cup of high-quality dark chocolate chips. For a slightly lighter texture, you can substitute the sour cream with an equal amount of unsweetened applesauce, which maintains moisture while reducing fat content slightly, offering a route toward a Healthy Banana Nut Bread .
Determining Doneness: Foolproof Doneness Checks
If you notice the top browning aggressively around the 40-minute mark, a simple piece of aluminium foil tented loosely over the loaf will shield the surface, allowing the interior to cook through without burning the crust. Always trust the skewer test over the clock, especially in different ovens.
If the skewer comes out sticky, it needs more time; if it’s totally dry, it may be slightly overdone, but still salvageable!
Storage Secrets: Keeping the Loaf Fresh for Days
To maintain that incredible moisture, never slice into the loaf until it has cooled completely on the wire rack. Once cool, wrap the loaf tightly in plastic wrap, followed by a layer of aluminium foil, or place it in an airtight container.
Stored at room temperature, this loaf will remain remarkably moist and delicious for up to four days. For longer storage, slices freeze beautifully just wrap them individually first.
Nutritional Snapshot and Serving Suggestions
While this is a treat, the inclusion of whole fruit and whole nuts lends it some nutritional substance. On average, a slice contains around 300 330 calories, largely derived from healthy fats contributed by the browned butter and nuts, alongside complex carbohydrates.
For serving, nothing beats a thick slice spread with salted butter while still slightly warm. Alternatively, a light drizzle of a simple powdered sugar glaze adds a touch of bakery elegance, making this perfect for serving alongside your morning coffee.
Recipe FAQs
Why is my Banana Nut Bread always a bit dry, even when I thought I followed the recipe?
Ah, the dreaded dry loaf! For Banana Nut Bread, the culprit is almost always overmixing or under ripe bananas. Make sure your bananas are practically black the spottier, the better for moisture. Also, stop stirring the moment the flour disappears; mixing too much develops gluten, leading to a tough, dry texture.
A few lumps are a sign you’re doing it right!
Can I make this without browning the butter? I’m short on time.
You certainly can, but honestly, you’ll be missing the best bit! Browning the butter gives the loaf that deep, nutty, caramel undertone that elevates it from standard banana bread to "The Ultimate Loaf." If you’re pressed for time, just melt the butter until fully liquid, but for the best results, give the browning a go it only adds about three extra minutes!
How should I store my Banana Nut Bread to keep it fresh for the week?
This loaf actually improves after the first day! Once completely cool, wrap the loaf tightly in plastic wrap, and then place it in an airtight container or a zip-top bag. Kept at room temperature, it should stay perfectly moist for 3 to 4 days.
You can also freeze slices; just wrap them individually, and they’ll be good for up to three months.
My loaf looked done, but the centre was still gooey. What’s the trick to getting the centre baked?
That’s a classic baking bind! The outside sets before the centre catches up, especially with such a moist recipe. If the top is getting too dark around the 40-minute mark, loosely tent a piece of aluminium foil over the top.
This shields the crust from direct heat, allowing the centre to bake through gently without burning the top. Always test with a skewer right in the middle!
Can I swap out the walnuts for a different nut or add something extra?
Absolutely! Pecans are a cracking substitute for walnuts; they offer a slightly sweeter, richer flavour profile. If you want to mix things up even more, feel free to use half nuts and half dark chocolate chips for a delightful treat.
Just remember, the recipe suggests toasting the nuts first, which really deepens their flavour, so don’t skip that step!
Brownbutter Banana Nut Loaf

