The Ultimate Autumn Apple Crisp Bars Crumbly Base Tangy Filling Toasty Top
- The Definitive Guide to Perfect Autumn Apple Crisp Bars
- Why This Bar Format Triumphs Over Traditional Crumbles
- Curating Your Crisp Components: A Detailed Shopping List
- Mastering the Flour-to-Butter Ratio for Optimal Texture
- Step-by-Step Journey: From Raw Ingredients to Baked Perfection
- Achieving the Golden Brown Topping Without Burning
- Elevating Your Apple Crisp Bars: Tips, Tricks, and Variations
- Recipe FAQs
- 📝 Recipe Card
The Definitive Guide to Perfect Autumn Apple Crisp Bars
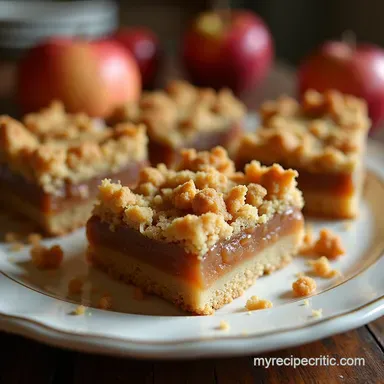
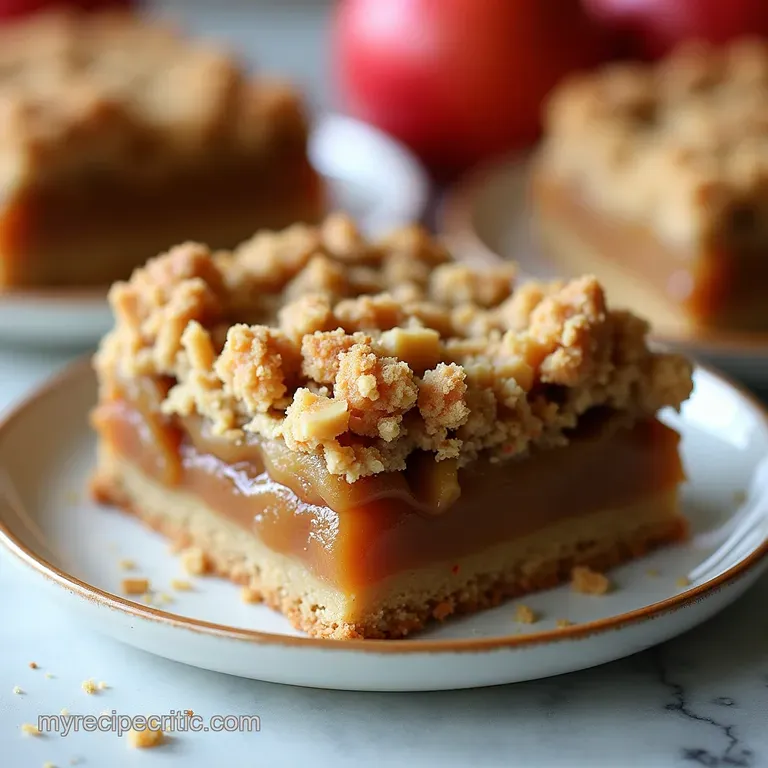
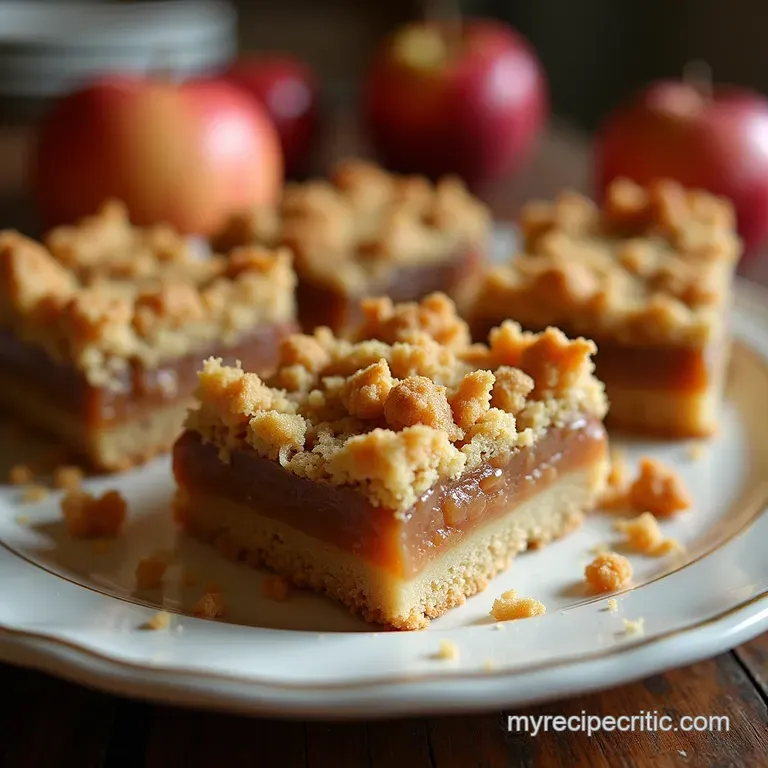
These Apple Crisp Bars capture the very essence of fall baking in a marvellously tidy format. Forget fiddly lattice work; we’re layering a buttery, slightly salty shortbread base, topping it with tender, spiced apples (we’ll use a good mix of sharp and sweet), and crowning it all with a crunchy, oat-laden crisp topping.
They are the perfect intersection of pie and crumble ideal for lunchboxes, picnics, or simply enjoying with a proper cuppa. This recipe lands squarely in the "Easy" difficulty bracket, relying on simple mixing techniques where the biggest challenge is simply pressing the base evenly, which is far more forgiving than rolling out traditional pastry.
Expect about 30 minutes of active preparation, roughly 45 to 50 minutes in the oven, and then the crucial waiting game of cooling. When finished, this recipe yields 16 substantial Apple Crisp Squares baked perfectly in a standard apple crisp bars 9x13 pan.
Why This Bar Format Triumphs Over Traditional Crumbles
The shift from a bowl served crumble to a structured bar brings immense practical advantages without sacrificing any of that comforting warmth. We gain portability, a guaranteed ratio of crust to filling in every bite, and a clean presentation that makes them excellent Fall Food Bars For Parties .
Capturing Peak Cinnamon Warmth in a Portable Treat
The aromatic quality of a traditional apple crumble is legendary, but transporting it can be messy. By incorporating the signature spices generous cinnamon with a whisper of nutmeg directly into both the base and the filling, we ensure that the flavour profile is locked in.
When sliced, each bar delivers that essential hit of autumnal spice, making them a satisfying dessert, even without the addition of a scoop of melting ice cream.
The Beauty of the Buttery, Slightly Salty Foundation
What truly sets these apart from a standard oat topping is the foundational layer. We aren't just sprinkling oats on top; we create a rich, shortbread like base using cold butter cut into the dry ingredients. This base bakes up firm enough to hold the juicy filling but remains tender.
Importantly, incorporating salt into this foundation ½ teaspoon for the entire crumble mix balances the sweetness of the apples and brown sugar beautifully, elevating the overall taste profile.
More Than Just Dessert: Your Go-To Cozy Baking Project
Because these Apple Crisp Bars with oats are so straightforward, they become an ideal baking project for a crisp afternoon. With only about 30 minutes of active work, the bulk of the time is hands off baking and cooling.
This makes them perfect for fitting into a busy schedule; you can prep them in the afternoon and have them ready for an evening treat or packed up for the next day.
Curating Your Crisp Components: A Detailed Shopping List
To achieve the ideal texture and flavour balance, selecting the right components is key. For the crumble mix, you'll need 2 ¼ cups (280g) of All-Purpose Flour and 1 ½ cups (140g) of Old-Fashioned Rolled Oats instant oats will result in a pasty, rather than crisp, texture.
The sugars required are 1 cup of packed Light Brown Sugar and ½ cup of Granulated White Sugar for both the topping and base. The flavour anchors are 1 ½ teaspoons of Ground Cinnamon and ¼ teaspoon of Ground Nutmeg, complemented by ½ teaspoon of salt.
The binding agent must be 1 cup (two sticks or 225g) of Unsalted Butter, kept very cold and cubed.
For the filling, the magic relies on 6 cups (about 1kg) of firm baking apples, ideally a mix for complexity think tart Granny Smiths balanced with sweeter Honeycrisp. These require ¼ cup (50g) of white sugar, 1 tablespoon of fresh Lemon Juice to prevent browning and add brightness, 2 tablespoons of All-Purpose Flour to manage the inevitable apple juices, 1 teaspoon of Ground Cinnamon, and just a tiny pinch of salt.
Related Recipes Worth Trying
- The Best Apple Crisp with Oatmeal Recipe Ultimate Crunch — Forget fiddly pastry This Easy Apple Crisp Recipe with Oatmeal topping is pure comfort Golden buttery and bubblingyour new favourite homemade apple dessert
- The Ultimate Peanut Butter Lunch Lady Bars Recipe Easy Comfort Baking — Relive your school days with these authentic Peanut Butter Lunch Lady Bars Rich shortbread creamy filling and chocolate top Easy Peanut Butter Cookie Bars...
- MakeAhead Dinners SlowCooked Lamb Ragu Crispy Polenta — Transform your weeknights with this genius MakeAhead Dinners recipe Rich lamb ragu and sliceable polenta squaresperfect for freezing Get the flavour of...
Mastering the Flour-to-Butter Ratio for Optimal Texture
The success of both the base and the topping hinges on the ratio of dry goods to cold butter. We use a large quantity of flour and oats relative to the butter. This ensures that when the butter melts during baking, it coats the dry particles, creating distinct crumbs rather than merging into a heavy dough.
If you use softened butter, you risk overworking the mixture and activating too much gluten, leading to a tough, cakey bar instead of a satisfying crumble.
Selecting the Ideal Duo of Apples for Tang and Sweetness
While you can certainly use one type of apple, using a duo guarantees depth. A single, purely sweet apple (like Fuji) can turn overly mushy and flat. A purely tart apple (like Granny Smith) can be overwhelming.
By combining a tart variety with a sweeter, firmer one, you achieve a filling that remains slightly chunky, intensely flavourful, and perfectly balanced after baking. Peel, core, and dice these apples into uniform ½-inch pieces for even cooking.
Essential Spices and Flavor Boosters for Depth
While cinnamon is the star, the ¼ teaspoon of nutmeg we incorporate into the crumble mix is vital; it adds an earthy background note that rounds out the flavour. On top of that,, the fresh lemon juice mixed with the apples is essential; it doesn't just brighten the apple’s natural flavour, it also helps the thickening flour do its job by keeping the apples slightly acidic.
The Necessary Equipment for Flawless Apple Crisp Bars Assembly
You will need a standard 9x13 inch baking pan. The absolute most critical piece of equipment is quality parchment paper. Line the pan generously, ensuring you leave an overhang on the two long sides.
This parchment sling will allow you to lift the entire cooled bar structure out of the pan for clean, perfect cuts later on a true game changer for bar cookies. A pastry blender is helpful for incorporating the cold butter, though your fingertips work perfectly well if you move quickly to avoid warming the butter too much.
Step-by-step Journey: From Raw Ingredients to Baked Perfection
The process begins by setting your oven to 375° F ( 190° C) and preparing that parchment lined 9x13 pan. Next, focus on the crumble mix. Whisk together the flour, oats, both sugars, cinnamon, nutmeg, and salt in a large bowl.
Now, using your chosen method, cut in the cold, cubed butter until the mixture resembles coarse crumbs. Crucially, set aside about 1 ½ cups of this mixture to use as your eventual topping. The remaining, larger portion becomes the base. Press this base firmly and evenly into the bottom of your prepared pan.
While the base is being set, toss your diced apples with the filling ingredients sugar, lemon juice, flour, cinnamon, and a pinch of salt until every piece is lightly coated. Spread this apple mixture uniformly over the compressed base layer.
Finally, take the reserved crumble mixture and scatter it generously and evenly over the apples; do not press this topping down at all, as you want it to remain loose and airy.
Achieving the Golden Brown Topping Without Burning
The baking process requires careful monitoring to ensure the base sets, the apples soften, and the topping achieves a perfect golden hue.
Prepping the Shortbread Base: Pressing and Pre-Baking Secrets
The base must be compressed firmly. Use the bottom of a measuring cup or a flat glass to press the mixture tightly against the bottom of the pan. While some recipes call for pre-baking the base, we skip this step here.
Since the base is heavily reliant on the cold butter to create that crumbly texture, baking it alongside the wet filling helps steam the butter slightly, resulting in a softer, slightly moister shortbread that complements the apples beautifully, rather than drying it out entirely.
Building the Apple Layer: Juiciness Without Soggy Results
The key to avoiding a watery mess lies in the 2 tablespoons of flour added to the apple mixture. This flour absorbs the liquid released by the apples as they cook, creating a thick, jammy consistency rather than a thin syrup that might soak into the crust.
Distributing this layer evenly ensures every slice gets the perfect amount of fruit filling.
Creating the Iconic Crisp Topping: Oats, Butter, and Brown Sugar Harmony
When scattering the reserved topping, aim for even coverage but avoid clumping. The combination of brown sugar and oats is what creates that signature crisp texture. As it bakes, the brown sugar melts slightly around the oats, binding them just enough to form clusters, but leaving plenty of surface area exposed to toast up into a beautiful, crunchy crown.
The Crucial Waiting Game: Allowing the Bars to Set Firmly
This is arguably the most important instruction for achieving clean Apple Crisp Bars : they must cool completely. Baking time is approximately 45– 50 minutes at 375° F ( 190° C), evidenced by bubbling filling and a golden brown top.
Immediately transfer the pan to a wire rack. Resist the urge to cut for at least 2 hours at room temperature, or ideally, 3– 4 hours.
Chilling them speeds this process up significantly, ensuring the sticky filling has fully gelled and the crust holds its shape when sliced.
Elevating Your Apple Crisp Bars: Tips, Tricks, and Variations
These Apple Crisp Bars recipe foundations are incredibly versatile. Don’t be afraid to experiment once you have mastered the basic technique.
Flavor Twists: Introducing Nuts or Caramel Drizzles
For an added layer of texture and richness, consider adding ½ cup of chopped pecans or walnuts directly into the crumble mixture before scattering it over the apples. If you prefer an indulgent finish, once the bars are completely cooled, use the parchment sling to lift them out and drizzle generously with a high-quality salted caramel sauce.
This transformation turns a humble bake into something truly spectacular.
Troubleshooting Common Crisp Bar Issues
If your topping looks burnt but the filling is still liquid, reduce the oven temperature slightly and cover the top loosely with foil for the last 10 minutes of baking.
If your base seems underbaked or soggy, it’s usually because the base wasn't pressed firmly enough, or you cut into them while they were still warm. Remember, pressing firmly and cooling completely are your two defensive strategies against sogginess!
Optimal Cooling and Cutting Techniques for Clean Slices
Once fully cooled, use the parchment overhangs as handles to gently lift the entire block of Apple Crisp Bars onto a cutting board. Using a large, sharp chef's knife, wipe the blade clean between cuts.
For the cleanest possible results, chill the bars for an extra hour after they have reached room temperature to firm up the filling one last time before slicing into those perfect 16 squares.
Making Ahead: Can These Delightful Apple Crisp Bars Be Frozen?
Absolutely. These apple crisp bars healthy texture remains fantastic even after freezing. Once completely cool and sliced, arrange the individual bars in a single layer inside an airtight, freezer safe container, separated by sheets of wax or parchment paper.
They will keep beautifully for up to three months. Thaw them overnight in the refrigerator or let them sit on the counter for an hour before enjoying.
Recipe FAQs
What is the secret to making sure my Apple Crisp Bars don't turn out soggy on the bottom?
The key is twofold: first, ensure your butter for the base is very cold, as this creates pockets of steam that keep the base from compacting too much. Secondly, don't skimp on baking time the base needs that initial dry heat, and you must let them cool completely, as the juices continue to set up as they chill.
Can I make these Apple Crisp Bars ahead of time, or do they go off quickly?
These are excellent make-ahead treats! Once fully cooled, they store beautifully in an airtight container at room temperature for up to three days. If you want them to last longer, pop them in the fridge for up to a week just bring them back to room temperature briefly before serving for the best texture.
My apples aren't very sweet; should I change the sugar in the filling when making Apple Crisp Bars?
Absolutely! If you are using tart apples like pure Granny Smiths, you might want to increase the ¼ cup of sugar in the filling by another tablespoon or two. Conversely, if you use naturally sweet apples like Fuji, you can reduce it slightly. Always taste a small piece of raw apple first to gauge!
I don't have rolled oats; what can I use instead in the crumble topping?
If you’re fresh out of oats, you can substitute them with an equal amount of finely chopped nuts, such as pecans or almonds, for crunch. Alternatively, you can use extra flour mixed with a touch more sugar and butter, but be warned you'll lose that signature hearty texture that makes it a true crisp!
Why is the cooling time for these bars so long, and can I skip it?
That cooling time is non-negotiable if you want neat slices! While warm, the butter is soft and the apple syrup is runny, meaning slicing results in a mess, not a bar. Give them at least three hours at room temperature or better yet, chill them for an hour so they hold their shape like a proper traybake.
Apple Crisp Bars