The Proper Sunday Roast Slowcooked Tender Corned Beef
- Why This Corned Beef Recipe Will Be Your New Holiday Staple
- Achieving Ultimate Melt-In-Your-Mouth Succulence
- Sourcing the Best Components for Your Feast
- Phase One: Preparing the Beef for Immersion
- The Low-and-Slow Technique for Tender Results
- Finalizing the Dish: Resting and Presentation
- Elevating Your Meal: Recommended Accompaniments
- Storage Solutions for Leftover Corned Beef
- Frequently Asked Questions
- 📝 Recipe Card
Why This Corned Beef Recipe Will Be Your New Holiday Staple
Forget those rubbery slices you get at the deli counter. This recipe delivers a show stopping corned beef joint, slowly cooked until it’s fall apart tender, infused with traditional pickling spices and a lovely sweet glaze (optional, but highly recommended!).
It’s the heart of any great Irish American meal, promising deep, savoury flavour with a hint of warm spice. It’s traditional comfort food, elevated. This process, whether you opt for the Corned Beef Recipes Slow Cooker approach or the classic oven braise, guarantees a melt-in-your mouth experience that redefines what a Sunday roast can be.
Achieving Ultimate Melt-In-Your Mouth Succulence
The magic of transforming a dense brisket into a truly Tender Corned Beef Recipe lies entirely in the technique specifically, the application of low, consistent heat over many hours.
We are breaking down tough connective tissue, allowing the muscle fibres to relax and absorb the rich, spiced cooking medium. This careful method is adaptable across various appliances, ensuring excellent results whether you are mastering Corned Beef Recipes Stove Top or using modern conveniences.
The Secret to Flavour Penetration Before Cooking
Before any heat is applied, proper preparation sets the stage. While we use a store-bought, pre-brined brisket (which saves days of labour involved in a Corned Beef Recipe From Scratch ), we must address the exterior saltiness.
Start by rinsing the 3.5 to 4 lb corned beef brisket thoroughly under cold water. This removes the surface brine residue. Next, we build a flavour bed: roughly chopped yellow onion and smashed garlic cloves go into the cooking vessel first. This provides an aromatic base that gently steams into the meat as it cooks.
Setting Expectations: The Payoff of Patience
This isn't a quick weeknight meal; this is a commitment to deep flavour. With a prep time of about 25 minutes, the bulk of the work involves waiting. Cooking times range from 4 to 6 hours, depending on your chosen method.
This extended cooking period is vital; rushing it results in chewy meat. Embrace the aroma filling your kitchen; it is the scent of success promising a richly flavoured main course.
Is This The Best St. Patrick's Day Corned Beef Recipe?
Absolutely. By controlling the spices using our own blend of allspice berries, whole cloves, and peppercorns alongside brown sugar and vinegar in the cooking liquid we achieve a depth of flavour that surpasses simpler preparations.
On top of that,, the optional sweet and tangy glaze introduced at the very end adds a beautiful, savoury sweet crust that makes this preparation truly stand out for any celebration.
Sourcing the Best Components for Your Feast
Selecting the right ingredients ensures success, especially when dealing with a large, fatty joint like brisket. We are aiming for a balanced result that contrasts the meat's inherent saltiness.
Selecting the Right Cut of Brined Beef
For this recipe, a 3.5 to 4 lb flat cut brisket is ideal. The flat cut tends to be leaner and slices more neatly, which is perfect for serving alongside vegetables or piling onto rye bread.
If you prefer a richer, fattier result that shreds beautifully, the point cut can also be used, though it requires careful trimming if you don’t enjoy a high fat content.
Building the Aromatic Simmering Liquid
The liquid is where the primary flavour infusion occurs. We use 6 cups of water or beef broth, balanced immediately with 1/2 cup of packed brown sugar to counteract the salt cure. A quarter cup of apple cider vinegar aids in tenderising the meat structure.
This mixture is then fortified with the essential pickling spices: a tablespoon of whole black peppercorns, one teaspoon of allspice berries, a half teaspoon of whole cloves, and three large bay leaves.
Crafting the Optional Sweet & Tangy Finishing Glaze
While the meat is sublime without it, the glaze elevates this dish significantly. This sticky coating uses Dijon mustard for sharpness, 1/2 cup of dark brown sugar and 2 tablespoons of maple syrup for robust sweetness, and, critically, 1/2 cup of the concentrated cooking liquid reserved from the pot.
Simmering these together creates a perfect, lacquer like finish.
Phase One: Preparing the Beef for Immersion
The first active step is preparing the meat itself. After rinsing the corned beef joint well, pat it dry. Place the brisket fat-side up over the chopped onion and smashed garlic in your cooking vessel. This positioning ensures the fat bastes the meat as it cooks.
Pour the spiced liquid mixture over the beef, ensuring it is at least two-thirds submerged. If using an oven or stove top method, you may need to add a little extra water midway through the process to keep the meat adequately covered.
Related Recipes Worth Trying
- The Best Chewy Cowboy Cookies Recipe With Coconut Pecans — Craving a seriously satisfying bake This homemade Cowboy Cookies recipe delivers robust texture thanks to oats chocolate and nuts Find out why chilling the...
- The Velvet Mug Truly Decadent Homemade Hot Chocolate Recipe — Ditch the powder This easy homemade hot chocolate recipe uses real chocolate for a luxurious thick texture that feels like a warm hug Get the foolproof...
- CloudLike Mini German Pancakes Foolproof Muffin Tin Recipe — Tired of floppy pancakes This easy Mini German Pancakes recipe bakes up perfectly puffed custardy clouds in a muffin tin A dazzling breakfast ready in 35 mins
The Low-and-Slow Technique for Tender Results
Achieving that melt-in-your mouth texture requires patience, which is why methods like How To Cook Corn Beef And Cabbage In A Crockpot are so popular. Whether you choose the oven at 300° F ( 150° C) or the Crockpot on Low for 8 to 10 hours, the principle remains the same: gentle heat applied consistently over many hours.
This low-and-slow cooking approach ensures that the collagen breaks down completely into gelatin, resulting in an exceptionally moist and tender product. If you are using the Corned Beef Recipes Instant Pot , you can significantly reduce the cooking time, typically requiring about 70 to 90 minutes under high pressure, followed by a natural pressure release.
Finalizing the Dish: Resting and Presentation
Once the beef feels truly yielding, perhaps when a fork slides into it with almost no resistance, it’s time to finish the process.
Initial Searing vs. Direct Simmering Debate
In this slow cooked scenario, initial searing is usually unnecessary because the beef spends its entire life immersed in liquid; searing would merely toughen the exterior. We focus instead on the final glazing step for texture.
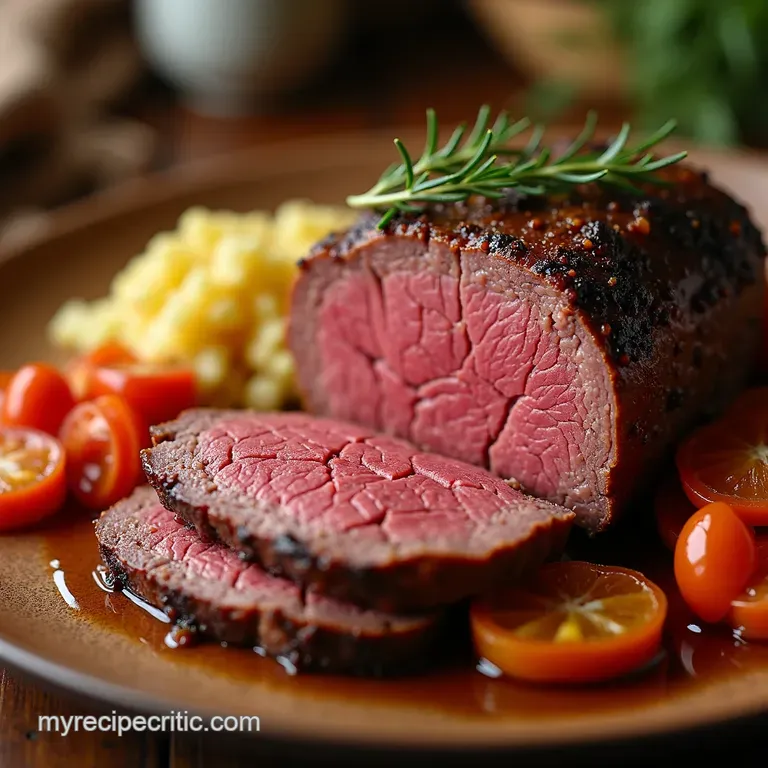
After removing the meat, let it rest, tented loosely with foil, for a minimum of 20 minutes.
Monitoring Internal Temperature Milestones
While texture is the best indicator, a meat thermometer can confirm perfection. For corned beef, you are aiming for an internal temperature around 200° F to 205° F ( 93° C to 96° C).
This is well past standard "safe" temperatures because we are deliberately cooking it to break down connective tissue, not just to kill bacteria.
How Long to Braise for Maximum Tenderness
For a standard 4 lb joint cooked at 300° F in the oven, budget approximately 4.5 to 5 hours. In a Crockpot, expect 8 to 10 hours on Low. The goal isn't a precise clock time but achieving that yielding, fork tender state.
The Critical Resting Period: Do Not Skip This Step
Allowing the meat to rest is non-negotiable. Just like any prime rib or roast, resting permits the internal juices, which were driven to the centre by the heat, to redistribute throughout the muscle fibres.
If you slice immediately, all that moisture will flood your cutting board, leaving you with a drier slice of Corned Beef Recipe .
Elevating Your Meal: Recommended Accompaniments
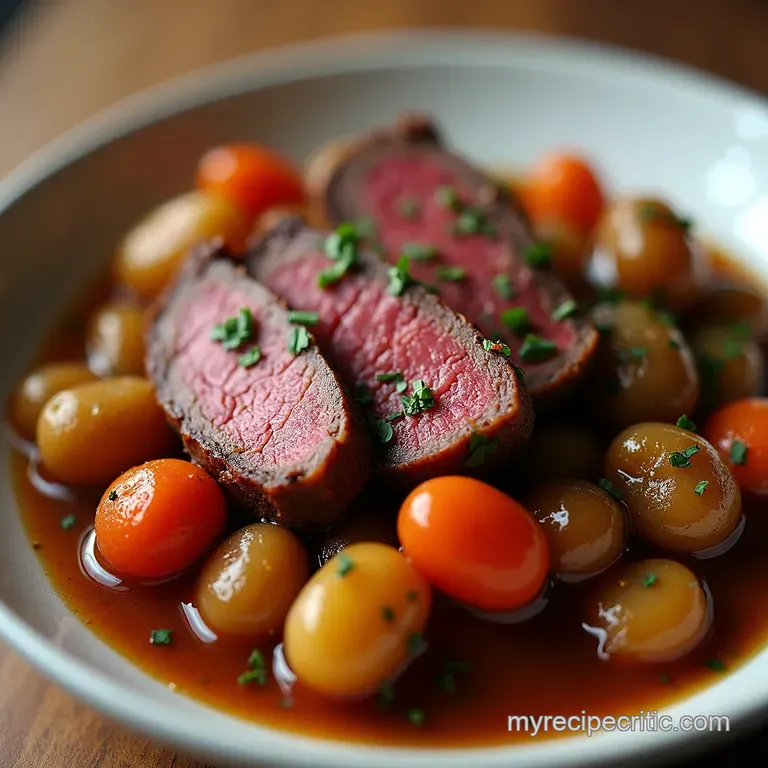
While the beef is resting, this is the perfect time to prepare the cabbage and root vegetables typically carrots and potatoes by simmering them gently in the remaining spiced cooking liquid. The vegetables soak up the flavour beautifully.
The classic trio tender beef, boiled root vegetables, and steamed cabbage is elevated when served with a side of whole grain mustard or horseradish cream.
Storage Solutions for Leftover Corned Beef
Fortunately, corned beef is one of the best leftovers in the culinary world. The cooked meat stores wonderfully in the refrigerator for up to four days, submerged slightly in its own cooking liquid to retain moisture.
Perfecting the Cabbage and Root Vegetable Timing
When planning your meal, the vegetables should be added only for the last hour or hour and a half of cooking, depending on their size. If you add potatoes and carrots at the beginning, they will likely disintegrate into mush by the time the brisket is ready.
Ensure they are fully submerged in the cooking liquor for maximum absorption of flavour.
Transforming Leftovers into Reubens and Hash
The true joy of making a large batch is the next day potential. Thinly sliced leftover corned beef is the essential component for an authentic Reuben sandwich, layered with Swiss cheese, sauerkraut, and Russian dressing on grilled rye bread.
Alternatively, dice the leftover meat and fry it with potatoes and onions for a hearty, savoury breakfast hash.
Nutritional Snapshot of This Hearty Meal
This meal is deeply satisfying, providing an excellent source of protein. While the sodium content is inherently high due to the brining process of the beef itself, you can mitigate this slightly by carefully trimming any large pieces of exterior fat.
Served with plenty of boiled vegetables, it becomes a robustly balanced, comforting meal perfect for feeding a crowd.
Frequently Asked Questions
Why is my finished Corned Beef Recipe tough or dry, even though I cooked it for ages?
This is usually down to slicing incorrectly or not letting the joint rest the cardinal sins of brisket cooking! Always slice your corned beef against the grain, following the direction the muscle fibres are running, as this shortens them, making every bite tender.
Also, ensure you rest the meat for at least 20 minutes after cooking before attempting to carve it.
Do I really need to rinse the corned beef before cooking? It smells fine!
Yes, absolutely! That salty, slightly metallic flavour comes from the curing brine, and while it’s traditional, too much will ruin your dinner. Giving the brisket a good, thorough rinse under cold running water before it hits the pot washes away the excess surface saltiness.
It keeps your final product savoury, not purely salty.
How can I make sure my Corned Beef Recipe is suitable for a less salty diet?
Since corned beef is pre-cured and naturally high in sodium, the best approach is through management during cooking. Since you are using your own spice mix here, you can control the added sugar, but for sodium, simply soak the rinsed brisket in a large bowl of fresh cold water for 4 to 6 hours in the fridge before you start cooking, changing the water halfway through.
This leaches out some of the excess salt.
I’ve finished cooking, but what’s the best way to store leftover corned beef?
Leftovers are brilliant think Reubens for lunch all week! Store the sliced meat submerged in a little bit of the cooking liquid in an airtight container in the fridge for up to 4 days. The liquid keeps it moist.
If you freeze it, make sure to freeze it sliced, perhaps with a teaspoon of liquid per portion, for up to three months.
Can I use a pressure cooker or Instant Pot instead of the oven or slow cooker?
You certainly can! A pressure cooker speeds things up considerably, often yielding tender results in about 75 to 90 minutes on high pressure, depending on the joint's thickness. Just ensure you have enough liquid to meet the minimum requirement for your machine, and always allow for a natural pressure release to help keep the meat juicy.
Slowcooked Tender Corned Beef

