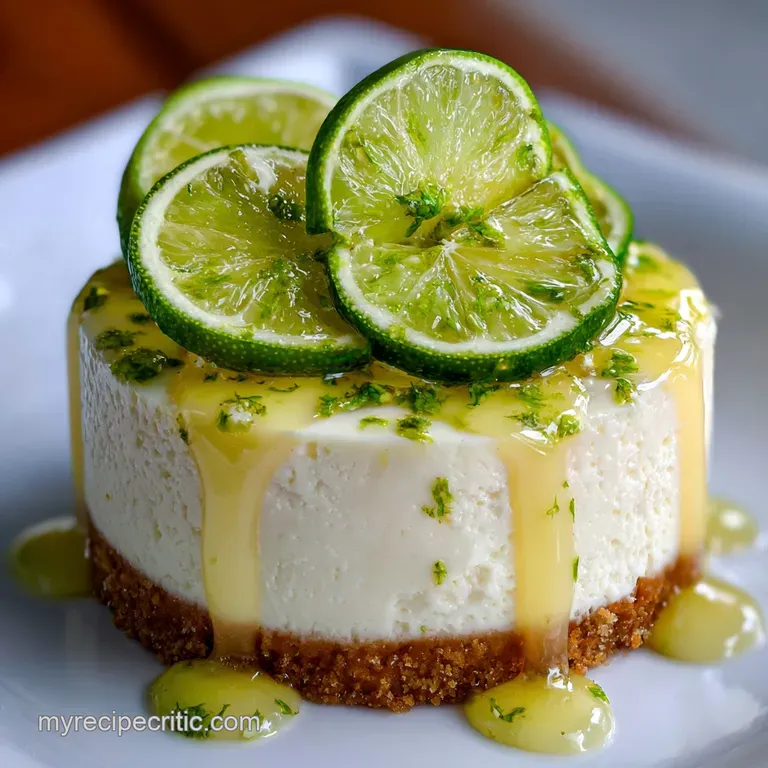
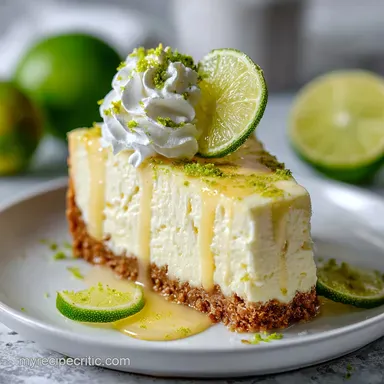
No Bake Key Lime Cheesecake
- Time: Active 20 minutes, Passive 6 hours, Total 6 hours 20 minutes
- Flavor/Texture Hook: Zesty, velvety filling with a shatteringly crisp crust
- Perfect for: Humid summer afternoons, stress free dinner parties, or beginner bakers
- Achieving the Perfect Balance in a No Bake Key Lime Cheesecake
- Essential Recipe Specs for This Tart and Creamy Dessert
- Gathering the Right Components for a Balanced Citrus Filling
- Selecting the Best Tools for a Stress Free Baking Session
- The Detailed Process for Achieving a Flawless Tart Finish
- How to Fix Textural Issues and Avoid Common Kitchen Mistakes
- Personalizing Your Dessert with Fun Variations and Tasty Swaps
- Maintaining Freshness and Reducing Waste in Your Home Kitchen
- Finding the Right Pairings to Complement the Tangy Lime Flavor
- Recipe FAQs
- 📝 Recipe Card
Picture this: you walk into your kitchen and the air is instantly filled with that sharp, floral, almost pine like aroma of fresh lime zest hitting the air. It’s one of those scents that makes your mouth water before you even grab a spoon.
I remember the first time I tried a no bake key lime cheesecake, I was skeptical. I thought it would be runny or taste like a cheap pudding cup, but I was so wrong. When you do it right, it's silkier and more refreshing than the heavy, baked versions that sit like a brick in your stomach.
We have all been there, staring at a cheesecake that looks more like a soup than a dessert. I’ve spent way too many afternoons troubleshooting why my fillings wouldn’t set, only to realize I was rushing the temperature of my ingredients or skimping on the citrus.
This recipe is the result of those messy trials. It is a foolproof way to get that iconic Florida Keys flavor right in your own kitchen, no matter where you live.
The beauty of this dish lies in its simplicity. You don't need to worry about water baths, cracked tops, or the anxiety of wondering if the middle is still wobbling. We are going to lean into the science of emulsification and acid thickening to do the hard work for us.
Trust me on this, once you see how beautifully a slice holds its shape, you’ll never go back to the oven for your lime fix.
Achieving the Perfect Balance in a No Bake Key Lime Cheesecake
The Science of Why it Works: Acid induced protein denaturation occurs when the citric acid in the lime juice reacts with the proteins in the sweetened condensed milk and cream cheese.
This reaction causes the mixture to thicken and "set" into a stable, velvety structure without the need for eggs or heat.
- Structural Integrity: Full fat cream cheese provides a solid fat base that firms up significantly when chilled, acting as the primary scaffold for the filling.
- Aeration: Whipping the heavy cream to stiff peaks introduces tiny air bubbles, which are then folded into the dense cheese base to create a mousse like lightness.
- Osmotic Balance: The high sugar content in the condensed milk helps stabilize the whipped cream, preventing the moisture from weeping out and making the crust soggy.
- Flavor Volatility: The lime zest contains essential oils that are fat soluble, meaning they infuse into the cream cheese and butter for a longer lasting aroma than juice alone.
Essential Recipe Specs for This Tart and Creamy Dessert
Before we start zesting, let's look at how this version compares to the traditional baked style. Many people assume they are interchangeable, but the textures are worlds apart.
| Feature | No Bake Method (This Recipe) | Classic Baked Key Lime |
|---|---|---|
| Texture | Airy, velvety, and mousse like | Dense, custard like, and heavy |
| Prep Time | 20 minutes active | 60 minutes active |
| Set Method | Cold cure and acid thickening | Egg coagulation and heat |
There is a distinct trade off here. While the baked version offers a more traditional "cheesecake" bite, this no bake version is far superior for hot weather because it feels lighter on the palate.
It behaves beautifully when served straight from the fridge, providing a cooling sensation that cuts through the rich fat of the dairy.
Gathering the Right Components for a Balanced Citrus Filling
The quality of your ingredients will make or break the final aroma and taste of this dish. I always tell my friends to prioritize the limes and the cream cheese. If you use the low-fat stuff in the tub, the cheesecake will never firm up properly. It needs that fat to behave correctly during the chilling process.
| Ingredient | Science Role | Pro Secret |
|---|---|---|
| Key Lime Juice | Primary thickening agent | Use fresh juice only; bottled versions lack the necessary enzymatic punch. |
| Full Fat Cream Cheese | Structural foundation | Ensure it is exactly room temperature to prevent "beading" or lumps in the silk. |
| Heavy Whipping Cream | Provides lift and volume | Freeze your metal bowl and whisk for 10 minutes to get the stiffest peaks. |
| Graham Cracker Crumbs | Moisture barrier | Grind them into a fine sand so the butter can coat every single grain. |
For the foundation, we use 200g graham cracker crumbs mixed with 115g unsalted butter, 25g granulated sugar, and 0.5g fine sea salt. This creates a base that is salty enough to contrast the sweet filling. If you're looking for a different spin on citrus, you might also enjoy the technique used in my Citrus Cheesecake No Bake recipe.
For the filling ingredients:
- 450g full fat brick cream cheese, softened (Do not use spreadable tubs)
- 400g sweetened condensed milk (One standard can)
- 120ml fresh Key lime juice (Roughly 15-20 small key limes)
- 1 tbsp Key lime zest (Don't skip the green bits!)
- 240ml heavy whipping cream, cold
- 5ml vanilla extract
Ingredient Substitutions Table
| Original Ingredient | Substitute | Why It Works |
|---|---|---|
| Key Lime Juice | Fresh Persian Lime Juice | Similar acidity. Note: Lacks the floral notes but still sets the filling perfectly. |
| Graham Crackers | Digestive Biscuits | Same dry, crumbly texture. Note: Slightly less sweet, which some people actually prefer. |
| Granulated Sugar | Light Brown Sugar | Adds a molasses like depth to the crust. Note: Makes the crust a bit softer. |
When you are picking out your limes, look for ones that feel heavy for their size. That’s the trick to getting the most juice out of those tiny fruits. If you can only find the larger Persian limes, that's okay too, though the flavor won't be quite as "tropical" as the authentic key limes.
Selecting the Best Tools for a Stress Free Baking Session
Having the right gear is just as important as the ingredients. You don't need a professional kitchen, but a few specific items will make your life much easier. First and foremost, a 9 inch springform pan is non negotiable if you want those clean, beautiful edges.
If you use a standard pie dish, you won't be able to remove the sides, which is fine for a casual family dinner but less impressive for a party.
You will also need a sturdy stand mixer or a hand mixer. Trying to whip 240ml of heavy cream to stiff peaks by hand is a workout I wouldn't wish on anyone. A microplane zester is another essential. You want the zest to be so fine that it disappears into the filling, leaving only its vibrant scent and flavor behind.
If the pieces are too big, they can feel "leafy" in an otherwise silky dessert.
Chef's Tip: To get the most juice out of your key limes, microwave them for 10 seconds and then roll them firmly against the counter with your palm before cutting. This breaks down the internal membranes and lets the juice flow freely.
If you find yourself making these often, you might want to try making them in smaller batches. I have a great guide on using a muffin tin for this in my Mini Cheesecakes in Cups recipe. It is a great way to practice the folding technique on a smaller scale.
The Detailed Process for Achieving a Flawless Tart Finish

- Prepare the base. Combine 200g graham cracker crumbs, 115g melted unsalted butter, 25g granulated sugar, and 0.5g fine sea salt in a bowl. Note: The texture should resemble wet sand that holds its shape when squeezed.
- Press the crust. Firmly pack the mixture into the bottom and 1 inch up the sides of a 9 inch springform pan. Press until the surface is flat and even.
- Chill the foundation. Place the crust in the freezer for 15 minutes while you prepare the filling. Note: This prevents the crust from crumbling when you spread the heavy filling on top.
- Cream the cheese. Beat 450g softened cream cheese until it is completely smooth and looks like thick frosting. Watch for a glossy, lump free finish.
- Incorporate sweetness. Gradually pour in 400g sweetened condensed milk while the mixer is on low. Note: Scrape the bowl often to ensure no cream cheese pockets remain.
- Add the citrus. Mix in 120ml Key lime juice, 1 tbsp zest, and 5ml vanilla extract. The mixture will begin to thicken immediately as the acid reacts.
- Whip the cream. In a separate chilled bowl, whip 240ml heavy cream until it forms stiff peaks that don't slump. Note: Stiff peaks are reached when the whisk leaves a clear trail and the cream stands straight up.
- Fold gently. Using a silicone spatula, fold the whipped cream into the lime mixture in three stages. Fold until no white streaks remain.
- Fill and level. Pour the filling into the chilled crust and smooth the top with an offset spatula. Note: Tap the pan gently on the counter to release any trapped air bubbles.
- The cold cure. Refrigerate for at least 6 hours, though overnight is much better. Chill until the center feels firm and doesn't wobble.
The smell during step six is truly the best part of the whole process. When that lime juice hits the dairy, it releases a fragrance that is so bright and clean. You'll notice the filling goes from a loose liquid to a thick, holdable cream almost instantly. That's the science we talked about earlier!
How to Fix Textural Issues and Avoid Common Kitchen Mistakes
Even with a simple recipe, things can go sideways. The most common complaint with no bake desserts is that they don't set firmly enough to slice. Usually, this comes down to one of two things: the temperature of the cream cheese or the fat content of the dairy.
Resolving Issues with Soft Filling
If your cheesecake is still "soupy" after six hours, you likely used a "spreadable" cream cheese from a tub, which has a higher water content. You can try moving it to the freezer for 2 hours to firm it up for serving, but it will soften again quickly once it sits on the table.
Another culprit is under whipping the heavy cream. If the cream doesn't have enough air trapped in it, the filling won't have the structure it needs to stand tall.
Preventing a Soggy Crust
There is nothing worse than a crust that turns into mush. This happens when the filling is too wet or if the crust wasn't packed tightly enough. I always add a half gram of sea salt to my crust because it helps "cure" the butter crumb bond, making it a bit more resilient against the moisture of the cheesecake.
Troubleshooting Table
| Problem | Root Cause | Solution |
|---|---|---|
| Lumpy Filling | Cream cheese was too cold | Microwave the mixture in 5 second intervals and whisk vigorously. |
| Crumbly Crust | Not enough butter or pressure | Use the bottom of a flat measuring cup to pack the crumbs tighter. |
| No Tartness | Lime juice was old or bottled | Always use fresh zest to supplement the juice for that essential oil punch. |
gluten-free Crust Adaptation
If you need to make this gluten-free, simply swap the graham crackers for your favorite gluten-free ginger snaps or GF graham crackers. Because the filling is naturally gluten-free, this is one of the easiest recipes to adapt for dietary needs without sacrificing the texture or the flavor.
Personalizing Your Dessert with Fun Variations and Tasty Swaps
Once you have mastered the basic version, you can start getting creative. I love experimenting with different crusts. While graham cracker is the classic choice, a ginger snap crust adds a spicy warmth that pairs incredibly well with the tart lime.
- If you want a tropical vibe, swap 50g of the graham crumbs for toasted shredded coconut.
- If you want a "Frozen" version, simply pop the finished cheesecake in the freezer. It takes on the texture of a premium ice cream cake.
- If you want more decadence, drizzle the finished slices with a white chocolate ganache to mellow out the acidity.
You can also turn this into a "No Cook Lemon" version by simply swapping the lime juice and zest for lemon. It’s a bit sweeter and less floral, but just as refreshing. Check out my No Cook Lemon recipe for the exact ratios on that one.
Maintaining Freshness and Reducing Waste in Your Home Kitchen
This cheesecake is a champion of longevity. Because it doesn't contain eggs, it stays fresh in the fridge for up to 5 days. Just make sure to keep it tightly covered so it doesn't pick up any "fridge smells" like onions or garlic.
The high fat content in the cream cheese is like a sponge for outside odors, so a double layer of plastic wrap is your friend here.
Freezing and Thawing This recipe freezes beautifully. I often make two at a time and keep one in the freezer for unexpected guests. To freeze, let it set in the fridge first for the full 6 hours, then wrap the entire springform pan in plastic wrap and foil.
It will stay perfect for up to 3 months. When you're ready to eat, move it to the fridge for 4 hours to thaw slowly.
Zero Waste Tips Don't throw away those spent lime halves! After you've juiced them, you can toss them into a jar of white vinegar for a week to create a citrus scented natural cleaner. Or, if you're feeling fancy, you can candy the lime peels to use as a garnish.
Simply simmer thin strips of the peel in a sugar water syrup until they turn translucent, then roll them in granulated sugar. They look like little green jewels on top of the white filling.
Finding the Right Pairings to Complement the Tangy Lime Flavor
When it comes to serving, less is usually more. A simple dollop of extra whipped cream and a few thin slices of lime are all you really need. However, if you are hosting a party, I love serving this alongside something with a bit of a "crunch" to contrast the velvety filling.
Think about a light, berry based sauce. A raspberry coulis provides a stunning color contrast and its natural sweetness plays perfectly with the lime's tartness. Just simmer some frozen raspberries with a spoonful of sugar, strain out the seeds, and drizzle it over the top right before serving.
If you are looking for a complete dessert spread, this cheesecake sits perfectly next to a The Homemade Pumpkin recipe during those transitional months like September, where you still want something cool but are starting to crave those cozy flavors. The cream cheese filling in the pumpkin roll acts as a nice bridge between the two desserts.
Regardless of how you serve it, the key is to keep it cold. This cheesecake is at its absolute best when it’s chilled to the bone. It's the ultimate "repeatable sweetness" that you'll find yourself making every time the temperature climbs.
Enjoy the process, breathe in that lime aroma, and get ready for the best slice of summer you've ever had.

Recipe FAQs
Why doesn't my no-bake key lime cheesecake set?
Likely ingredients or technique errors. Ensure you used full fat brick cream cheese, not spreadable tub varieties, as the higher water content in tubs prevents proper setting.
Also, make sure you whipped the heavy cream to stiff peaks and incorporated it gently; under whipped cream won't provide enough structure.
Can I use regular limes instead of key limes?
Yes, but with a flavor difference. Regular Persian limes have less floral and aromatic notes than true key limes, so the flavor will be less intense. You might need to add a touch more zest to compensate. If you enjoyed the technique of balancing citrus with cream, see how it's applied in our No Cook Lemon recipe.
How do I get a smooth, lump free filling?
Start with perfectly softened cream cheese. Ensure your cream cheese is at true room temperature, not just slightly cool. Beat it thoroughly on its own until it’s glossy and completely smooth before adding any other ingredients to avoid lumps.
My crust is crumbly. What did I do wrong?
Probably insufficient butter or pressing. Make sure you used the correct amount of melted butter to bind the crumbs and pressed the mixture very firmly into the pan. Using the bottom of a measuring cup can help create a dense, cohesive crust that won't crumble.
How long does no-bake key lime cheesecake last in the fridge?
Up to 5 days. Due to the absence of eggs, it holds well in the refrigerator. Always keep it tightly covered to prevent it from absorbing odors from other foods in your fridge.
Can I freeze this no-bake key lime cheesecake?
Yes, it freezes very well. Wrap the entire set cheesecake (still in the springform pan) tightly in plastic wrap and then foil. It can be stored in the freezer for up to 3 months and will thaw in the refrigerator in about 4 hours.
What can I serve with no-bake key lime cheesecake?
Simple is best, or something complementary. A small dollop of whipped cream and a lime slice are perfect. For a contrast, a light berry coulis works wonderfully, or consider serving it alongside a rich, contrasting dessert like a The Best Homemade Chocolate Cream Pie Recipe Velvety Rich for a truly decadent spread.
No Bake Key Lime Cheesecake
Ingredients:
Instructions:
Nutrition Facts:
| Calories | 545 kcal |
|---|---|
| Protein | 7.9 g |
| Fat | 38.4 g |
| Carbs | 44.2 g |
| Fiber | 0.8 g |
| Sugar | 31.8 g |
| Sodium | 182 mg |
