Cream Filled Chocolates: Velvety Vanilla
- Time: Active 25 mins, Passive 20 mins, Total 45 mins
- Flavor/Texture Hook: Velvety vanilla mascarpone inside a bittersweet shell
- Perfect for: Holiday gifting or a high end dinner party dessert
- The Absolute Best Cream Filled Chocolates
- Key Techniques for Silky Filling
- Success Stats and Recipe Timing
- Essential Components for Deep Flavor
- The Best Tools for Success
- Assembly Steps for Perfect Candies
- Solving Common Homemade Candy Problems
- Creative Flavor Twists to Try
- Scaling the Batch Size
- Proper Storage for Lasting Candy Freshness
- Delicious Pairings for Rich Chocolate
- Debunking Candy Making Myths
- Cream Filled Chocolates FAQs
- 📝 Recipe Card
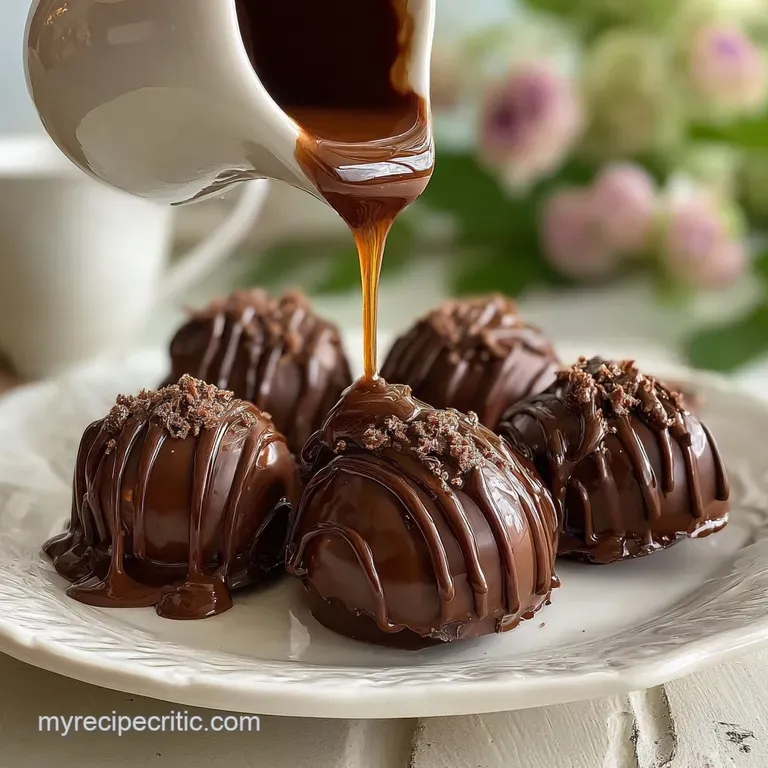
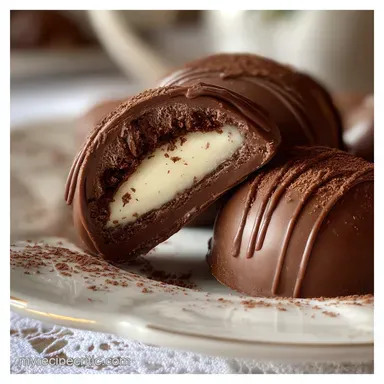
The Absolute Best Cream Filled Chocolates
The smell of dark chocolate melting over a gentle water bath is something I never get tired of. It's a deep, earthy aroma that fills the whole kitchen, signaling that something truly indulgent is on the way.
I remember the first time I tried making these; I was so nervous about the chocolate seizing that I barely breathed, but once I smelled that vanilla bean paste hitting the warm mascarpone, I knew I was onto a winner.
Most store-bought versions are just too sugary for me, leaving that weird film on the roof of your mouth. By using mascarpone cheese and a touch of maple syrup, we get a filling that's actually creamy and rich rather than just sweet. It's a total game changer for anyone who finds traditional chocolates a bit much.
We're going to use a simple method that doesn't require a degree in pastry arts. I’ve made all the mistakes leaky centers, dull shells, you name it so you don’t have to. We'll focus on getting that perfect contrast between the cold, creamy center and the dark, brittle exterior.
Trust me, once you hear that first shell shatter between your teeth, you’ll never go back to the boxed stuff.
Key Techniques for Silky Filling
Cold Emulsification: By whisking the maple syrup into room temperature mascarpone, we create a stable fat in-water emulsion that stays creamy even when chilled.
Starch Stabilization: The arrowroot powder acts as a moisture binder, preventing the filling from weeping or becoming grainy over time.
Snap Optimization: Adding refined coconut oil to the dark chocolate lowers the melting point slightly while maintaining a glossy finish and a clean break.
| Method | Time | Texture | Best For |
|---|---|---|---|
| Stovetop (Double Boiler) | 10 mins | Very glossy and smooth | Maximum control and shine |
| Microwave (Short Bursts) | 3 mins | Matte to semi glossy | Quick batches and beginners |
Using a double boiler is my preferred way to melt the dark chocolate because the steam provides a gentle, indirect heat. This prevents the cocoa solids from scorching, which can happen in a heartbeat in the microwave if you aren't careful.
If you do use the microwave, work in 15 second intervals and stir like your life depends on it between each one.
Success Stats and Recipe Timing
| Batch Size | Chocolate Weight | Mascarpone Weight | Yield |
|---|---|---|---|
| Single Batch | 8 oz | 4 oz | 24 candies |
| Double Batch | 16 oz | 8 oz | 48 candies |
| Half Batch | 4 oz | 2 oz | 12 candies |
A single batch fits perfectly in a standard 24 cavity silicone chocolate mold. If you're planning on gifting these, I highly recommend doubling the recipe because they disappear faster than you’d think.
Just remember that when you double the ingredients, you'll need to work in batches for the dipping process to keep the chocolate at the right temperature.
Essential Components for Deep Flavor
| Ingredient | Science Role | Pro Secret |
|---|---|---|
| Dark Chocolate (70%) | Structural shell | Use bars, not chips, for a better melt |
| Mascarpone Cheese | Fat rich filling base | Ensure it's room temp to avoid lumps |
| Arrowroot Powder | Thickening agent | Prevents the filling from leaking out |
Mastering Cold Emulsification
When you're mixing the filling, the mascarpone must behave. If it's too cold, it will clump when you add the maple syrup. I usually leave it on the counter for at least 30 minutes. You're looking for a dough texture that is soft enough to pipe but firm enough to hold its shape.
For the "No Temper" Chocolate Shells
We use refined coconut oil here as a shortcut. It helps the chocolate stay fluid for longer, making it much easier to coat the molds without needing a marble slab and a thermometer. It won't be as rock hard as professionally tempered chocolate, but it gives a beautiful sheen and a lovely mouthfeel.
The Best Tools for Success
You don’t need a factory of equipment, but a few specific items make this much less messy. A small offset spatula is brilliant for scraping excess chocolate off the top of your molds.
I also swear by using a disposable piping bag for the filling; trying to spoon mascarpone into tiny cavities is a recipe for frustration.
If you don't have a professional mold, a clean ice cube tray can work in a pinch, though the candies will be larger. Just make sure it’s the flexible silicone kind, or you’ll be fighting to get the chocolates out.
A small glass bowl that fits snugly over a saucepan is all you need for your DIY double boiler.
Assembly Steps for Perfect Candies

- Melt the chocolate. Combine 8 oz dark chocolate and 1 tsp coconut oil in a glass bowl over simmering water until 75% melted, then remove from heat and stir until smooth. Note: Residual heat prevents overheating.
- Coat the molds. Spoon a teaspoon of chocolate into each cavity, swirling until the sides are completely covered.
- Invert and chill. Turn the mold upside down over parchment to let excess chocolate drip out, then chill for 10 minutes until the shell is set.
- Cream the filling. Whisk 4 oz mascarpone, 2 tbsp maple syrup, 1 tsp vanilla bean paste, 1 tbsp arrowroot, and a pinch of salt until velvety and uniform.
- Fill the shells. Pipe the mascarpone mixture into the chocolate shells, leaving 2mm of space at the top until they look nearly full.
- Seal the base. Spoon the remaining melted chocolate over the filling, spreading it gently until the cream is hidden.
- Level the bottoms. Use an offset spatula to scrape the mold flat until the edges are clean and sharp.
- Final set. Refrigerate for at least 20 minutes until the chocolate feels firm and cold.
- Release the candies. Gently peel the silicone mold back from the edges until the chocolates pop out.
Solving Common Homemade Candy Problems
Preventing Leaky Centers
If your filling is escaping, it’s usually because the top seal didn't fully bond with the side walls of the shell. When you're adding that final layer of chocolate, make sure it touches the edges of the hardened shell. This creates a vacuum seal that keeps the mascarpone right where it belongs. This is a similar technique to the one used in The Homemade Chocolate recipe where the crust and filling need to be perfectly joined.
Resolving Stuck Candies
Chocolates usually stick because the shell was too thin or the mold wasn't clean. If they won't budge, pop them in the freezer for exactly 5 minutes. The cold causes the chocolate to contract slightly, pulling away from the walls of the mold.
Don't leave them in too long, though, or you'll get condensation on the surface when you take them out.
| Problem | Root Cause | Solution |
|---|---|---|
| Dull or grey shell | Chocolate got too hot | Keep water at a bare simmer, never boiling |
| Filling is too runny | Mascarpone was over whisked | Fold gently; don't use a high speed mixer |
| Bubbles in chocolate | Stirred too vigorously | Tap the mold firmly on the counter after filling |
Common Mistakes Checklist
- ✓ Always dry your bowl and spatula completely (water makes chocolate seize).
- ✓ Don't overfill the cavities or you won't be able to seal the bottoms.
- ✓ Use refined coconut oil to avoid a strong coconut aftertaste.
- ✓ Let the shells set completely in the fridge before adding the cream.
- ✓ Tap the mold on the counter to release trapped air bubbles.
Creative Flavor Twists to Try
Infusing with Espresso
Add 1/2 teaspoon of instant espresso powder to the mascarpone filling. The coffee notes cut through the richness of the cheese and pair beautifully with the dark chocolate shell. It's a sophisticated version of a mocha truffle that feels very grown up.
Swapping for a Vegan Alternative
| Original Ingredient | Substitute | Why It Works |
|---|---|---|
| Mascarpone Cheese | Cashew Cream (thick) | High fat content provides a similar richness |
| Maple Syrup | Agave Nectar | Neutral sweetness that blends easily |
| Dark Chocolate | dairy-free Dark Chocolate | Ensure cacao is high to maintain the snap |
If you decide to go the vegan route, the texture will be slightly softer. You might want to increase the arrowroot powder by a tiny bit to help the cashew cream hold its shape inside the shell. It's a great way to make sure everyone can enjoy a treat.
Scaling the Batch Size
To scale down to a half batch, you can easily divide the ingredients, but be careful when melting a smaller amount of chocolate as it burns more easily. Use a very small bowl to keep the chocolate depth sufficient for dipping or pouring.
When doubling the recipe, I recommend making the filling in one big batch but melting the chocolate in two separate lots. This ensures the chocolate stays at the right consistency while you're working through the 48 cavities. If the chocolate starts to thicken, just set it back over the warm water for 30 seconds.
Proper Storage for Lasting Candy Freshness
Because these contain fresh mascarpone cheese, they behave differently than solid chocolate bars. You must store them in the refrigerator in an airtight container. They will stay fresh and delicious for up to 5 days.
If you leave them out at room temperature for too long, the filling will soften too much, though the shell will stay intact.
For long term storage, you can freeze these for up to 2 months. Place them in a single layer on a tray to freeze solid, then transfer to a freezer bag. When you're ready to eat one, let it thaw in the fridge for an hour.
To avoid waste, use any leftover chocolate as a drizzle over fruit or stir it into a warm mug of milk.
Delicious Pairings for Rich Chocolate
These chocolates are quite rich, so they pair best with something that has a bit of acidity or heat. A tart raspberry coulis on the side is fantastic, or even just a few fresh berries. The bright fruitiness cuts right through the dense mascarpone center.
If you're serving these after dinner, they are incredible alongside a hot drink. I love pairing them with The Proper Cuppa recipe for a double chocolate experience that feels incredibly luxurious. The heat from the drink slightly melts the cream filling as you eat, creating a really cool texture contrast.
Debunking Candy Making Myths
A common misconception is that you need a specialized thermometer to make good chocolates at home. While professionals use them for tempering, our coconut oil trick bypasses the need for strict temperature curves while still giving you a glossy, snappy result.
You don't need fancy gear to get a "crack" when you bite into it.
Another myth is that you can't use "regular" chocolate bars from the grocery store. As long as the cacao percentage is high (70% or more) and the ingredient list is short, most high-quality dark chocolate bars will work perfectly.
Avoid "chocolate candy coating" or "compound chocolate" as they often use inferior fats that don't have the same aroma or flavor.

Cream Filled Chocolates FAQs
What are cream filled chocolates called?
They are often called filled chocolates, bonbons, or pralines. The specific name can vary by region and the exact type of filling used, but "filled chocolate" is the most general and accurate term.
What are filled chocolates called?
Filled chocolates are commonly known as bonbons or pralines. These terms refer to small confectionery, typically chocolate, with a filling such as ganache, caramel, or cream.
How do you make cream filling for chocolate?
Whip softened cream cheese or mascarpone with sugar, flavorings, and a stabilizer like arrowroot. For a stable filling that won't weep, ensure ingredients are at room temperature and gently whisk to combine, avoiding over mixing to maintain a velvety texture. You can then pipe this into pre-made chocolate shells, similar to how the filling is secured in our The Absolute Best Cream Filled Chocolates.
What is the #1 best chocolate in the world?
There is no single #1 best chocolate in the world. Taste is subjective and depends entirely on personal preference for sweetness, bitterness, origin, and texture; however, fine dark chocolates from regions like Ecuador or Madagascar are often highly acclaimed for their complex flavor profiles.
Can I use dairy-free cream for filling chocolates?
Yes, you can use a thick, stable dairy-free cream alternative. Cashew cream or a rich coconut cream can work well as a substitute for mascarpone, offering a similar richness, though you might need to adjust the stabilizer slightly. This approach is similar to making vegan versions of desserts, like our The Velvet Mug Truly Decadent Homemade Hot Chocolate Recipe where non-dairy options are key.
What type of chocolate is best for shells?
A high-quality dark chocolate with at least 70% cacao is ideal for shells. It provides a good snap and balances the sweetness of the filling. Using bars, rather than chips, will result in a smoother melt and glossier finish for your shells.
How long do homemade cream filled chocolates last?
Homemade cream filled chocolates typically last 3-5 days when refrigerated. Because they contain fresh dairy or dairy alternatives, they are perishable and should be stored in an airtight container in the refrigerator to maintain freshness and prevent them from absorbing odors.
Cream Filled Chocolates
Ingredients:
Instructions:
Nutrition Facts:
| Calories | 85 kcal |
|---|---|
| Protein | 0.9 g |
| Fat | 6.6 g |
| Carbs | 6.1 g |
| Fiber | 1.1 g |
| Sugar | 4.2 g |
| Sodium | 12 mg |
