The Chefs Classic Fudgy Mint Brownies Triplelayer
- Beyond the Bake Sale: Mastering the Triple-Layer Mint Brownies
- The Science of Fudgy: Why Most Brownies Fail
- Sourcing the Gold: Ingredients That Guarantee Intensity
- The Workflow: Blending, Setting, and Sealing
- Assembly Instructions for Perfect Mint Brownies
- Troubleshooting Your Triple-Layer Bake
- Adjusting the Ratio: Variations and Dietary Swaps
- Recipe FAQs
- 📝 Recipe Card
Beyond the Bake Sale: Mastering the Triple Layer Mint Brownies
For true chocolate lovers, the humble brownie must be more than just a baked square; it must be an experience. These Mint Brownies elevate the classic flavor combination into a sophisticated Chocolate And Mint Desserts achievement.
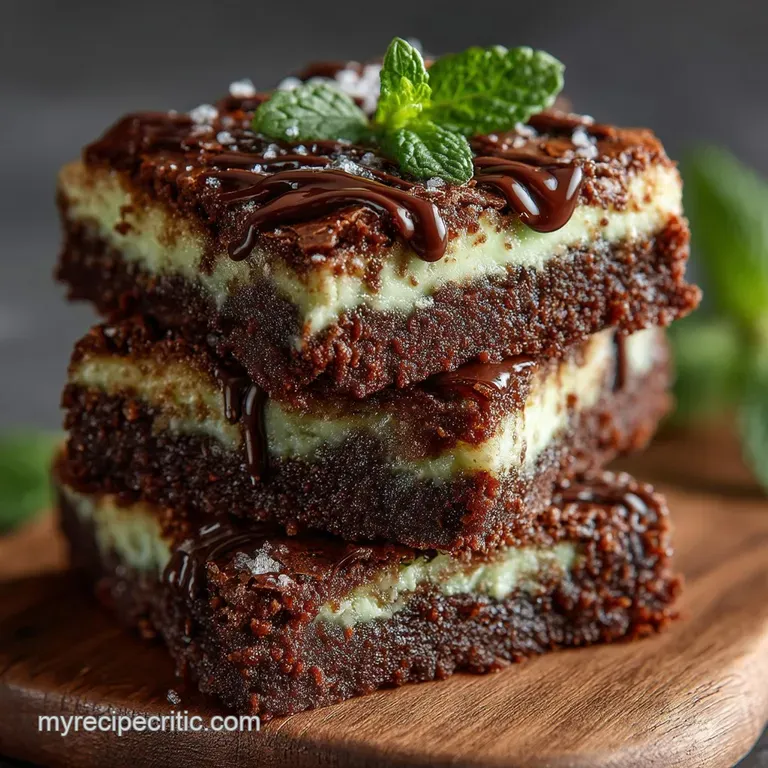
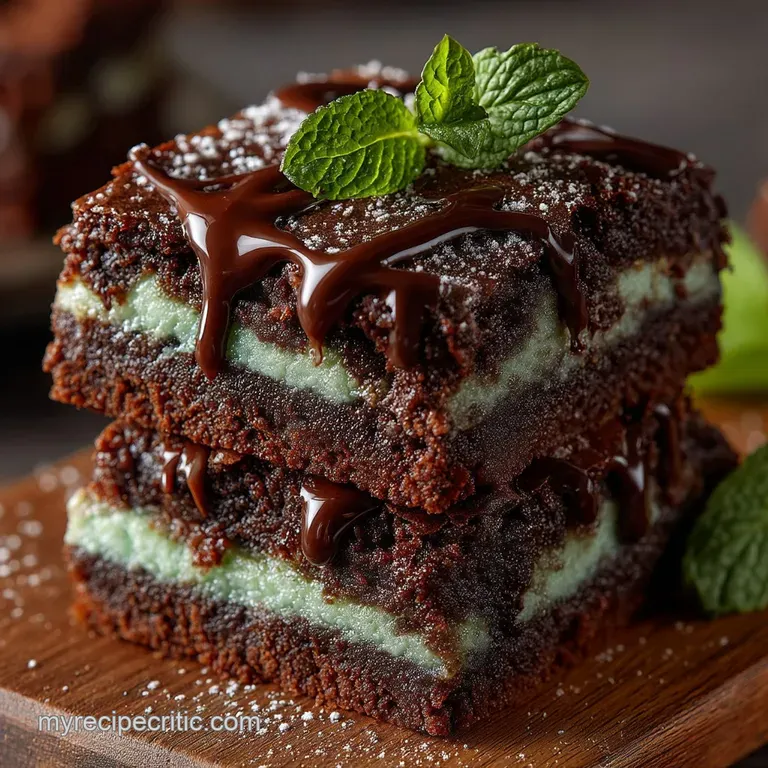
Forget the often dry, cake like squares found at many bake sales; this mint brownies recipe is engineered for maximum indulgence, featuring three distinct layers that harmonize perfectly.
We achieve a profoundly fudgy mint brownies base, topped with a cooling, vibrant peppermint cream, and sealed with a thin, snapping chocolate glaze. Mastery lies in the technique ensuring each layer contributes to a balanced textural and flavor profile, making these the ultimate Mint Chocolate Treats .
The result is a spectacular dessert that demands the kind of attention usually reserved for pastry shop masterpieces.
The Science of Fudgy: Why Most Brownies Fail
The failure of most homemade brownies stems from a single common error: treating them like cake. Brownies that are light, airy, and spring back when touched are, frankly, disappointing.
Our goal is intense density and moisture, which is achieved by prioritizing fat and sugar content over flour, and controlling the mixing process rigorously.
Deconstructing the Three Perfect Layers
Achieving the perfect structure for these Layered Mint Brownies requires precision in preparation and temperature control across all phases. The foundation is a deeply chocolatey, rich base, created using melted butter (226g, or 1 cup) and dark chocolate (115g, 60-70% cocoa) which locks in moisture.
The second stage is the peppermint frosting a smooth, whipped center that provides the necessary contrast to the intense chocolate. Finally, we finish the composition with a sturdy, yet thin, dark chocolate shield.
This final layer serves not only as a visual flourish but also provides a necessary textural snap against the soft frosting and dense base, similar to a high-quality mint brownies with chocolate ganache .
Fudge vs. Cake: Identifying the Critical Difference
The difference between a cakey and a fudgy brownie comes down to two factors: fat source and flour quantity. Cakey brownies rely on cocoa powder and usually incorporate flour (90g, or ¾ cup, in our recipe) that has been creamed with butter, encouraging air incorporation.
Fudgy brownies, conversely, rely heavily on melted fat (butter) and melted chocolate. Crucially, we whisk the granulated sugar (1 ¼ cups, 250g) and eggs into the warm chocolate mixture vigorously for about 60 seconds before adding the dry ingredients.
This mixing stage emulsifies the fats and sugar, creating the necessary structure for the shiny, crackly crust characteristic of superior squares, while the minimal folding of flour ensures gluten development is restricted.
A Word on Temperature and Texture Control
Baking time is critical. The 8x8 inch pan of brownie batter is baked at 350°F (175°C) for a relatively short period, approximately 28 to 32 minutes.
To ensure the base remains supremely moist, you must remove it when the edges are set but a toothpick inserted an inch from the perimeter still shows moist crumbs clinging to it. The residual heat from the pan will complete the baking process, preventing the dreaded dry center.
Sourcing the Gold: Ingredients That Guarantee Intensity
The triple layer structure means that every single ingredient needs to pull its weight, especially regarding flavor and texture contrast.
The Chocolate Roster: Semisweet vs. Dark for Maximum Depth
We use two slightly different types of high-quality dark chocolate to build our layers. For the base, a 60-70% dark chocolate (115g) offers depth without bitterness, harmonizing with the sugar and butter.
For the top layer, which forms the snapping glaze, increasing the cocoa content slightly to 70-75% (115g) ensures a richer, more powerful contrast to the sweet peppermint center. Using chopped blocks of high-quality chocolate rather than standard chips guarantees a smoother melt and superior texture.
Essential Equipment for Precise Layering
Beyond the standard bowls and spatulas, the success of Layered Mint Brownies rests heavily on the 8x8 inch baking pan lined with parchment paper. Cutting the parchment to leave an overhang creates "slings," which are indispensable for lifting the delicate, multi layered confection from the pan once chilling is complete.
This prevents structural damage and ensures the edges remain sharp. An electric stand mixer or hand mixer is also required to properly aerate the softened butter (113g, ½ cup) and powdered sugar (2 cups, 240g) for the cloud like, peppermint center.
Achieving the Perfect Green: Natural Color Alternatives
While green food coloring is completely optional for the peppermint frosting, adding just 1 to 3 drops of gel coloring helps visually enhance the mint identity. The vibrant hue makes these a fantastic choice for festive occasions, often being featured as St Patrick Brownies or holiday Mint Chocolate Treats .
If avoiding artificial coloring, alternatives like a tiny amount of spinach powder (which has a neutral flavor) or a touch of spirulina powder can achieve a subtle, natural green, though gel coloring provides the most reliable vibrancy.
Why Quality Peppermint Extract Matters Most
The difference between a refreshing mint flavor and one that tastes artificial and medicinal often comes down to the quality of the extract. We specify using pure peppermint extract (1 tsp, 5ml), which delivers a clean, sharp cooling flavor.
It is crucial not to confuse this with spearmint extract, which has a much softer, herbal profile that does not provide the bold flavor required for this classic pairing.
Related Recipes Worth Trying
- Ultimate Fudgy Mint Brownies with Glossy Ganache and Mint Frosting — These classic Mint Brownies are pure decadence Get that truly fudgy base no cakey nonsense topped with vibrant mint buttercream and mirrorshine chocolate...
- The Ultimate Summer Peach Fruit Salad with HoneyLime Mint — Ditch the soggy leftovers This vibrant Summer Peach Fruit Salad recipe uses a zesty honeylime dressing to elevate ripe peaches beautifully Find out how to...
- Vibrant Summer Fruit Salad with Honey Lime Mint Dressing — This is the ultimate vibrant Summer Fruit Salad recipe featuring peak seasonal produce and a zesty honeylime dressing Its a healthy fruit salad that tastes...
The Workflow: Blending, Setting, and Sealing
The successful creation of these triple layer fudgy mint brownies requires patience. Total time for this medium difficulty bake is around three hours, but the majority of that time is inactive chilling a necessary step for creating the distinct, clean layers this dessert is known for.
The process flows logically: blending the warm base, cooling it entirely, whipping and spreading the cool center, chilling again, and finally sealing it all with the glaze.
Assembly Instructions for Perfect Mint Brownies
Phase One: Achieving the Crinkle Top Fudgy Base
Preheat your oven to 350°F (175°C) and prepare your 8x8 pan. Begin by melting the 1 cup of butter and the 4 oz of dark chocolate together gently either using a bain marie or microwave bursts until perfectly smooth.
Whisk the granulated sugar into this warm mixture, then beat the three room temperature eggs and vanilla extract (1 tsp) one at a time. This vigorous whisking builds the glossy layer. Finally, gently fold in the ¾ cup of flour and salt. Remember: fold only until the last streaks of flour disappear.
Bake for 28– 32 minutes, then cool completely on a wire rack for about an hour.
Crafting the Cool Cloud: Whipping the Peppermint Center
The base must be fully cool before this stage begins. Beat the softened ½ cup of butter until light, then gradually incorporate the two cups of sifted powdered sugar, alternating with the two tablespoons of milk. Once smooth, beat in the 1 tsp of pure peppermint extract and any optional green coloring.
The result should be a light, stable buttercream. Spread this cool cloud evenly over the fully cooled chocolate base.
The Chill Protocol: Setting the Layers Before the Glaze
Immediately after spreading the mint layer, the brownies must be chilled. Place the pan in the refrigerator for at least one full hour. This chilling protocol is essential; if the peppermint frosting is not sufficiently firmed up, the warm chocolate glaze applied next will simply melt it, causing the layers to marble and the final appearance to be sloppy.
Sealing the Deal: Applying the Snapping Chocolate Shield
Prepare the glaze by melting the remaining 4 oz of dark chocolate and 3 tbsp of butter together until glossy. Crucially, let the glaze cool for 5 to 10 minutes, stirring occasionally. It should still be pourable but only slightly warm.
Pour the glaze over the chilled mint layer and quickly tilt the pan to ensure full, even coverage. Return the brownies to the refrigerator for a final 30 minutes.
This final chill sets the glaze into a hard, snappy shell, ensuring your Mint Chocolate Treats are ready for the ultimate clean cut.
Troubleshooting Your Triple Layer Bake
The most common issues encountered when preparing these luxurious Layered Mint Brownies involve poor texture control. If your base turns out too cakey, you likely either overmixed the flour (developing too much gluten) or overbaked the batter (drying out the internal structure).
Ensure your oven temperature is accurate and that you stop baking when the center is still visibly moist. If your mint layer melts when the glaze is applied, the mint layer was not chilled sufficiently, or the glaze was poured on while too hot. Patience in the chilling stages is the secret to success here.
Adjusting the Ratio: Variations and Dietary Swaps
While this classic recipe produces superior results, there is always room for modification, whether you want to try an easy mint brownies with brownie mix shortcut (though the quality won't compare) or adapt the recipe for dietary needs.
The Clean Cut: Warming the Knife for Crisp Edges
Achieving aesthetically pleasing slices is simple with one key trick. Before cutting, heat a long, sharp knife under very hot running water. Wipe the knife completely dry, then make your first cut. Repeat this heating and drying process before every single slice.
This technique prevents the dense base, sticky frosting, and hard glaze from adhering to the blade and dragging the layers, resulting in those desirable, razor sharp edges.
Preventing the Cracking Crisis in the Glaze
The final chocolate layer should snap cleanly rather than shattering or cracking upon cooling. To guarantee this, ensure the final glaze is not overworked. A simple trick is replacing 1 tablespoon of the butter in the glaze with 1 tablespoon of coconut oil; the oil has a lower melting point than butter, contributing to a cleaner, crisper snap when the entire structure is chilled.
For an extra textural flourish, you can sprinkle the wet glaze with chopped mint brownies with andes mints or crystallized mint pieces before it fully sets.
Storage Solutions: Extending the Life of Your Fudgy Treats
Because of the rich buttercream center and the layered structure, these fudgy mint brownies store beautifully in the refrigerator. Place them in an airtight container immediately after cutting. They will keep well for up to five days.
In fact, these brownies are often best served slightly chilled, straight from the fridge, which enhances the contrast between the cool peppermint and the intense dark chocolate base.
Gluten-free and Vegan Adaptations for the Brownie Base
To accommodate specific dietary needs without sacrificing flavor, several swaps are possible. For a gluten-free base, substitute the all-purpose flour with a high-quality 1:1 gluten-free baking blend that already contains xanthan gum.
If aiming for a dairy-free rendition, the butter in the base can be replaced with a neutral oil (like canola) for a slightly chewier texture, while the butter in the peppermint frosting can be successfully swapped for high-quality vegan butter sticks and non-dairy milk (like oat milk) to maintain the creamy consistency.
Recipe FAQs
Why are my Mint Brownies coming out cakey instead of perfectly fudgy?
Ah, the classic baking blunder! Achieving fudginess is all about control. This is usually down to two things: overmixing the flour, which develops too much gluten, or overbaking them.
Ensure you pull the brownies when the centre still looks slightly wet and a toothpick inserted near the edge comes out with moist, sticky crumbs clinging to it that residual heat will finish the job perfectly as they cool.
I don't fancy using food colouring will skipping the green dye mess up the recipe?
Absolutely not, ditch the dye if you like! The green colour is purely for the visual spectacle, giving the mint layer that classic, vibrant look (think of those lovely After Eight mints).
The flavour comes entirely from the pure peppermint extract, so skipping the colouring is fine; your brownies will just have a charming, natural off-white filling instead.
Can I make these triple layer Mint Brownies ahead of time for a party, and how long do they keep?
Making them ahead is a brilliant idea, as the chilling time is essential for clean slices! You can easily prep these 24 hours in advance. Store them tightly wrapped in an airtight container in the fridge for up to 5 days.
They are actually best served slightly chilled, which means they are the perfect prep ahead dessert for when you’re hosting a proper knees-up.
Help! My glaze cracked when I cut the brownies. What went wrong, and can I use milk chocolate instead?
Glaze cracking is a common issue when the layers aren't fully chilled or if you rush the cutting process. To get those picture perfect slices, use the ‘hot knife’ technique: run a sharp knife under very hot water, wipe it completely dry, slice, and repeat between each cut.
While you can swap in milk chocolate, we strongly recommend the specified dark chocolate to provide that essential, rich counterpoint to the sweet peppermint layer.
How do I ensure the peppermint layer isn't overwhelmingly strong or like a smack of toothpaste?
Peppermint extract is potent stuff, so you must measure it carefully; this is not the time to measure with your heart! Start exactly with the recommended amount in the frosting (1 tsp), blend, and then taste a tiny sample.
If you feel it needs a little more pep, add another quarter teaspoon, but tread carefully it’s far easier to add more than to take it away!
Classic Triplelayer Mint Brownies

