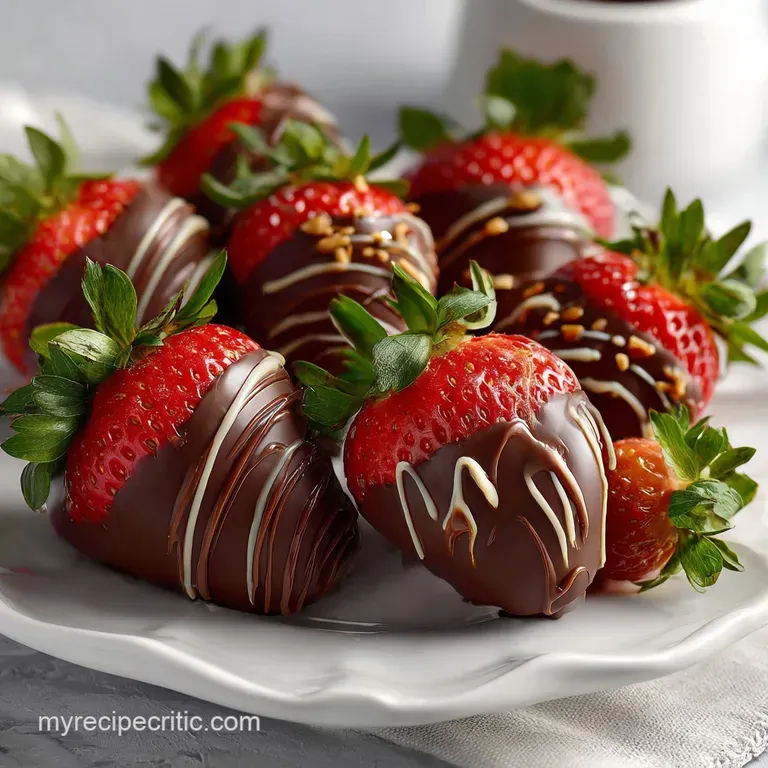
Best Chocolate Covered Strawberries Recipe: Professional Snap
- Time: Active 20 mins, Passive 30 mins, Total 50 mins
- Flavor/Texture Hook: Deep cocoa shatter with a lush, juicy fruit center
- Perfect for: Anniversary celebrations, hosting brunch, or a late night treat
- Science Behind the Chocolate Snap
- Official Recipe Specifications and Timing
- Sourcing High Quality Dipping Ingredients
- Essential Tools for Dipped Fruit
- Executing the Dipping Process Correctly
- Fixing Common Berry Dipping Errors
- Guidelines for Scaling Batch Sizes
- Debunking Common Chocolate Myths
- Storage and Zero Waste Methods
- Creative Ways to Serve Treats
- Recipe FAQs
- 📝 Recipe Card
Science Behind the Chocolate Snap
To get that professional crackle, we have to understand how the lipids in this BEST Chocolate Covered Strawberries recipe interact with the fruit surface. It isn't just about melting; it is about controlling the crystal structure of the cocoa butter.
- Lipid Emulsification: The refined coconut oil lowers the surface tension of the chocolate, allowing it to flow into a thinner, more even layer that sets with a velvety mouthfeel.
- Hygroscopic Prevention: Strawberries are over 90 percent water, so we must create a dry exterior to prevent the chocolate from seizing when the two surfaces meet.
- Crystalline Stabilization: Melting the wafers slowly keeps the stable Type V crystals intact, which ensures the chocolate remains firm at room temperature rather than melting in your hands.
| Method | Total Time | Final Texture | Best For |
|---|---|---|---|
| Microwave Melt | 50 mins | Glossy and snappy | Quick weeknight cravings |
| Double Boiler | 65 mins | Very smooth and thick | Large parties or holiday batches |
| Flash Freeze | 35 mins | Ultra cold and firm | Immediate eating / Hot days |
Choosing the right approach depends on your patience and the humidity in your kitchen. If you are in a rush, the microwave method is surprisingly effective as long as you use short bursts of heat to avoid scorching the delicate cocoa solids. For a more traditional experience, similar to the technique used in my Valentine Strawberries recipe, the stovetop provides the most control over the liquid state.
Official Recipe Specifications and Timing
Before we start dipping, let's look at the logistics of this batch. We are aiming for a yield of 24 servings, which typically uses about 907g (2 lbs) of berries depending on their size. Precision with your measurements ensures the chocolate to berry ratio stays balanced so every bite is managed easily.
| Ingredient | Science Role | Pro Secret |
|---|---|---|
| Dark Chocolate (340g) | Structural Shell | Use wafers for faster, more even melting without scorching |
| Coconut Oil (5ml) | Gloss Agent | Refined oil has a neutral scent and adds a brilliant sheen |
| Fresh Strawberries (907g) | Acidic Base | Keep stems attached to provide a natural handle for dipping |
You will want to ensure your dark chocolate is at least 60 percent cacao. This provides enough bitterness to balance the natural sugars in the fruit. If you use a lower percentage, the shell may feel too soft or cloying.
The refined coconut oil is a non negotiable addition if you want that professional, reflective look that doesn't dull as it cools.
Sourcing high-quality Dipping Ingredients
Selecting your components is the most important step for success. You want berries that are bright red all the way to the top because white shoulders usually mean a lack of sweetness and a firmer, woodier texture that doesn't pair well with dark cocoa.
- 2 lbs (907g) Fresh Strawberries: Look for medium sized berries; the giant ones are often hollow and watery.
- 12 oz (340g) high-quality Dark Chocolate Wafers: I recommend Ghirardelli or Guittard for a reliable melt.
- 4 oz (113g) White Chocolate Chips: These are for the decorative drizzle contrast.
- 1 tsp (5ml) Refined Coconut oil: This must be refined so your berries don't taste like a tropical island.
| Original Ingredient | Substitute | Why It Works |
|---|---|---|
| Dark Chocolate Wafers | Semi Sweet Chips | Easier to find. Note: Result will be sweeter and slightly softer |
| Refined Coconut Oil | Cocoa Butter | High fat content. Note: Provides a firmer snap but is more expensive |
| White Chocolate Chips | Almond Bark | Melt stability. Note: Very sweet and lacks authentic vanilla notes |
When picking your berries, avoid any with soft spots. A single bruised berry can introduce moisture into your dipping bowl, which will cause the entire batch of chocolate to behave poorly and turn into a thick, unworkable paste. For a deeper flavor profile, you can even incorporate techniques from this Cream Filled Chocolates recipe if you decide to pipe fillings later.
Essential Tools for Dipped Fruit
You don't need a professional pastry kitchen, but a few specific items make the process much cleaner. I highly recommend using a microwave safe glass bowl such as a Pyrex measuring cup because the handle stays cool while the glass retains enough heat to keep the chocolate liquid while you work.
- Baking Sheets: Line these with parchment paper or a silicone mat so the berries don't stick.
- Fine Mesh Strainer: Use this to wash the berries without bruising the skins.
- Paper Towels: You will need plenty of these to ensure every berry is bone dry.
- Small Zip Top Bag: This serves as a makeshift piping bag for the white chocolate drizzle.
- Toothpicks: Helpful for maneuvering the berries if you choose to remove the stems.
Executing the Dipping Process Correctly
This is where the magic happens. We are going to move with intention to ensure the chocolate stays at the right temperature while we work through the two pounds of fruit.
- Wash and dry. Rinse 907g of strawberries in cold water. Note: Do not remove the stems yet as they prevent water from entering the berry core.
- Ensure total dryness. Lay the berries on paper towels for 20 minutes until the skins feel matte and not tacky.
- Prep the station. Line two large baking sheets with parchment paper to prevent sticking.
- Melt the base. Place 340g of dark chocolate wafers and 5ml of coconut oil in a glass bowl.
- Heat in bursts. Microwave for 30 seconds, then stir. Repeat in 15 second intervals until the mixture is smooth and glossy.
- Execute the dip. Hold a berry by the stem, dip it into the dark chocolate, and swirl to coat.
- Drain excess. Lift the berry and let the extra chocolate drip off for 3 seconds until the flow slows to a thin thread.
- Set the berries. Place on the parchment and repeat with all berries. Let them sit for 15 minutes.
- Prepare the drizzle. Melt 113g of white chocolate chips in the microwave using the same burst method.
- Apply the finish. Transfer white chocolate to a bag, snip a tiny corner, and drizzle over the set dark chocolate until a striped pattern forms.
Chef's Tip: Freeze your berries for exactly 5 minutes before dipping. The cold surface causes the chocolate to grab hold and set almost instantly, preventing that unsightly "pool" of chocolate at the bottom of the fruit.
Fixing Common Berry Dipping Errors
Even seasoned cooks run into trouble with chocolate occasionally. Most issues stem from temperature fluctuations or hidden moisture. If your chocolate starts to look dull or "bloomed" with white streaks, it usually means it got too hot during the melting phase.
Preventing Chocolate Seizing
If a drop of water hits your melting bowl, the sugar and cocoa particles will clump together, turning your smooth liquid into a gritty paste. If this happens, you can sometimes save it by adding another teaspoon of coconut oil and stirring vigorously, but it is better to avoid it by using totally dry utensils.
Avoiding Sweaty Berries
Condensation is the enemy of a snappy shell. This happens when you move berries from a very cold fridge to a warm room. Try to let the berries set at room temperature for the first 20 minutes before moving them to the fridge for long term storage.
| Problem | Root Cause | Solution |
|---|---|---|
| Chocolate is Thick/Grainy | Overheating the cocoa | Stir in 1/2 tsp of oil and use a lower power setting |
| Chocolate Slides Off | Wet or oily berry skin | Pat each berry with a fresh paper towel right before dipping |
| White Streaks Appear | Poor tempering/heat | Keep the chocolate under 90°F (32°C) while melting |
Common Mistakes Checklist
- ✓ Never wash the berries after removing the stems (they act like sponges).
- ✓ Avoid using wooden spoons for stirring as they retain hidden moisture.
- ✓ Do not crowd the berries on the parchment; they need airflow to set.
- ✓ Ensure the coconut oil is refined to avoid unwanted tropical flavors.
- ✓ Use a deep, narrow bowl rather than a wide one to make dipping easier.
Guidelines for Scaling Batch Sizes
If you are making these for a large wedding shower or a small intimate dinner, the ratios need to be adjusted carefully. Chocolate does not always scale linearly because of the way it retains heat in larger volumes.
- Scaling Down (1/2 Batch): Use a smaller bowl to maintain depth for dipping. You will likely only need 30 seconds total in the microwave.
- Scaling Up (2x-4x Batch): Work in smaller batches of melted chocolate (12 oz at a time). If you melt 48 oz at once, the bottom will scorch before the top softens.
- Spices and Extracts: If adding vanilla or sea salt, only increase these by 1.5x when doubling the recipe to avoid overwhelming the fruit.
For a larger gathering, I love serving these alongside a hot beverage. The contrast of the cold berry and a warm drink is outstanding. Try pairing them with The Proper Cuppa recipe for a double chocolate experience that feels incredibly indulgent.
Debunking Common Chocolate Myths
One frequent misconception is that you need an expensive tempering machine to get a professional shine. In reality, the "seeding" method where you save a few un melted wafers to stir in at the end works perfectly for home cooks. This introduces the correct crystal structure back into the warm liquid.
Another myth is that you must use milk chocolate for a "classic" taste. Actually, milk chocolate has a much higher sugar and milk solid content, which makes it far more prone to burning and much softer at room temperature. Dark chocolate provides the structural integrity needed for that iconic crackle.
Storage and Zero Waste Methods
To keep your berries from sweating, store them in a single layer in a container lined with paper towels. The paper towels will absorb any moisture the berries release as they sit. They are best eaten within 10 to 12 hours, but they will stay safe in the fridge for up to 2 days.
I do not recommend freezing them, as the berries will turn mushy once thawed, and the chocolate will likely crack and fall off.
If you have leftover melted chocolate, don't throw it out! Pour it onto a piece of parchment paper, sprinkle it with some crushed nuts or leftover strawberry scraps, and let it harden into a simple bark.
You can also use strawberry tops (the green parts) to infuse water or vinegar for a subtle fruity note, ensuring nothing from your 2 lbs of berries goes to waste.
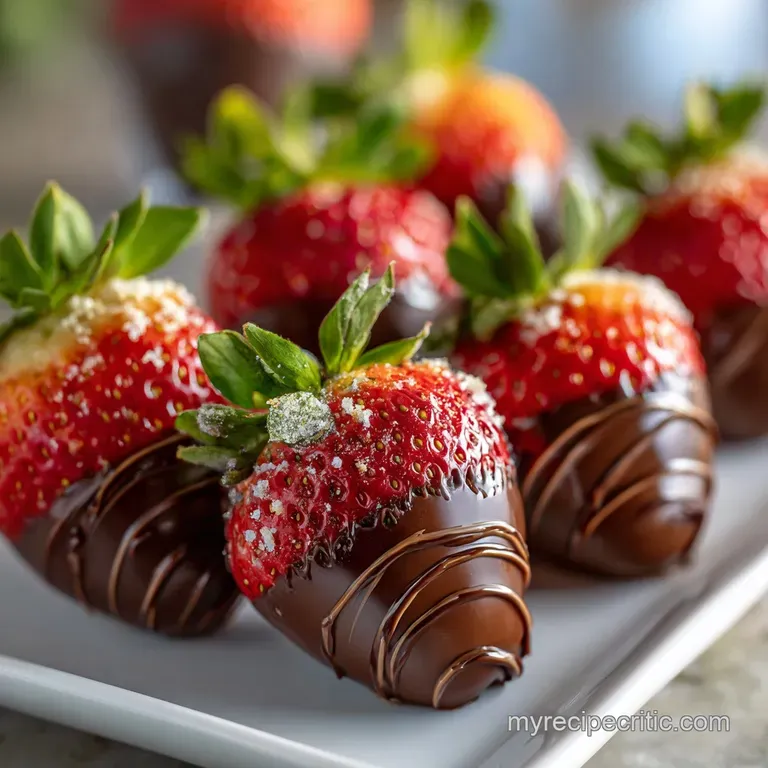
Creative Ways to Serve Treats
If you want to move beyond the simple tray, consider building a dessert charcuterie board. Surround your chocolate covered gems with toasted walnuts, sprigs of mint, and maybe some small wedges of brie. The saltiness of the cheese plays beautifully against the dark cocoa shell.
- For a Crunchy Finish
- Roll the wet chocolate immediately into crushed pistachios or toasted coconut.
- For a Gala Look
- Dust the finished berries with edible gold luster powder once the chocolate is completely set.
- For Kids
- Use colorful sprinkles or crushed graham crackers for a "s'mores" inspired strawberry.
Right then, you are ready to create a batch that will actually stay snappy and look brilliant. Whether you're making these for a special someone or just because you found a great deal on berries at the market, the key is the dry and dip precision. Let's crack on and get dipping!

Recipe FAQs
What is the secret to chocolate covered strawberries?
Thoroughly drying the strawberries. Berries contain high water content; if the surface is even slightly damp, the chocolate will seize or slide right off. Ensure the skins are matte and completely dry before dipping to achieve that professional snap.
What kind of chocolate is best for dipping strawberries?
high-quality dark chocolate wafers, 60% cacao or higher. Wafers melt more evenly than standard chips, and the higher cacao content balances the fruit’s sweetness better than milk chocolate. Adding a tiny amount of refined coconut oil improves gloss.
Should strawberries be warm or cold before dipping in chocolate?
Slightly chilled (but not ice cold). They should be cool to help the melted chocolate set quickly upon contact, but not so cold that condensation forms when they hit the warmer air. Flash freezing for 5 minutes before dipping is the ideal compromise.
How do I get chocolate to stick to my strawberries?
Ensure the chocolate is the right viscosity and the berry is dry. Dip quickly, coating about two-thirds of the berry, then lift and swirl gently while allowing excess chocolate to drip back into the bowl.
If you mastered controlling the fat ratio here, that same principle applies to keeping your drizzle stable.
Is it true I must use a double boiler for melting dipping chocolate?
No, this is a common misconception. You can successfully melt dipping chocolate using short bursts (15-20 seconds) in the microwave at 50% power. Stir vigorously between each burst to prevent scorching the delicate cocoa solids.
Why does my chocolate set with white, streaky marks (bloom)?
The chocolate was overheated or cooled too quickly unevenly. This bloom is usually due to unstable cocoa butter crystals reforming incorrectly. Keep your melted chocolate below 90°F and avoid moving the berries rapidly between temperature zones while setting.
Can I make chocolate covered strawberries ahead of time?
Yes, but aim for the same day for best results. They are best eaten within 10 hours of dipping. Store single layer in an airtight container with paper towels at room temperature or slightly cool, but avoid refrigeration unless absolutely necessary to reduce humidity.
Best Chocolate Covered Strawberries

Ingredients:
Instructions:
Nutrition Facts:
| Calories | 116 kcal |
|---|---|
| Protein | 1.2 g |
| Fat | 6.2 g |
| Carbs | 14.3 g |
| Fiber | 1.7 g |
| Sugar | 9.8 g |
| Sodium | 5 mg |
