Nobake Peanut Butter and Jelly Pie with Salty Pretzel Crust
- Elevating Childhood Nostalgia: The Grown-Up PB&J Dessert
- Stocking the Pantry for the Ultimate Dessert Build
- Must-Have Equipment for a Smooth Assembly
- Mastering the Layers: Step-by-Step Assembly Walkthrough
- Expert Tips for a Picture-Perfect Finish
- Troubleshooting and Perfecting Your Dessert
- Creative Flavour Twists for Your Next Pie
- Recipe FAQs
- 📝 Recipe Card
Elevating Childhood Nostalgia: The Grown-Up PB&J Dessert
This Showstopper Pie takes inspiration from the ultimate schoolyard favourite and transforms it into a luxurious, yet wonderfully approachable, confection. Forget simple bread and fillings; we are talking about a sophisticated layered dessert, pairing the salty crunch of pretzels with an impossibly smooth, cloud like peanut butter mousse.
This creamy creation delivers the familiar, comforting essence of the classic sandwich but elevated to Pie Dessert status a true celebration of the sweet and savoury profile that makes the Peanut Butter and Jelly Pie so irresistible.
It's the ultimate Comfort Food Dessert for any grown-up craving a nostalgic sweet treat.
Why the No-Bake Approach Wins Every Time
Opting for a peanut butter and jelly pie no bake method is simply the smartest way to achieve a perfect, stable texture and makes this an ideal Easy Summer Dessert .
Baking a crust introduces unnecessary complications and heat, which is precisely what we want to avoid when handling delicate, airy fillings. Our approach relies on the magical powers of the freezer and fridge.
This zero oven recipe is perfect for those sweltering days or when entertaining, allowing you to prep the entire dessert hours, or even a day, in advance, leaving you free to enjoy your guests without fussing over temperatures and timings.
The Culinary Magic of Salty Pretzel Crusts
While many traditional chilled desserts rely on a peanut butter and jelly pie with graham cracker crust , incorporating salted pretzels fundamentally changes the game. The pretzel base isn't merely a vessel; it’s an integral flavour component.
The salty crunch provides a sharp, addictive counterpoint to the dense, sweet richness of the peanut butter filling and the vibrant tartness of the berry jelly swirl. This savoury foundation cuts through the heaviness of the mousse, ensuring every bite is perfectly balanced and prevents the pie from feeling overly cloying a crucial step in elevating this simple concept to a truly memorable sweet.
Unpacking the Perfect Peanut Butter and Jelly Pie
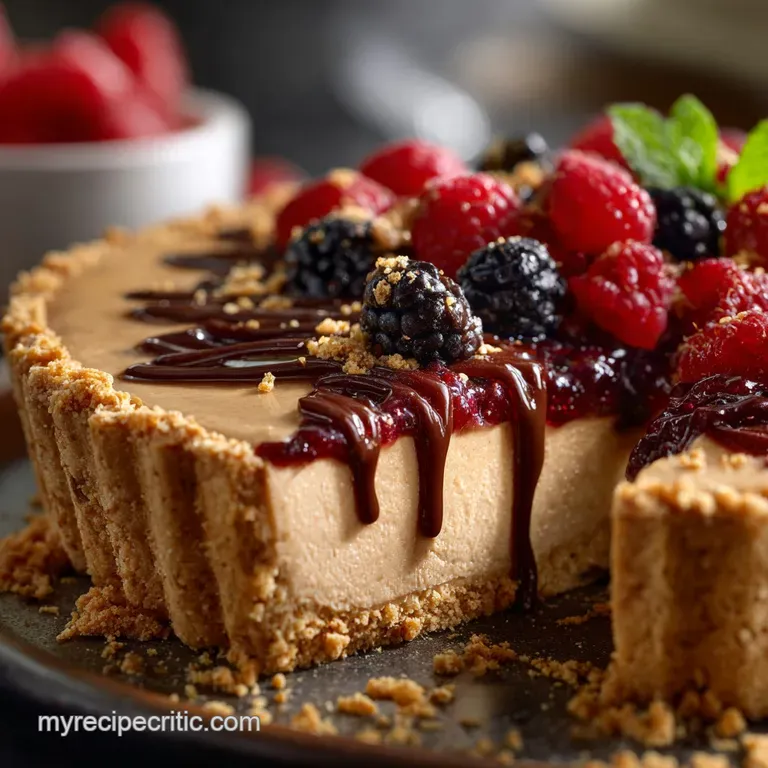
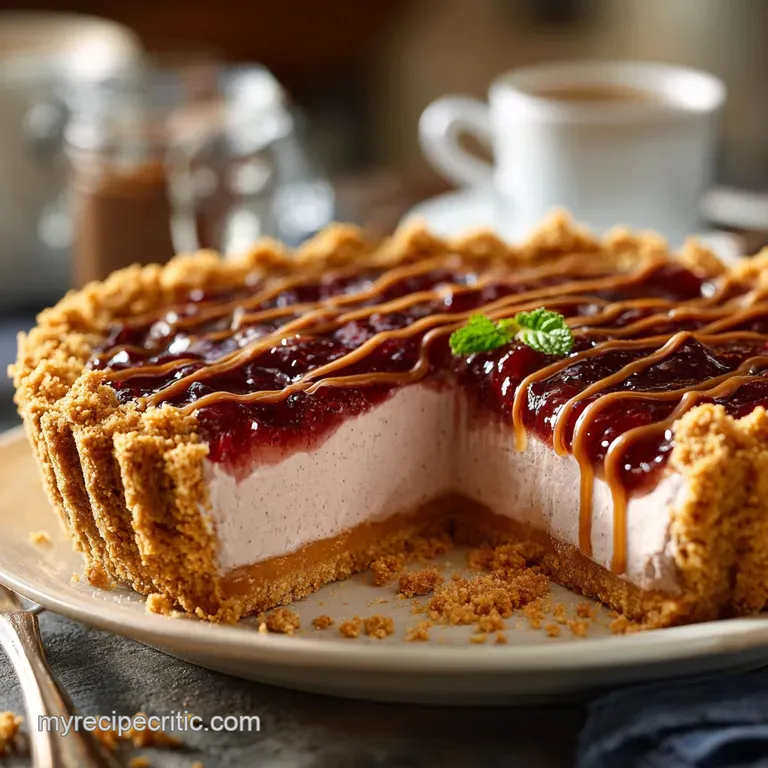
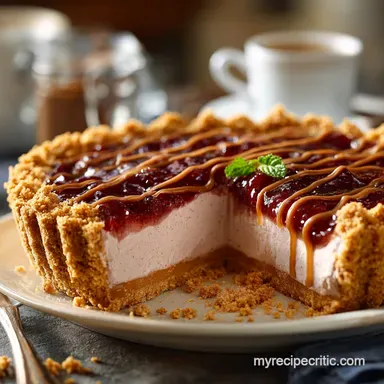
Achieving the perfect slice of this Peanut Butter and Jelly Pie is all about structural integrity and contrasting textures. The foundation is the deeply chilled, sturdy salty pretzel base.
Layered immediately above is the star: a creamy, airy mousse crafted from whipped cream and rich peanut butter, stabilized beautifully by softened cream cheese. The finishing touch is the vibrant swirl of fruit preserves, which adds necessary acidity and visual appeal.
This trifecta creates a truly satisfying bite that offers crunch, creaminess, and fruity brightness all in one perfect Sweets Treats package.
Stocking the Pantry for the Ultimate Dessert Build
Success begins with quality ingredients, especially when making this specific peanut butter and jelly pie recipe . For the creamy filling, the type of peanut butter is paramount: you must select a stable, smooth, commercial brand (like Jif or Skippy) rather than natural, oily varieties.
Natural peanut butter tends to separate and can make the mousse greasy and unstable. Similarly, full fat cream cheese is non-negotiable for achieving that necessary rich mouthfeel and structural support.
For the preserves, choose a high-quality, seedless raspberry or strawberry variety; the tartness of the berry provides the best flavour contrast, while seedless preserves ensure the smoothest texture against the filling.
Ensure your heavy cream is intensely cold before whipping this guarantees maximum volume and stiffness.
Must Have Equipment for a Smooth Assembly
While this is one of the easier No Bake Desserts to assemble, having the right tools makes the process seamless. A 9 inch (23 cm) springform pan is highly recommended, as its removable sides allow for effortless, clean slicing and presentation of the finished pie.
An electric hand mixer or a stand mixer with both whisk and paddle attachments is essential for thoroughly creaming the dense peanut butter base and for whipping the heavy cream to stiff peaks.
A food processor is the quickest way to achieve the fine, uniform crumbs needed for the salty base, though a sturdy Ziploc bag and a rolling pin work as well, providing a therapeutic, manual alternative.
Essential Components of the Salty Sweet Pretzel Base
The pretzel crust requires three simple elements: finely crushed salted pretzels, a small amount of granulated sugar for added stability and texture, and melted unsalted butter to bind the crumbs.
Ensure the pretzels are reduced to a sand like consistency any large chunks will prevent the crust from setting into a firm, cohesive foundation. Once combined with the melted butter, the mixture should resemble wet sand, ready to be densely pressed into the pan.
Achieving the Whipped, Airy Peanut Butter Mousse
The secret to the mousse’s light texture lies in the technique. First, the cream cheese must be beaten until totally smooth and fluffy before adding the peanut butter and powdered sugar. This step eliminates lumps. Once the heavy base is ready, the cold heavy cream is whipped separately until stiff peaks form.
The critical step is folding the whipped cream into the peanut butter base gently in two stages, ensuring you cut through the mixture rather than stirring. This prevents the loss of air, resulting in a light, almost ethereal mousse.
Selecting the Ideal Fruit Preserve or Jelly Swirl
While any classic jelly works, a slightly tart preserve such as raspberry or strawberry provides the perfect acidic foil to the rich fat of the peanut butter and cream cheese. Using a high-quality preserve means you get more concentrated fruit flavour without excessive added liquid.
Before swirling, warming the preserves slightly makes them spoonable and easy to marble, but care must be taken not to overheat them, as warm jelly will melt the filling instantly.
Preparing Your Springform Pan and Mixing Bowls
Preparation ensures a perfect release. If using a springform pan, line the bottom with a circle of parchment paper, trapping it when you secure the sides; this prevents the crust from sticking to the base.
For the filling, ensure your mixing bowl and whisk attachment are completely clean and dry before whipping the heavy cream, as even a trace of moisture or grease can prevent the cream from whipping properly.
Related Recipes Worth Trying
- Proper Flaky Mini Chicken Pot Pies Muffin Tin Method — These individual Mini Chicken Pot Pies are the ultimate comfort foodrich filling golden flaky crust and perfectly portioned Great Chicken Pot Pie For One
- Proper Mini Chicken Pot Pies Recipe No Soggy Bottoms Made in a Muffin Tin — Make perfect individual Mini Chicken Pot Pies in your muffin tin Flaky shortcrust pastry prevents the dreaded soggy bottom giving way to a rich thymeinfused...
- Foolproof No Knead Rye Bread Recipe with Caraway and Molasses — This easy No Knead Rye Bread recipe uses a slow rise for incredible depth of flavor Baked in a Dutch oven you get a thick burnished crust and moist crumb...
Mastering the Layers: step-by-step Assembly Walkthrough
The creation of the ultimate Peanut Butter and Jelly Pie follows a logical, chilled path. Start by crushing the 6 ounces (170 g) of pretzels with 2 tablespoons of sugar, combining them with 5 tablespoons of melted butter, and pressing this mixture firmly into the prepared 9 inch pan.
Freeze this foundation for 15 minutes. While the crust sets, whip 1 1/2 cups (360 ml) of cold heavy cream until stiff peaks are achieved and refrigerate. In a separate bowl, beat the 8 ounces (225 g) of softened cream cheese until smooth, then incorporate the 1 cup (250 g) of peanut butter, powdered sugar, vanilla, and salt.
Finally, gently fold the whipped cream into the peanut butter base. Spoon this filling into the chilled crust. Warm the 1/2 cup (120 g) of preserves until easily spooned, dollop it across the top, and gently swirl with a skewer.
Cover loosely and chill the pie for a minimum of 4 hours, though overnight is ideal for maximum firmness.
Expert Tips for a Picture Perfect Finish
Crushing and Setting the Crunchy Foundation
When crushing the pretzels, uniformity is your friend. Fine crumbs pack tighter and set harder. When pressing the base, use the flat bottom of a measuring cup or glass to apply even, firm pressure.
This density ensures that the crust will hold its shape when sliced and won't crumble apart under the weight of the rich filling. Immediate chilling in the freezer helps the butter solidify quickly, locking the structure in place.
Technique for Folding the Lightest Peanut Butter Filling
The success of a truly light mousse rests entirely on the folding technique. After adding one-third of the whipped cream to lighten the dense peanut butter base, add the remainder.
Using a large rubber spatula, employ a “cutting” motion down the centre of the bowl and then a “folding” motion to scoop the base over the cream. Rotate the bowl as you go. Stop folding the moment the streaks of white cream disappear. Overmixing turns the light mousse into a dense, heavy spread.
Swirling the Jelly and Chilling Your Peanut Butter and Jelly Pie
When applying the preserves, try to keep the majority of the jelly on the surface and only swirl gently into the top half inch of the filling. Digging too deeply can pull up pretzel crumbs and lead to a messy presentation. Regarding the chill time, patience is paramount.
Do not attempt to slice the pie before the minimum 4-hour set time. If the filling feels soft to the touch, it needs more time it must be firm all the way through to achieve those clean, elegant slices.
Slicing and Serving the Creamy Dessert
To get professional looking slices from your Sweets Treats creation, use a long, sharp knife. For the cleanest cuts, dip the knife in a tall glass of hot water and wipe it completely dry between each slice.
This warms the blade slightly, allowing it to glide through the dense, chilled filling without dragging the jelly or tearing the crust. Serve the pie immediately upon slicing.
Troubleshooting and Perfecting Your Dessert
Solving Common Mousse Density Issues
If your mousse turns out dense instead of airy, the culprit is usually either over softened cream cheese (too warm and runny) or over mixing the whipped cream when combining it with the peanut butter base.
To fix a slightly dense batch, you can often save it by gently folding in a small amount of newly whipped, perfectly stiff cream right before setting. If the mixture is already setting up, there is no real fix, but rest assured, it will still taste fantastic; it will just be less moussey and more cheesecake like.
Storing Leftovers and Freezing Instructions
Leftover Peanut Butter and Jelly Pie should be stored in an airtight container in the refrigerator for up to 4 days. If you are prepping far ahead, this Pie Dessert freezes exceptionally well.
Once fully set, wrap the entire pie (preferably still in the springform pan base) tightly in plastic wrap, followed by a layer of aluminum foil. It can be frozen for up to 2 months. Thaw overnight in the refrigerator before serving.
Best Beverages to Pair with Rich PB&J Flavours
The robust, rich profile of this Showstopper Pie pairs beautifully with beverages that cut through the richness. A strong, dark filter coffee or a robust builder's tea provides a necessary bitterness. For an evening treat, consider pairing it with a rich milk stout or a dark porter.
The malty, slightly roasted notes of the beer complement the deep, nutty flavour of the peanut butter wonderfully.
Creative Flavour Twists for Your Next Pie
Making a gluten-free Peanut Butter and Jelly Pie Crust
If you need a gluten-free option, substitute the pretzels with an equal weight of finely crushed gluten-free vanilla wafers or gingersnaps. Alternatively, you can create a unique, nutty GF base using a mixture of crushed roasted peanuts and gluten-free oat flour bound with the specified amount of butter.
This maintains the essential crunch and savoury element.
dairy-free Adaptations for the Filling
Creating a dairy-free version of this peanut butter and jelly pie no bake filling is straightforward using modern alternatives. Substitute the heavy cream with chilled, full fat canned coconut cream (the thick solids scraped from the top of an unshaken, refrigerated can) and whip it as you would heavy cream.
Replace the cream cheese with a high-quality, full fat vegan cream cheese alternative. Ensure all other ingredients (peanut butter, powdered sugar) are certified vegan.
Switching Up Nut Butters and Preserve Combinations
While this recipe is built on the classic Peanut Butter and Jelly Pie profile, feel free to experiment. Substitute the smooth peanut butter with almond butter, cashew butter, or even sunflower seed butter (for a nut-free option).
For the jelly, swap out raspberry for a tart cherry preserve, apricot jam, or even a sophisticated fig jam to alter the flavour profile and create an exciting new Sweets Treats experience.

Recipe FAQs
Crikey, my Peanut Butter and Jelly Pie filling is still a bit wobbly! How do I make sure it sets properly?
Don't panic, old bean! The most common culprit is simply impatience. Ensure the pie chills for the full recommended 6 hours, or ideally overnight; it really needs time for the fats in the cream cheese and peanut butter to firm up and bind the filling properly.
Also, when folding in the whipped cream, treat it delicately if you knock all the air out, the filling will become dense and won't set into that lovely light mousse texture.
I only have natural, runny peanut butter in the cupboard. Will that work for this recipe?
That’s a definite no, sadly! Natural, oily peanut butter tends to separate and weep liquid once mixed with dairy, which will make your filling runny and potentially greasy a proper baking disaster.
For this no-bake recipe, you really need a stabilised, processed type (like Skippy or Jif) to maintain the emulsified, airy mousse texture we’re aiming for. Save the healthy stuff for your toast!
I'm not a fan of raspberries. Can I swap the jelly/jam flavour for something else?
Absolutely! The beauty of this recipe is that it’s highly customisable, allowing you to use whatever preserves tickle your fancy. A slightly tart option like blackcurrant, apricot, or even orange marmalade works wonderfully to cut through the richness of the peanut butter.
Just make sure whatever you choose isn't too runny; warming it slightly helps with the swirl, but if it's too liquid, it will sink straight to the bottom.
I want to make this ahead for a garden party. How long can I store this absolute showstopper?
This dessert is actually an absolute dream for making ahead! It keeps splendidly in the fridge for up to 4 days, provided you cover it loosely with cling film once fully set. If you need to plan further ahead, you can freeze the entire pie for up to a month; just ensure it is wrapped tightly in cling film and then foil to prevent freezer burn.
When defrosting, remember to transfer it to the fridge overnight to thaw gently.
Be honest, is this a proper indulgent pudding, or can I pretend it's low-fat?
Let's be upfront: this is a seriously decadent treat, loaded with cream, cream cheese, and peanut butter it’s pure indulgence! While the protein content is surprisingly high thanks to the nuts, you should definitely view this as a celebratory slice of naughtiness rather than a healthy snack.
It pairs perfectly with a strong cup of builder's tea to help cut the richness.
Salty Peanut Butter And Jelly Pie
Ingredients:
Instructions:
Nutrition Facts:
| Calories | 588 kcal |
|---|---|
| Protein | 2.3 g |
| Fat | 14.5 g |
| Carbs | 51.8 g |
| Fiber | 0.4 g |
| Sodium | 5177 mg |
