Cherry Pie Bars: the Crumbly Shortbread Recipe with Almond Filling
- The Proper Cherry Bakewell Pie Bars: Easier Than Lattice Pie
- The Science of Perfect Texture: Why These Cherry Pie Bars Set Beautifully
- Essential Ingredients for the Buttery Shortbread Crust and Vibrant Filling
- Baking the Best Cherry Pie Bars: Step-by-Step Method
- Chef’s Troubleshooting: Achieving the Ideal Crumb and Set
- How to Store and Preserve Your Homemade Cherry Pie Bars
- Perfect Pairings: What to Serve with Your Crumbly Cherry Pie Bars
- Recipe FAQs
- 📝 Recipe Card
The Proper Cherry Bakewell Pie Bars: Easier Than Lattice Pie
Oh my goodness, you absolutely have to try these. When they’re baking, the whole house smells like a perfect summer Saturday, that mix of warm, buttery shortbread and sharp, bubbly cherries.
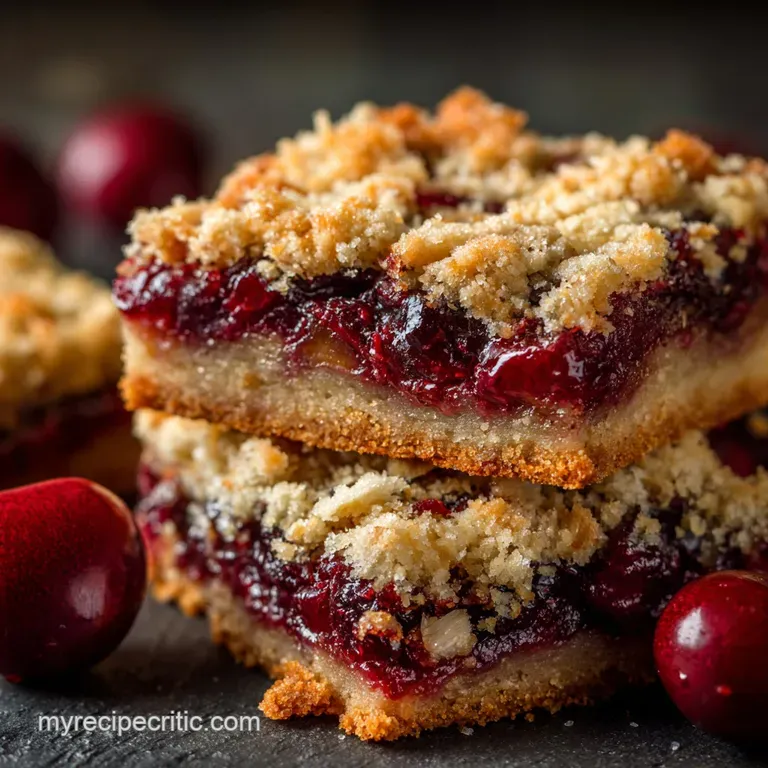
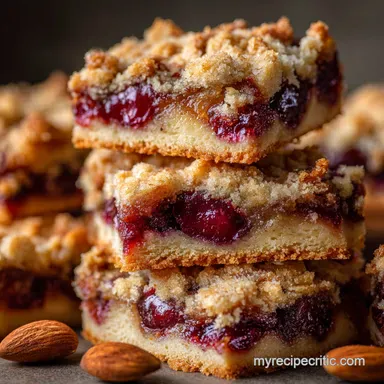
The finished result has this incredible dual texture: a sturdy, melt-in-your mouth crust topped by jammy, vibrant fruit, all covered with a crisp, crunchy streusel. It is honestly the best dessert bar in the whole wide world, hands down.
I adore a classic double crust cherry pie, but let’s be real, who has time for all that fiddly lattice work? This Cherry Pie Bars recipe is my lifesaver because it takes all that complex flavor and delivers it in an easy, sliceable square that requires zero rolling or crimping.
It’s fast, forgiving, and cheap, especially if you snag a big bag of frozen cherries when they’re on sale.
This recipe nails the classic Bakewell flavour profile, marrying the sweet almond notes with the tart fruit it’s pure genius. If you’re ready to ditch the soggy bottoms and complex pastry techniques, grab your 9x13 pan.
Let’s crack on and bake the most foolproof, deeply satisfying cherry squares you’ve ever had.
The Science of Perfect Texture: Why These Cherry Pie Bars Set Beautifully
You know I’m not just here to list ingredients; I want to tell you why this works so you never fail. The success of this specific bar hinges on managing temperature and moisture, simple as that.
We are essentially building a shortbread, not a pastry dough, which makes the base sturdy enough to hold the fruit without dissolving.
The Joy of the Dual Purpose Shortbread Crumb
We use the same mixture for the base and the topping, which is brilliant for efficiency and flavor continuity. Crucially, the butter must be ice cold when you cut it into the flour. This keeps the fat separate from the gluten, guaranteeing a flaky, tender, and crumbly texture, rather than a tough cookie like base. Remember that time I tried to make Banana Oatmeal Bars: The Healthy Breakfast Bar Recipe with warm butter? Total mess.
Why Almond Extract is Non-Negotiable for That Classic Bakewell Flavour
If you want these to taste deep, complex, and nostalgic like the English Bakewell tart that inspired them you absolutely cannot skip the almond extract. A tiny splash enhances the natural, subtle nutty flavor present in the cherry pits themselves.
It’s the secret ingredient that transforms a simple fruit bar into something sophisticated and memorable.
A Brief History of the Bakewell vs. American Cherry Bar
The original Bakewell tart relies on an almond filling (frangipane) and sometimes cherry jam. My recipe is a friendly fusion; it borrows the sturdy shortbread base and that delightful almond hint, but replaces the heavy frangipane with a vibrant, American style, cornstarch thickened fruit filling.
This fusion gives you the best of both worlds: robust flavor and a clean, sliceable square.
How the Stovetop Cherry Filling Prevents a Soggy Bottom
Wait, we don't cook this filling on the stove! That's a trick I save for high moisture fruits like peaches. Here, we toss the slightly frozen cherries directly with the cornstarch.
The moisture from the thawing fruit mixes with the cornstarch in the oven , preventing premature gelling and ensuring the filling bubbles thickly. This method is faster and guarantees the shortbread base doesn't absorb too much liquid before the starch activates.
The Role of Chilling the Dough (Thermal Shock)
Chilling the pressed crust for 30 minutes is non-negotiable, seriously. It helps the butter firm up again before hitting the hot oven. This thermal shock prevents the crust from shrinking away from the edges and becoming too dense.
It sets the structure, giving you that nice, straight sided bar you want for a clean cut.
Balancing Tartness: Sour vs. Sweet Cherry Varieties
I usually lean toward frozen dark sweet cherries because they are readily available and perfectly plump. However, if you are lucky enough to find fresh sour (tart) cherries, they are truly divine here!
If you use tart cherries, just bump the sugar in the filling up to 3/4 cup instead of 1/2 cup to keep the balance right.
Essential Ingredients for the Buttery Shortbread Crust and Vibrant Filling
We don't need fancy ingredients for these Cherry Pie Bars: Crumbly Perfection with a Simple Shortbread Crust , just good quality basics.
Building the Flaky, Rich Crumb Base
The key to the crumb is using both white and brown sugar for depth, and ensuring the butter is cut into tiny, cold pieces.
| Ingredient | Substitute/Alternative | Chef's Note |
|---|---|---|
| All-Purpose Flour | 1:1 GF Baking Blend (with xanthan) | Ensure you follow weight measurements if possible for GF success. |
| Unsalted Butter | Cold Vegetable Shortening or Vegan Butter Sticks | Do not use margarine; the water content is too high. |
| Brown Sugar | Honey or Maple Syrup (reduce other liquids slightly) | Brown sugar adds that lovely molasses depth, but granulated sugar works fine in a pinch. |
| Baking Powder | None needed if using self raising flour | Crucial for keeping the crumb light and airy. |
Selecting the Best Cherries (Fresh, Frozen, or Canned?)
Frozen is often easiest and best for texture, but don't discount the canned option if cherries are out of season.
| Cherry Type | Preparation | Resulting Texture |
|---|---|---|
| Frozen | Toss straight into the mix, do not fully thaw. | Best, nice jammy consistency. |
| Fresh | Pit them (a chopstick works well!) and follow the recipe. | Most vibrant flavor, but requires work. |
| Canned Filling | Use 4 cups of well drained canned filling. Skip the cornstarch and sugar. | Fastest method, but the flavor is often sweeter. |
Cornstarch vs. Flour: Achieving the Right Filling Consistency
Cornstarch is superior here. It creates a clear, glossy, firm gel that sets beautifully upon cooling, whereas flour creates a cloudier, slightly duller finish and doesn't hold its structure as firmly. Three tablespoons gives us the perfect thick, sliceable filling for these Cherry Squares Recipe.
Chef’s Note: Never eyeball the cornstarch! If you use too little, you get a runny mess. If you use too much, the filling turns gummy and dense. Measure exactly.
Baking the Best Cherry Pie Bars: step-by-step Method

This is straightforward, but speed and temperature control are your best friends for the perfect Shortbread Cherry Pie Bars.
Preparing the Pan and Pressing the Base Layer
- Preheat your oven to 350°F (175°C). Line your 9x13 inch pan with parchment paper, allowing enough overhang on the two long sides to create a handy sling.
- Combine the flour, sugars, baking powder, and salt. Add the cold, cubed butter. Work it in quickly using a pastry blender or by pinching with your fingertips until the mixture is sandy with some pea-sized crumbs remaining. Don't let the butter melt.
- Remove and reserve 1 1/2 cups of the mixture for the topping and immediately stash it in the fridge. To the remaining crumb, stir in the egg yolk and milk.
- Press this base firmly and evenly into the bottom of your prepared pan. Place the pan in the freezer for 30 minutes.
Simmering the Cherry Filling to the Nappe Stage
Actually, for this specific method, we are skipping the stovetop simmer! We are letting the oven do the heavy lifting to ensure the base doesn't get soggy.
- While the base chills, mix your filling. Toss the slightly frozen cherries with the sugar, lemon juice, cornstarch, vanilla, and the crucial almond extract. The frozen fruit will release some liquid as it sits, starting the binding process.
- Make sure every piece of fruit is coated in that white cornstarch mixture. This ensures even gelling later.
Layering, Crumbing, and Baking to Golden Perfection
- Retrieve the chilled base and pour the cherry filling evenly over the top. Don't press the fruit down.
- Take the reserved crumb mixture from the fridge and sprinkle it loosely and evenly over the cherries. I love that rustic look.
- Bake for 40 to 45 minutes. You know they are done when the topping is a deep golden brown and the cherry mixture is bubbling vigorously and thickly around the edges of the pan. The kitchen aroma will be incredible!
- Remove from the oven and transfer to a wire rack. This is the hardest part: leave them alone.
Chef’s Troubleshooting: Achieving the Ideal Crumb and Set
These Cherry Bars Recipe are incredibly forgiving, but a few things can go wrong if you rush the process.
Avoiding a Runny Filling: Temperature and Cooling Time
This is the number one reason people fail. The filling relies entirely on the cornstarch, and cornstarch doesn't fully set until it cools. If you slice the bars while they are even remotely warm, the filling will run out everywhere, turning your beautiful bars into an absolute disaster.
Fix: Allow them to cool for a minimum of two hours at room temperature, or stick them in the fridge for an hour after the initial room temperature cool down.
If the Crumb Topping is Too Sandy or Too Wet
If your topping seems overly powdery and doesn't clump at all, add a teaspoon of milk, mixing quickly until it forms small, shaggy clumps. If it’s too wet and forms a solid dough (usually because your butter was too warm), put the mixture back in the freezer for 15 minutes and then use a fork to break it back into smaller, separated crumbs.
The ‘Clean Cut’ Secret: When to Slice the Bars
The truly perfect time to slice is once the bars are completely cool, maybe even slightly chilled. Use the parchment sling to lift the whole slab out onto a cutting board. Use a sharp, non-serrated knife, wiping the blade clean with a damp cloth between every cut. This yields those beautiful, bakery worthy edges.
How to Store and Preserve Your Homemade Cherry Pie Bars
Yes, they store brilliantly! You can definitely make these ahead of time for a picnic or party. These are far sturdier than a piece of pie. If you're looking for other hearty bars, maybe try my recipe for St Patricks Day Desserts: Ultimate Irish Cream Cheesecake Bars sometime!
Airtight Storage for Optimal Freshness
Store completely cooled bars in a sealed, airtight container at room temperature for up to 3 days, or in the refrigerator for up to 5 days. Layering parchment paper between the bars prevents sticking.
Best Practices for Freezing Baked or Unbaked Bars
Cherry Pie Bars freeze beautifully! Wrap individual, cooled bars tightly in plastic wrap, then place them inside a freezer safe bag or container. They can stay frozen for up to 3 months. Thaw them overnight in the refrigerator.
Refreshing Day-Old Bars (The Quick Bake Method)
If the crumb topping has lost its crispness, don't worry. Place the bars on a sheet pan and bake in a preheated 300°F (150°C) oven for about 5 to 8 minutes. This gently reheats the filling and re-crisps the shortbread topping. Serve immediately!
Perfect Pairings: What to Serve with Your Crumbly Cherry Pie Bars
These delicious Pie Bars Recipe pair wonderfully with simple, creamy textures that contrast the tart fruit.
- Ice Cream: Classic vanilla bean is always a winner, but a scoop of salted caramel elevates the buttery notes beautifully.
- Whipped Cream: Always serve with a generous dollop of freshly whipped cream, maybe spiked with a tiny bit of vanilla or Amaretto.
- Cheeses: If you’re feeling adventurous, a thin slice of mild, soft goat cheese on the side is a surprisingly excellent textural counterpoint.

Recipe FAQs
Can I use frozen cherries instead of fresh ones for the filling?
Yes, frozen cherries work beautifully for this recipe, but do not thaw them beforehand; use them directly from the freezer. Since frozen fruit releases more moisture, you should increase your thickening agent (cornstarch or flour) by about one full teaspoon to ensure the filling sets properly.
My filling seems runny after baking. What went wrong?
A runny filling is usually a result of insufficient baking time or not allowing the bars to cool completely. The filling only achieves its firm, sliceable texture once it has cooled down fully to room temperature. Do not attempt to slice the bars until they have rested for at least 3 hours.
How do I know when the Cherry Pie Bars are perfectly baked?
The bars are finished when the shortbread crumb topping turns a rich, golden brown and the cherry filling is visibly bubbling slightly around the edges. If the topping browns too quickly, loosely tent the pan with aluminum foil for the remaining 10 to 15 minutes of baking time.
I don't like almond extract. Can I omit it or substitute it?
The almond extract is highly recommended as it provides the classic "Bakewell" nuance that complements the cherry, but you may certainly omit it. If you wish for a substitute, use an equal amount of pure vanilla extract instead for a classic, rounder flavor profile.
What is the best way to store these bars, and how long do they last?
Store the completely cooled bars in an airtight container at room temperature for up to 3 days. For longer storage, refrigerate them for up to 5 days; ensure they are cooled before sealing the container to prevent a soggy crumb base.
Do I need to chill the shortbread dough before pressing it into the pan?
Chilling is typically unnecessary for this type of shortbread crumb, as it is meant to be handled easily. However, if your kitchen is very warm and the dough feels overly sticky, chill it for 15 minutes to firm it up, which will make pressing the base much easier.
Can I freeze the Cherry Pie Bars for later consumption?
Yes, these bars freeze very well. Once fully cooled, wrap individual bars tightly in plastic wrap, then place them in a freezer safe container or bag for up to 3 months. Thaw them overnight in the refrigerator or briefly on the counter before serving.
Proper Cherry Pie Bars With Shortbread Crumb
Ingredients:
Instructions:
Nutrition Facts:
| Calories | 248 kcal |
|---|---|
| Protein | 0.0 g |
| Fat | 0.0 g |
| Carbs | 0.0 g |
