Instant Pot Cheesy Taco Ground Beef and Rice

- Time: 8 min active + 17 min cook = Total 25 mins
- Flavor/Texture Hook: Velvety cheese with fluffy, flavor soaked rice
- Perfect for: Hectic weeknights, budget meal prep, and picky eaters
- Instant Pot Cheesy Taco Ground Beef
- The Secret To Better Texture
- The Essential Recipe Specs
- Gathering Your Ingredient List
- Essential Tools You'll Need
- Step By Step Cooking Guide
- Solving Common Cooking Problems
- Troubleshooting Common Issues
- Creative Ways To Swap
- Budgeting and Scaling Your Meal
- Truths About Pressure Cooking
- Storage And Waste Tips
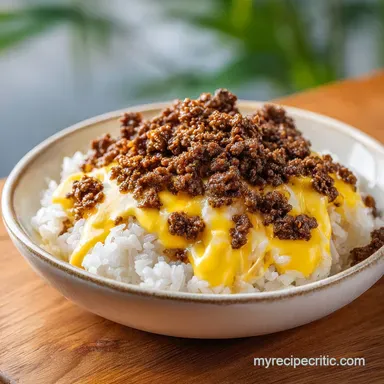
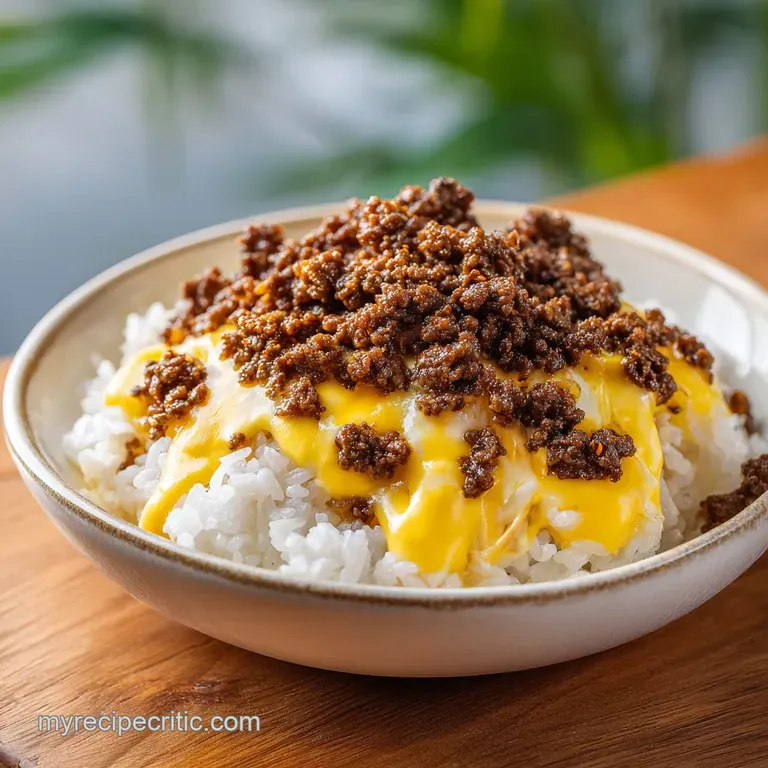
- Plating For Maximum Impact
- Recipe FAQs
- 📝 Recipe Card
The scent of toasted cumin and sizzling garlic hitting a hot pan is enough to make anyone's mouth water. For me, this dish is a nod to the Tex Mex tradition of "one pot" family meals, where the goal is to feed a crowd without spending the entire evening scrubbing five different pans.
It's the kind of food that feels like a warm hug, reminding me of those chaotic family gatherings where the table is crowded and the laughter is louder than the music.
This Instant Pot Cheesy Taco Ground Beef and Rice Recipe is the ultimate one pot meal. We're not just tossing things in a pot and hoping for the best, we're layering flavors from the very first sear. You can expect a dish where the rice isn't just a side, but a sponge that has absorbed all the savory goodness of the beef and broth.
Whether you're cooking for kids who only eat "orange food" or you're trying to stretch a few hundred grams of meat to feed a whole family, this approach works. We'll use a few smart budget swaps and some basic pressure cooking logic to make sure you get a velvety result every single time.
Instant Pot Cheesy Taco Ground Beef
The secret to this dish is the order of operations. If you just dump everything in, you get a bland, mushy mess. By searing the beef first, we create those deep, browned bits on the bottom of the pot that hold the real flavor. It's all about building a foundation of savory notes before the pressure takes over.
I've found that the most common mistake is rushing the sauté phase. You want that beef to be a deep mahogany, not just a pale grey. That color is where the richness comes from. Once that's locked in, the pressure cooker does the heavy lifting, steaming the rice and beans in a concentrated beefy broth.
When the lid finally comes off and the cheese melts into the mixture, the texture becomes silky and cohesive. It's a brilliant way to get a complete meal, including protein, grains, and vegetables, without the stress of timing three different pots on the stove.
The Secret To Better Texture
Since we're dealing with rice and pressure, there are a few things happening under the hood that make this recipe work.
- Liquid Absorption
- Pressure forcing liquid into the rice grains faster than simmering does, which means the rice tastes like the sauce, not just water.
- Starch Control
- Rinsing the rice removes excess surface starch, preventing the grains from clumping into a sticky mass.
- Fat Emulsification
- Folding in the cheese at the very end uses the residual heat to create a velvety sauce without breaking the fats.
- Deglazing Effect
- Using a splash of broth to scrape the pot prevents the "Burn" warning and incorporates those caramelized beef bits back into the rice.
If you're looking for a more customized flavor profile, using a homemade taco seasoning can add a level of freshness that store-bought packets sometimes lack.
| Method | Total Time | Texture | Best For |
|---|---|---|---|
| Instant Pot | 25 mins | Velvety & Integrated | Fast weeknights |
| Oven Bake | 60 mins | Crusty & Layered | Sunday dinner |
| Stovetop | 40 mins | Fluffy & Separate | Traditional feel |
The Essential Recipe Specs
Before we dive in, let's look at the numbers. This recipe is designed to be budget smart, using frozen corn and canned beans to bulk up the protein without spending a fortune on extra meat.
Precision Checkpoints: 1. Beef must reach a mahogany brown color during the sauté phase. 2. High pressure must be set for exactly 8 minutes. 3. Natural pressure release must occur for exactly 5 minutes before venting.
This ensures the rice is fully cooked but still has a distinct bite, and the beef remains tender. Using lean ground beef (around 90% lean) is usually best here so the dish doesn't end up with a layer of oil floating on top, though you can always spoon some off if needed.
Gathering Your Ingredient List
Here is everything you'll need. I've included metric conversions because it's just more precise for those of you who prefer a scale.
- 450g (1 lb) lean ground beef Why this? Less grease prevents a "slick" texture in the rice
- 15ml (1 tbsp) olive oil Why this? High smoke point for searing
- 100g (1/2 cup) diced yellow onion Why this? Adds a sweet, aromatic base
- 3 cloves minced garlic Why this? Essential punch of flavor
- 200g (1 cup) long grain white rice, rinsed Why this? Holds shape better than short grain
- 240ml (1 cup) beef broth, low sodium Why this? Control the salt levels
- 30g (2 tbsp) taco seasoning Why this? Quick, complex flavor profile
- 425g (15 oz) black beans, drained and rinsed Why this? Budget friendly fiber and protein
- 150g (1 cup) frozen corn Why this? Adds pops of sweetness and color
- 170g (1 1/2 cups) shredded sharp cheddar cheese Why this? Strong flavor cuts through the beef
- 56g (1/2 cup) shredded Monterey Jack cheese Why this? Superior meltability for that silky finish
- Fresh cilantro for garnish
- Lime wedges for garnish
| Original Ingredient | Substitute | Why It Works |
|---|---|---|
| Lean Ground Beef | Ground Turkey | Similar texture. Note: Leaner, so add 1 tsp oil if dry |
| Beef Broth | Chicken Broth | Works well. Note: Lighter flavor, less "beefy" |
| White Rice | Jasmine Rice | Very fragrant. Note: Reduce broth by 2 tbsp to avoid mush |
| Cheddar Cheese | Pepper Jack | Adds heat. Note: Great for a spicy kick |
Essential Tools You'll Need
You don't need a professional kitchen for this, just a few basics. A 6 quart Instant Pot is the standard, but an 8 quart works just as well.
I highly recommend using a silicone spatula. It's the best tool for deglazing the bottom of the pot, and it won't scratch the inner lining. You'll also want a fine mesh strainer to rinse your rice. If you don't rinse the rice, you're asking for a gummy texture that ruins the whole experience.
Finally, have your cheese shredded fresh if you can. Pre shredded cheese is coated in potato starch to prevent clumping, but that same starch can make your sauce feel grainy rather than velvety.
Step by step Cooking Guide
Let's crack on. Follow these steps closely, especially the deglazing part, or you'll be dealing with a "Burn" warning.
Phase 1: Searing and Aromatics
- Set the Instant Pot to Sauté (Normal). Add 15ml olive oil and 450g ground beef. Cook, breaking the meat apart with a spatula, until the beef is mahogany colored and no longer pink. Note: Don't rush this; the brown bits are where the flavor lives.
- Stir in the 100g diced onions and 3 cloves minced garlic. Sauté for another 3 minutes until the onions are translucent and fragrant.
Phase 2: Deglazing and Pressurizing
- Turn off the Sauté function. Pour in a splash of the 240ml beef broth and scrape the bottom of the pot thoroughly with a spatula to remove any browned bits. Note: This is the most critical step to avoid the Burn warning.
- Stir in the 30g taco seasoning, 200g rinsed rice, remaining beef broth, 425g black beans, and 150g corn. Ensure the rice is fully submerged in the liquid.
Phase 3: The Pressure Cycle and Finishing
- Secure the lid and set the valve to Sealing. Select Manual/Pressure Cook (High) for 8 minutes.
- Once the timer beeps, allow a Natural Release for 5 minutes, then quick release the remaining pressure.
- Open the lid and fold in the 170g shredded cheddar and 56g Monterey Jack cheese. Stir gently until the cheese is fully melted and velvety.
Chef's Tip: If the mixture looks too thick after the pressure release, stir in a tablespoon of hot water or extra broth before adding the cheese to loosen it up.
Solving Common Cooking Problems
Even with a great recipe, things can go sideways. Most Instant Pot issues come down to liquid ratios or heat management.
Troubleshooting Common Issues
| Issue | Solution | |
|---|---|---|
| Why Your Rice Is Mushy | This usually happens if the rice wasn't rinsed properly or if you used too much liquid. If you use a variety of rice that cooks faster than long grain white, it can overcook during the 8 minute cycle. | |
| Why the Pot Says "Burn" | The "Burn" warning is just the pot telling you there's something stuck to the bottom. In this recipe, it's usually because the beef wasn't scraped off well enough during the deglazing step. | |
| Why Your Cheese Is Grainy | If you stir the cheese in while the pot is still on the Sauté function, the cheese can overheat and separate. Always fold it in after the pressure has been released and the heat is off. | Problem |
Creative Ways To Swap
This recipe is a great base, but you can easily pivot it depending on what's in your pantry. If you're looking to use this as a base for a healthier meal, you can turn it into a beef taco salad by serving the mixture over a bed of romaine lettuce with extra lime.
For a Spicy Kick
Add a diced jalapeño during the sauté phase with the onions. For an even deeper heat, stir in a teaspoon of chipotle peppers in adobo sauce right before you seal the lid.
For Extra Veggies
I love adding diced bell peppers (red or green) along with the onions. You can also stir in a handful of frozen peas at the very end with the cheese for a bit of extra brightness.
For a Low Carb Swap
While the rice is a core part of this Ground Beef and Rice Recipe, you can substitute it with cauliflower rice. Note: Since cauliflower rice doesn't absorb liquid the same way, reduce the beef broth to 1/4 cup and cook on high pressure for only 2-3 minutes.
For a dairy-free Version
Use a nutritional yeast based "cheese" sauce or a vegan cheddar alternative. Just be aware that vegan cheeses have different melting points, so you might need to add a splash of warm water to help them incorporate.
Budgeting and Scaling Your Meal
If you're cooking for a crowd or just want some leftovers for the week, scaling this recipe is simple, but you can't just double everything blindly.
Scaling Down (Half Batch): If you're only using 225g of beef, reduce the rice and broth by half. I recommend reducing the pressure cook time to 6-7 minutes, as smaller volumes can overcook more quickly. Use a smaller pot if possible, or be very careful with the deglazing.
Scaling Up (Double Batch): When doubling to 900g of beef, don't double the salt or taco seasoning start with 1.5x the amount and taste at the end. You can reduce the beef broth by about 10% because the larger mass of food traps more steam, meaning less liquid evaporates.
The Budget Angle: To keep costs low, I often swap half the beef for an extra can of black beans or lentils. This increases the fiber and lowers the cost per serving without sacrificing the hearty feel. Using frozen corn is also significantly cheaper than fresh, and it tastes identical once pressurized.
Truths About Pressure Cooking
There are a few myths floating around about the Instant Pot that can lead to bad results if you believe them.
Myth: Searing meat "seals in" the juices. This is a classic kitchen lie. Searing doesn't create a waterproof seal; moisture still escapes. However, we sear the beef in this recipe because it creates flavor compounds through browning, which makes the final dish taste richer.
Myth: You must always do a full Natural Release for rice. Not necessarily, but for rice, a short 5 minute natural release allows the moisture to redistribute. If you quick release immediately, you might find some grains are undercooked or the rice is sticking to the sides.
Myth: More liquid makes the rice fluffier. Actually, too much liquid is the enemy of fluffy rice. It turns the dish into a porridge. Stick to the 1:1 ratio of rice to broth provided in the schema for the best results.
Storage And Waste Tips
This dish is a meal prep dream. The flavors actually deepen after a day in the fridge, making the leftovers taste almost better than the fresh batch.
Fridge Storage: Store in an airtight container for up to 4 days. The rice will absorb more liquid as it sits, so it might look a bit drier when you first open the container.
Freezer Storage: You can freeze this for up to 3 months. I recommend freezing it in individual portions. When reheating, add a tablespoon of water or broth to restore the velvety texture of the cheese.
Reheating: The best way to reheat is in a pan over medium heat with a splash of water. If you use a microwave, cover the dish with a damp paper towel to keep the rice from drying out.
Zero Waste Tips: If you have leftover beef and rice, don't let it go to waste. I love forming the cold mixture into small balls, rolling them in breadcrumbs, and pan frying them into "Taco Arancini." Serve them with a side of salsa for a great appetizer.
Any leftover onion or garlic scraps from the prep can be tossed into a freezer bag for making homemade veggie broth later.
Plating For Maximum Impact
Since this is a one pot meal, it can look a bit like a "blob" on the plate if you aren't careful. A few simple additions can make it look like a restaurant quality Taco Rice Bowl.
Start by scooping a generous portion into a shallow bowl. Instead of mixing everything in, keep a few beans and corn kernels on top for visual contrast. Now, the fresh elements are key. Top with a handful of chopped cilantro and a dollop of cool sour cream or Greek yogurt.
The acid from a fresh lime wedge is non negotiable. Squeeze it over the top just before serving; it cuts through the richness of the cheese and beef, brightening the whole dish. If you want to go all out, serve it with a side of sliced avocado and some crunchy tortilla chips for texture contrast.
The juxtaposition of the velvety beef and rice with the crunch of the chips is what makes the meal feel complete.
Recipe FAQs
Can I make this dish ahead of time?
Yes, it is ideal for meal prep. The flavors actually deepen after a day in the fridge. Store it in an airtight container for up to 4 days.
Why is my rice mushy?
You likely didn't rinse the rice or used too much liquid. Using a rice variety that cooks faster than long grain white can also cause overcooking during the 8-minute cycle.
Why did the Instant Pot give me a "Burn" warning?
The beef wasn't scraped off the bottom thoroughly during deglazing. Use a splash of beef broth and a spatula to remove all browned bits before starting the pressure cycle.
Why is the cheese grainy?
The cheese was likely stirred in while the pot was too hot. Gently fold in the cheddar and Monterey Jack only after the pressure has been released to ensure a velvety texture.
How to store leftovers for maximum freshness?
Place in an airtight container and refrigerate for up to 4 days. Note that the rice will absorb more liquid as it sits, so it may appear drier when reheating.
How to reheat frozen portions?
Add a tablespoon of water or beef broth before heating. This simple step restores the velvety consistency of the melted cheese.
Is it true that rinsing rice is optional for this recipe?
No, this is a common misconception. Rinsing is required to prevent the texture from becoming mushy. If you enjoyed the convenience of this method, see how the same one-pot principle works in our one-pot beef and macaroni.
Instant Pot Cheesy Taco Beef