Grandmas Pie Crust: Flaky and Tender Dough
- Time: Active 20 minutes, Passive 1 hours 0 mins, Total 1 hours 20 mins
- Flavor/Texture Hook: Shatter crisp, buttery layers with a melt on-the tongue finish
- Perfect for: Holiday centerpieces, rustic fruit galettes, and beginner bakers
- The Secrets Behind Authentic Grandmas Pie Crust
- Why This Specific Method Works
- Component Analysis for Optimal Results
- Selecting Your Essential Ingredients
- Necessary Tools for Perfect Dough
- Step by Step Dough Assembly
- Avoiding Common Dough Pitfalls
- Creative Flavors and Regional Swaps
- Keeping Your Baked Crust Fresh
- Serving Suggestions and Pairings
- Recipe FAQs
- 📝 Recipe Card
The Secrets Behind Authentic Grandmas Pie Crust
The air in my kitchen always shifts when I pull out the large ceramic mixing bowl. There is a distinct, earthy scent of raw flour and cold vegetable shortening that immediately transports me back to my grandmother's flour dusted countertop.
I remember watching her hands work with a rhythmic precision, the metal pastry blender making a soft "skritch skritch" sound as it transformed cubes of fat into tiny, pea sized crumbs. It was a sensory ritual that promised something golden and flaky was on the way.
You might think you need a culinary degree to master a dough that does not shrink or turn into a soggy mess, but that's a myth we are going to bust today. I once spent an entire Saturday crying over a pile of crumbling dough because I over handled the flour.
Since then, I have learned the quiet secrets that make this Grandmas Pie Crust behave perfectly every single time. It is all about the temperature of your hands and the subtle "snap" of the shortening as it blends.
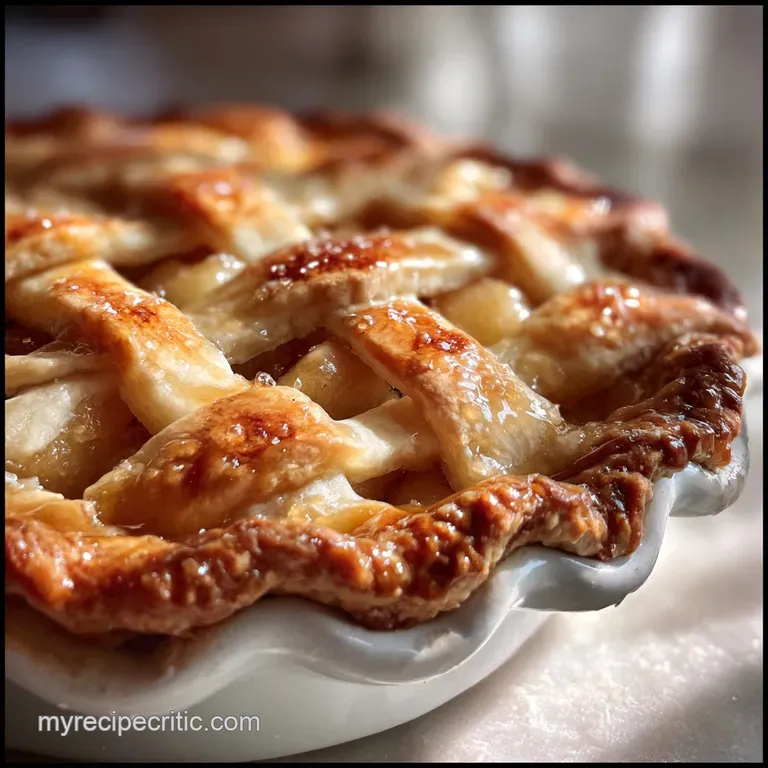
We are going after that elusive, shatter prone texture that makes people stop talking and just listen to the crunch. This recipe is not just a set of instructions, it is a piece of kitchen history that has survived because it actually works.
You'll get a dough that is easy to roll, stays together when you drape it over the pan, and develops a beautiful, toasted aroma as it bakes. Let's get into the mechanics of why this old-fashioned approach beats modern shortcuts.
Why This Specific Method Works
The brilliance of this traditional recipe lies in its chemical balance. By using a combination of specific fats and acidic binders, we manipulate the flour proteins to ensure the crust stays tender rather than tough.
- Fat Encapsulation: Cubing the vegetable shortening while chilled (around 35 degrees Fahrenheit) creates distinct pockets of fat that steam during baking.
- Acidic Tenderizing: The white vinegar limits gluten development by lowering the pH of the dough.
- Emulsified Strength: Adding a large egg provides protein that helps the dough hold its shape without becoming rubbery.
- Thermal Stability: Using vegetable shortening, which has a higher melting point than butter, prevents the crust from slumping in a hot oven.
The Alchemy of Acidic Crumble
The "how" behind the flakiness is actually simple physics. When the fat is kept cold and lumpy, it creates tiny physical barriers between the layers of flour. As the heat hits the pan, the water in the fat evaporates, pushing the flour layers apart to create those signature "shatters."
| Method Type | Texture Result | Best Use | Ease Level |
|---|---|---|---|
| Hand Mixed Classic | Large, flaky layers | Deep dish fruit pies | Intermediate |
| Food Processor | Uniform, sandy crumb | Savory quiches | Beginner |
| Hot Water Crust | Dense and sturdy | Handheld meat pies | Advanced |
Choosing the hand mixed classic method gives you the most control over the dough texture. It allows you to feel exactly when the shortening has reached that sweet spot between "too chunky" and "too oily."
Component Analysis for Optimal Results
To get the most out of your Grandmas Pie Crust, you need to understand the role each ingredient plays. We are not just tossing things in a bowl, we are building a structural masterpiece.
| Ingredient | Science Role | Pro Secret |
|---|---|---|
| All Purpose Flour | Provides structure | Weigh it (375g) to avoid a dry, crumbly mess |
| Vegetable Shortening | Creates flaky layers | Grate it while frozen for maximum air pockets |
| White Vinegar | Inhibits gluten | Keeps the dough workable for longer periods |
| Cold Egg | Adds elasticity | Whisk with liquid first to prevent yellow streaks |
Using the right fat is non negotiable for this specific result. If you are planning to fill this with a classic fruit center, I highly recommend using it as the base for a Grandmas Apple Pie recipe to see how the flavors meld.
Selecting Your Essential Ingredients
Every item in this list has a purpose. We use 3 cups all purpose flour (375g) as the foundation because it has the perfect protein count for a crust that is neither too soft nor too hard. The 1 teaspoon salt (6g) is essential for flavor, otherwise, the crust tastes like cardboard.
For the fat, we use 1 1/4 cups vegetable shortening (250g), and it must be chilled and cubed. Why this? Shortening has a higher melting point than butter, ensuring the crust holds its shape. The liquid binder consists of 1 large egg (50g), 5 tablespoons cold water (75ml), and 1 tablespoon white vinegar (15ml).
These are the keys to a dough that behaves under the rolling pin.
| Original Ingredient | Substitute | Why It Works |
|---|---|---|
| Vegetable Shortening | Lard (equal weight) | Creates a very savory, traditional pork pie style crust. |
| White Vinegar | Lemon Juice | Provides the same acidity but adds a bright, citrus note. |
| All Purpose Flour | Pastry Flour | Results in an even more tender, delicate, but fragile crumb. |
If you decide to swap the shortening for butter, keep in mind the dough will be much softer. You will need to chill it twice as long to prevent it from melting into a puddle before it sets.
Necessary Tools for Perfect Dough
You do not need a fancy kitchen setup, but a few specific tools make the process much smoother. A sturdy pastry blender is my top recommendation. It allows you to cut the fat into the flour without the heat from your hands melting the shortening.
If you don't have one, two knives or even a large fork can work, but it takes more patience.
Chef Tip: Freeze your metal mixing bowl and pastry blender for 15 minutes before you start. This "cold chain" is the secret to a crust that doesn't feel greasy or heavy.
A heavy rolling pin is also a huge help. I prefer the French tapered style because it gives you more "feel" for the thickness of the dough. You want to aim for a consistent 1/8 inch thickness across the entire circle to ensure even baking.
step-by-step Dough Assembly
- Whisk the flour and salt in a chilled bowl.
- Cut in the chilled shortening cubes. Note: Work until the mixture looks like coarse sand with pea sized lumps.
- Beat the egg, water, and vinegar in a small jar.
- Pour the liquid over the dry ingredients.
- Stir gently with a fork until the dough just begins to clump.
- Press the dough into two disks. Note: Do not knead, or you will activate the gluten.
- Wrap in plastic and chill 30 mins until firm to the touch.
- Roll out on a floured surface.
- Transfer to the pie plate.
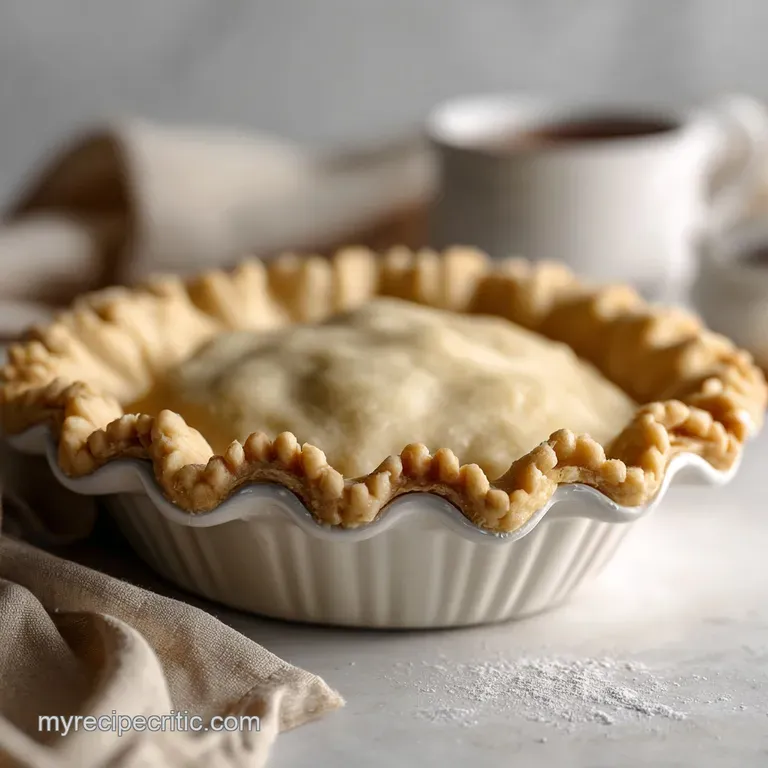
- Trim and crimp edges until they look uniform and sturdy.
When you are rolling, start from the center and push outward. If the dough resists, let it rest for two minutes. To see this technique in action for a more complex top, look at the Apple Pie Just recipe for a great lattice guide.
Avoiding Common Dough Pitfalls
The biggest mistake I see is over mixing. The moment you see the dough holding together, stop. If you keep going, you'll end up with a crust that is tough and shrinks away from the edges of the pan.
Preventing Crust Oven Shrinkage
Shrinkage usually happens because the gluten was overworked or the dough didn't rest enough. When you pull the dough out of the fridge, let it sit for five minutes so it is pliable, but still cold. This prevents the "snap back" effect during rolling.
| Problem | Root Cause | Solution |
|---|---|---|
| Gray dough | Oxidation or old flour | Use fresh ingredients and bake within 48 hours. |
| Tough texture | Over working the flour | Mix until the dough barely comes together. |
| Greasy finish | Fat melted during prep | Chill all tools and fats before starting. |
Common Mistakes Checklist
- ✓ Use ice cold water only to keep the fat solid (prevents a mealy texture).
- ✓ Chill the dough for at least 30 minutes before rolling (relaxes the gluten).
- ✓ Flour your surface lightly but consistently (prevents sticking and tearing).
- ✓ Avoid stretching the dough into the pan (prevents it from pulling back during baking).
If you want a flaky finish, do not skip the chilling. If you want a golden color, brush the edges with milk. If you want a savory crust, omit any sugar and add dried herbs to the flour.
Creative Flavors and Regional Swaps
While this classic Grandmas Pie Crust is perfect on its own, you can easily adapt it for different occasions. For a savory pot pie, I love adding a teaspoon of cracked black pepper or some dried thyme directly into the flour mixture. It adds a depth of flavor that complements chicken or beef beautifully.
You can also experiment with the types of fat used. Some old-fashioned recipes call for a 50/50 split of shortening and butter. This gives you the structural benefits of shortening with the rich flavor profile of butter.
If you go this route, make sure the butter is exceptionally cold, almost frozen, before you grate it into the bowl.
For another variation on a classic theme, think about the texture of the crust in a Classic French Bread recipe. While a pie crust should be flaky rather than chewy, the principle of hydration and temperature control remains the same. Mastering one helps you understand the other.
Keeping Your Baked Crust Fresh
Proper storage is the difference between a great leftover slice and a soggy disappointment. This dough is very hardy, but it does not like moisture once it has been baked.
- Fridge: Keep unbaked dough wrapped tightly for up to 3 days. Baked pies should be covered loosely with foil or plastic wrap for up to 4 days.
- Freezer: You can freeze unbaked disks for up to 3 months. To use, thaw in the fridge overnight. You can also freeze a fully baked crust for up to 2 months.
- Zero Waste: Never throw away the scraps! Roll them out, sprinkle with cinnamon and sugar, and bake them alongside your pie for a quick "pie crust cookie" snack.
Reheating a pie is best done in the oven. A microwave will turn the crust rubbery. Place your slice on a baking sheet at 350 degrees Fahrenheit for about 10 minutes. You will hear the fat start to crackle again, which is the signal that the crispness is returning.
Serving Suggestions and Pairings
This crust is a blank canvas. While it is the soul of a fruit pie, it also makes an incredible base for a custard based tart or a savory quiche. Because it is so sturdy, you can stack fillings high without worrying about the bottom giving way.
The smell of this crust baking is truly one of life's simple pleasures. It has a toasted, slightly sweet aroma that fills the whole house. I usually serve my pies slightly warm, perhaps with a scoop of vanilla bean ice cream or a dollop of unsweetened whipped cream to balance the richness of the dough.
The texture should be so light that it nearly shatters when your fork hits it. If you have followed the chilling steps and been careful not to over work the flour, you will have a result that would make any grandmother proud. Trust your hands, keep your fats cold, and enjoy the process of making something from scratch.
It is always worth the effort.

Recipe FAQs
Is butter or vegetable shortening better for pie crust?
Vegetable shortening is better for flakiness. Shortening has a higher melting point than butter, which means it stays solid longer in the oven, creating larger steam pockets that result in shatteringly crisp layers.
What is the secret to a good pie crust?
Keep all ingredients ice cold and do not overwork the dough. Cold fat creates steam pockets that separate the flour layers, and minimal mixing prevents tough gluten development.
What is the secret ingredient for pie crust?
White vinegar is the secret, though acid isn't technically a "secret." The acid lowers the dough's pH, tenderizing the gluten and allowing you to handle the dough longer without it becoming tough.
What is the secret to crispy bottom pie crust?
Bake the bottom layer blind, or use a lower oven rack position. For filling heavy pies, pre-baking the shell prevents moisture migration from the filling, similar to the moisture control needed for a good Cherry Pie Bars recipe.
How to prevent pie dough from shrinking during baking?
Chill the formed dough for at least 30 minutes before rolling and baking. This allows the gluten strands, which tense up while mixing, to relax, preventing them from contracting sharply when exposed to oven heat.
Is it true I must use a food processor for perfect texture?
No, this is a common misconception. Hand mixing with a pastry blender gives you better control over the fat particle size, which is crucial for that classic shatter. The hand method lets you feel the pea-sized chunks.
How to make the crust hold up under a heavy fruit filling?
Use a combination of shortening for flakiness and an egg in the liquid binder for strength. The egg protein helps stabilize the dough structure, which is necessary for supporting heavy loads like in our Grandmas Apple Streusel recipe.
Grandmas Pie Crust Heirloom Recipe

Ingredients:
Instructions:
Nutrition Facts:
| Calories | 228 calories |
|---|---|
| Protein | 2.8 g |
| Fat | 16.1 g |
| Carbs | 17.8 g |
| Fiber | 0.7 g |
| Sugar | 0.1 g |
| Sodium | 144 mg |
