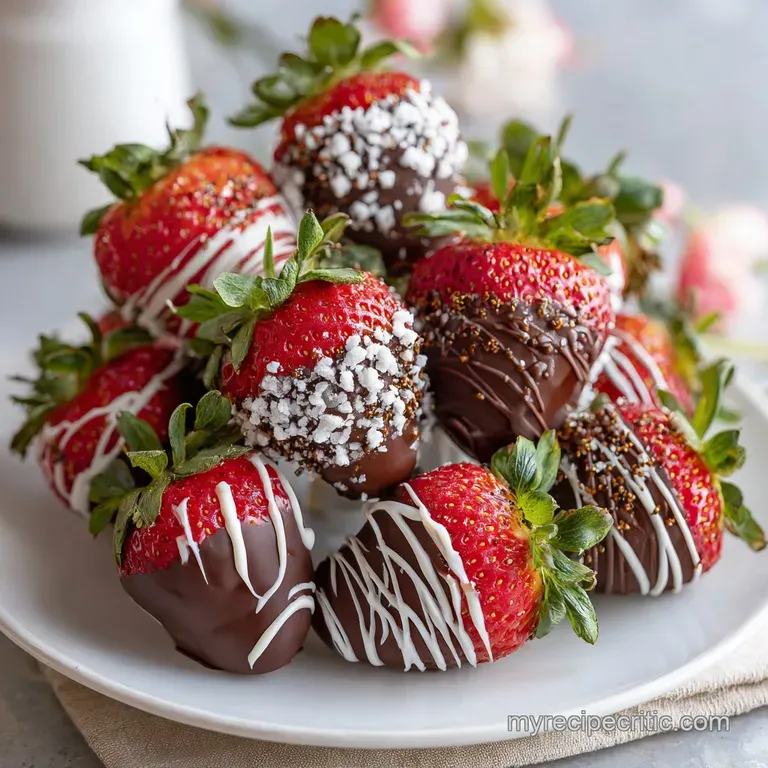
Chocolate Covered Strawberries: High Gloss Finish

- Time: Active 45 mins, Passive 20 mins, Total 1 hours 5 mins
- Flavor/Texture Hook: A velvety dark chocolate shell that shatters into juicy berry sweetness.
- Perfect for: Anniversary gifts, romantic dates, or a beginner friendly holiday treat.
- Mastering Your First Chocolate Covered Strawberries
- Why This Method Always Works
- Essential Components and Flavor Profiles
- Tools for a Flawless Finish
- Step by Step Assembly Guide
- Fixes for Common Berry Blunders
- Adjustments for Every Dietary Need
- Myths About Melting Chocolate
- Keeping Your Berries Fresh Longer
- Perfect Pairings for Sweet Occasions
- Recipe FAQs
- 📝 Recipe Card
Mastering Your First Chocolate Covered Strawberries
That specific sound of a firm dark chocolate shell breaking under your teeth is basically the peak of dessert experiences. I remember the first time I tried making these for a friend’s bridal shower; I was so nervous I’d mess up the chocolate that I over stirred it until it looked like grainy mud.
We ended up eating them anyway, but it wasn't the elegant "ramo de fresas con chocolate" I had envisioned. Since then, I’ve learned that the secret isn't in some fancy gadget, but in how you treat the temperature.
When you dip a cool, dry strawberry into warm, fluid couverture, you're essentially creating a custom fit suit for that fruit. The aroma of the melting dark chocolate filling the kitchen is intoxicating, but the real magic happens when you see that matte finish turn into a mirror like gloss as it sets.
It took me a few "sweaty" batches to realize that moisture is the absolute enemy here. Now, I'm sharing exactly how to get that boutique quality look without the boutique price tag.
We’ve all seen those overpriced arrangements in the mall, but honestly, making your own Chocolate Covered Strawberries at home is therapeutic once you get the rhythm down. It’s about the contrast between the slightly tart berry juice and the rich, bitter sweetness of the dark chocolate.
We are going to walk through every tiny detail, from why your chocolate might be seizing to how to make the white chocolate drizzle look like a professional pastry chef did it. Trust me, once you master this, you’ll never buy the pre made ones again.
Why This Method Always Works
- The Snap Factor: Using high-quality couverture chocolate ensures a high cocoa butter content, which creates a stable crystalline structure for that satisfying crackle.
- Moisture Barrier: A tiny splash of lemon juice in the cleaning phase helps brighten the fruit while the air drying step prevents the chocolate from sliding off.
- Viscosity Control: Adding refined coconut oil thins the chocolate just enough to create a thin, even coat rather than a thick, clumpy mess.
- Structural Stability: Using bamboo skewers and floral foam allows the berries to set in mid air, preventing those unsightly "flat bottoms" from resting on parchment.
The Science of the Snap
Tempering aligns the cocoa butter molecules into a stable "Form V" structure, which creates the characteristic shine and firm texture. The coconut oil lowers the melting point slightly, allowing the coating to behave more fluidly during the dipping process.
| Berry Thickness | Finish Temp | Set Time | Visual Cue |
|---|---|---|---|
| Small/Medium | 65°F | 10 mins | Matte surface with no wet spots |
| Large/Jumbo | 68°F | 15 mins | Firm to touch, no fingerprint marks |
| Long stem | 65°F | 12 mins | Chocolate clings tightly to the neck |
Getting the temperature right is the difference between a dull brown berry and a shimmering masterpiece. If you are looking for a more festive twist, you might also enjoy my Valentine Strawberries recipe which focuses on a different shattering shell technique. The key is always in the cooling phase; if you rush it in the freezer, you’ll end up with condensation issues that ruin the look.
Essential Components and Flavor Profiles
| Component | Science Role | Pro Secret |
|---|---|---|
| Dark Couverture | High fat ratio for fluid melting | Chop it into tiny shards for even heat distribution |
| Refined Coconut Oil | Reduces surface tension | Use refined only to avoid a tropical coconut scent |
| Long stem Berries | Natural handle and moisture wick | Keep the green tops on to act as a barrier for juice |
| White Chocolate | Decorative contrast and sugar hit | Melt at a lower temp than dark to prevent burning |
Selecting the right fruit is half the battle. You want berries that are firm, bright red all the way to the top, and free of any soft spots. If they’re even slightly mushy, they will release internal moisture the moment they hit the warm chocolate, causing the shell to pull away.
For the Berry Foundation
- 24 large long stem strawberries: Look for uniform sizes so your bouquet looks balanced. Why this? Long stems make dipping easier and look much more elegant in a bouquet.
- 1 tsp lemon juice: Added to the washing water. Why this? It helps remove wax and dirt while keeping the red color vibrant.
For the Chocolate Coatings
- 16 oz dark couverture chocolate: high-quality chocolate with at least 60% cocoa. Why this? Couverture has extra cocoa butter, making it melt much smoother than chips.
- 4 oz white chocolate: For the decorative drizzle. Why this? Provides a sharp visual contrast and a creamy sweetness against the dark shell.
- 2 tsp refined coconut oil: Divided between the two chocolate types. Why this? It creates a more "dip able" consistency and a softer bite.
| Original Ingredient | Substitute | Why It Works |
|---|---|---|
| Dark Couverture | Semi sweet chocolate chips | Easier to find. Note: Will be thicker and less shiny than couverture |
| Refined Coconut Oil | Cocoa Butter | The gold standard for thinning. Note: More expensive but offers better flavor |
| White Chocolate | Dark chocolate + Gold dust | For a monochrome look. Note: Changes the aesthetic but keeps the flavor profile |
If you're out of dark chocolate, you can actually use this same dipping method for a Valentines Chocolate Covered Strawberry recipe using milk chocolate instead. Just remember that milk chocolate has more milk solids and burns much faster, so you have to be extra careful with the microwave or double boiler.
Tools for a Flawless Finish
To create a stunning Chocolate Covered Strawberries display, you'll need a few specific items. A microwave safe glass bowl is best for melting because it retains heat well, keeping your chocolate fluid for longer.
Avoid plastic bowls if possible, as they can sometimes hold onto oils or moisture that might seize your chocolate.
You will also need 12 inch bamboo skewers to provide the height for your bouquet. A block of dry floral foam is essential for holding the skewers upright while the chocolate sets. This is the secret to getting that 360 degree perfect coating without any flat edges.
Finally, a small piping bag or even a plastic sandwich bag with the corner snipped off will help you achieve those delicate white chocolate lines.
Chef's Note: If you don't have a piping bag, use a fork! Dip the tines into the melted white chocolate and flick it back and forth over the berries for a more "rustic" and artistic look.
step-by-step Assembly Guide
Phase 1: The Dehydration & Prep
- Wash the berries. Submerge the 24 large long stem strawberries in cold water with 1 tsp lemon juice for 2 minutes.
- Dry completely. Pat each berry with a lint free towel and let them air dry on a wire rack for at least 30 minutes. Note: Even a single drop of water will cause the chocolate to seize into a clump.
- Prep the skewers. Gently insert a 12 inch bamboo skewer into the green leafy end of each berry, being careful not to push it all the way through the tip.
Phase 2: The Precision Dip
- Chop the chocolate. Break the 16 oz dark couverture into uniform, small pieces to ensure it melts at the same rate.
- Melt gently. Heat in the microwave in 20 second bursts, stirring in between, until 80% is melted. Let the residual heat melt the rest.
- Add the oil. Stir in 1 tsp of refined coconut oil until the mixture is velvety and flows like ribbons from your spoon.
- The Dip. Hold the skewer and plunge the berry into the chocolate, rotating it to cover up to the green hull. Lift and swirl to let the excess drip off.
- The Set. Stick the skewer into the floral foam block and let it sit at room temperature for 15 minutes until the surface is no longer shiny.
Phase 3: Decorative Flourishes
- White chocolate drizzle. Melt the 4 oz white chocolate with the remaining 1 tsp coconut oil. Drizzle over the set dark chocolate in a zig zag motion.
- Gold dust finish. Once the white chocolate is firm, use a dry brush to apply 1 tsp edible gold luster dust for a high end look.
Phase 4: Constructing the Bouquet
Place the skewers into a decorative vase or container filled with the floral foam. Arrange them at varying heights to create a full, lush appearance. This "ramo de fresas con chocolate" setup is always a showstopper.
Fixes for Common Berry Blunders
Why Your Chocolate is Grainy
If your chocolate looks like wet sand, it has likely "seized." This usually happens when a tiny bit of water gets into the bowl or if you overheat it. Chocolate is very temperamental; once it goes past 120°F (48°C), the proteins can clump together.
To fix it, you can sometimes stir in a teaspoon of warm coconut oil, but usually, it's best to start over and use that batch for brownies instead.
Why Your Berries are Sweating
"Sweating" is actually just condensation. If you move the berries from a very cold fridge to a warm room, moisture from the air collects on the cold chocolate. This can make the gold luster dust look muddy and the white chocolate drizzle run.
The best way to avoid this is to let the chocolate set at a cool room temperature rather than the fridge.
| Problem | Root Cause | Solution |
|---|---|---|
| Chocolate Slips Off | Berry was damp before dipping | Dry berries for 30+ mins; use a paper towel on each one |
| Thick, Clumpy Shell | Chocolate was too cold or too thick | Re heat in 10 sec bursts; add 1/2 tsp more coconut oil |
| White Drizzle Bleeds | Dark chocolate wasn't fully set | Wait 15 mins until the dark shell is matte before drizzling |
Common Mistakes Checklist
- ✓ Never wash the berries right before dipping; the "pores" of the fruit hold water.
- ✓ Avoid using "compound" chocolate or cheap chips if you want a professional snap.
- ✓ Do not skip the coconut oil; it provides the elasticity needed for a clean bite.
- ✓ Ensure your skewers are pushed in firmly so the berry doesn't spin while dipping.
- ✓ Work in a cool, low humidity environment to prevent the chocolate from blooming.
Adjustments for Every Dietary Need
Scaling for Large Crowds
If you're making a massive batch for a wedding or large party, don't try to melt all the chocolate at once. It will cool down before you reach the end of the berries. Work in 8 oz batches.
For scaling up, you only need to increase the chocolate and berries linearly, but you can keep the lemon juice and gold dust amounts roughly the same.
Scaling for a Solo Treat
To make just a few for yourself, use a small, deep ramekin for melting. This allows you to submerge the berry fully even with a small amount of chocolate. If you halve the recipe, use a smaller block of foam or even a tall glass filled with rice to hold the skewers upright.
If you are looking for another fruit based treat that's a bit more decadent, you might like my Chocolate Covered Strawberry recipe which incorporates these flavors into a cupcake. It's a great way to use up any berries that might be too small for the bouquet.
| Goal | Adjustment | Outcome |
|---|---|---|
| Vegan Option | Use dairy-free dark chocolate | Same method, slightly more bitter flavor profile |
| Keto Friendly | Use sugar-free chocolate (monk fruit) | Lower carb count; chocolate may set slightly faster |
| Extra Crunch | Roll in crushed nuts while wet | Adds texture but obscures the smooth chocolate finish |
Myths About Melting Chocolate
Myth: Adding a drop of water helps the chocolate melt smoother. Truth: This is the fastest way to ruin your batch. Even a single drop of water will cause the chocolate to seize and turn into a hard, grainy lump. Always keep your workspace bone dry.
Myth: The fridge is the best place to set chocolate. Truth: Room temperature is actually better. The fridge introduces too much moisture and can cause "sugar bloom," which creates white streaks on the surface of your beautiful Chocolate Covered Strawberries.
Myth: All chocolate chips are the same. Truth: Regular chocolate chips contain stabilizers designed to help them keep their shape under heat (like in a cookie). Couverture is designed to lose its shape and flow, which is why it's superior for dipping.
Keeping Your Berries Fresh Longer
Storage Guidelines
These are best eaten within 12 hours of making them. If you must store them, put them in a single layer in an airtight container lined with paper towels. The paper towel absorbs any moisture the berries release. Keep them in a cool, dark place rather than the fridge if possible.
If you do refrigerate them, they will last 2 days, but expect some "sweating" when you bring them to room temperature.
Zero Waste Tips
Don't throw away the leftover chocolate! Pour it onto a piece of parchment paper, sprinkle it with some sea salt or leftover nut pieces, and let it harden into a "bark." Also, if you have berries that are too bruised to dip, hull them and freeze them for smoothies later.
The green stems can even be tossed into a compost bin or used to infuse a light syrup for cocktails.
Perfect Pairings for Sweet Occasions
These berries are the ultimate versatile dessert. For a gourmet platter, serve them alongside some Cream Filled Chocolates recipe to give your guests a variety of textures. The creamy mascarpone filling of those chocolates complements the fresh acidity of the strawberries perfectly.
If you're serving these at a party, they pair beautifully with a dry sparkling wine or a cold glass of Prosecco. The bubbles cut through the richness of the dark couverture. For a non alcoholic option, try a hibiscus iced tea; the floral notes bring out the natural aroma of the "fresas con chocolate" beautifully.
If you want to get really creative, you can even serve these alongside a small bowl of whipped mascarpone for dipping. It’s a bit redundant with the chocolate, but honestly, can you ever have too much cream and fruit? I don't think so.
Just remember to keep the berries as the star of the show by not overcrowding the plate. Simple is always better when the ingredients are this high-quality.

Recipe FAQs
Can I skip drying the strawberries and go straight to dipping?
No, you absolutely must dry them completely. Any residual moisture will cause the chocolate to seize immediately, resulting in a grainy, unusable coating.
How to melt chocolate for dipping without using a double boiler?
Melt at 50% power in 20-second intervals. Stir thoroughly between each interval to prevent scorching, using residual heat to smooth out the last lumps.
Is it true that freezing the strawberries before dipping creates a better shell?
No, this is a common misconception. Frozen berries release too much internal moisture upon thawing or warming up, which leads to condensation and a dull, weeping chocolate finish.
What is the best way to ensure the chocolate coating has a smooth, glossy snap?
Use high-quality couverture chocolate and temper it properly. Tempering aligns the cocoa butter crystals into a stable structure that provides shine and a satisfying crack when bitten.
How to make the decorative drizzle contrast nicely against the dark chocolate?
Melt high-quality white chocolate separately, thinning it with a touch of refined coconut oil. Once the dark chocolate is completely set, drizzle the white chocolate across in quick, thin lines. If you enjoyed mastering temperature control here, see how the same principle works in our Homemade Chocolate Cream recipe for texture.
How long can I store finished chocolate covered strawberries?
Ideally, eat them within 12 hours for peak quality. Store them at cool room temperature in a single layer, ensuring no humidity gets trapped, as refrigeration often causes condensation.
What can I use to stabilize the berries upright while the chocolate sets?
Insert the skewer firmly into a block of dry floral foam. This holds the berry suspended mid-air, preventing a flat, messy bottom from forming on parchment paper or a plate.
Glossy Chocolate Strawberries
Ingredients:
Instructions:
Nutrition Facts:
| Calories | 138 calories |
|---|---|
| Protein | 1.3 g |
| Fat | 8.5 g |
| Carbs | 14.5 g |
| Fiber | 1.2 g |
| Sugar | 11.3 g |
| Sodium | 3 mg |
