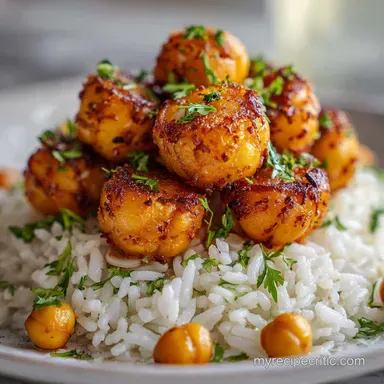
Baked Chickpea and Rice Balls: Crispy Cumin Heart

- Time: Active 15 minutes, Passive 20 minutes, Total 35 minutes
- Flavor/Texture Hook: Shatter crisp crust with a warm, cumin spiced heart
- Perfect for: Budget conscious meal prep or beginner friendly vegan appetizers
- Achieving Texture with Baked Chickpea and Rice Balls
- The Science of Starch and Protein
- Comparing Fast and Traditional Cooking Methods
- The Physics of the Bind
- Essential Ingredients and Their Smart Substitutes
- Crucial Equipment for Reaching Ultimate Crisp
- Master the Steps for Uniform Results
- Fixing Common Texture and Binding Problems
- Scaling Rules for Larger Groups
- Flavor Variations and Creative Dietary Tweaks
- Proper Storage and Smart Reheating Methods
- Serving Ideas and Flavorful Side Pairings
- High in Sodium ⚠️
- Recipe FAQs
- 📝 Recipe Card
Achieving Texture with Baked Chickpea and Rice Balls
The first time I tried making these, I was staring at a container of leftover rice and a lone can of chickpeas, wondering if I could turn them into something that didn't resemble mushy baby food. I threw them in a bowl, mashed them with a fork, and hoped for the best. The result?
They flattened into sad, beige pancakes that stuck to the tray. I almost gave up on the idea entirely, but the aroma of toasted cumin lingering in my kitchen told me there was potential if I could just figure out the structural integrity.
The secret, as it turns out, isn't fancy equipment it's patience and temperature. When you use rice that has spent a night in the fridge, the grains are firm and separate, providing the "skeleton" the balls need.
I learned that mashing the chickpeas into a coarse paste, rather than a smooth purée, creates little craggy pockets that catch the heat and turn crunchy. Now, every time I hear that specific "tink" of a crisp ball hitting a ceramic plate, I know I’ve nailed the balance.
We've all been there: wanting a snack that feels indulgent but doesn't require a deep fryer or a massive grocery bill. This recipe is the ultimate budget win. It uses basic spices like smoked paprika and garlic to punch way above its weight class.
You’re going to love how the lemon juice cuts through the earthiness of the beans, making every bite bright and fresh. Let's get into how to make these work every single time.
The Science of Starch and Protein
To get that specific texture, we have to look at how these ingredients behave under heat. It isn't just about mixing things together; it's about a chemical handshake between the grain and the legume.
- Starch Retrogradation: Using chilled rice is vital because the starch molecules have rearranged into a crystalline structure, making them firm enough to hold their shape during the bake.
- Protein Matrix Formation: Chickpea flour contains high levels of globulin and albumin which, when hydrated by lemon juice, create a sticky net that binds the heavier ingredients together.
- Maillard Browning: The combination of avocado oil and the natural sugars in the chickpeas creates a golden, savory crust through a chemical reaction between amino acids and reducing sugars.
- Fiber Reinforcement: The insoluble fiber from the chickpea skins acts like rebar in concrete, preventing the balls from collapsing as the internal moisture turns to steam.
Comparing Fast and Traditional Cooking Methods
Choosing the right approach depends on your equipment and how much time you have to supervise the kitchen.
| Method | Time | Texture | Best For |
|---|---|---|---|
| Standard Oven | 20 minutes | Uniformly golden and sturdy | Large batches for meal prep |
| Air Fryer | 12 minutes | Shatter crisp exterior, softer core | Immediate snacking or small portions |
| Deep Fried | 5 minutes | Rich, oily, and very crunchy | Special occasions or party appetizers |
Using the oven is my go to because it allows the heat to penetrate slowly, ensuring the middle is hot without burning the outside. If you are looking for a base for these, the texture is quite similar to the grains used in my Creamy Parmesan Rice recipe, though here we want the grains much firmer.
The Physics of the Bind
Science: The chickpea flour acts as a "hydrocolloid," meaning it absorbs the excess moisture from the lemon juice and chickpeas to create a thick, glue like paste. This prevents the rice grains from sliding past each other, ensuring the ball stays spherical even as it expands slightly in the heat.
Essential Ingredients and Their Smart Substitutes
Everything in this list serves a purpose, but being a budget smart cook means knowing when you can swap things out without ruining the vibe.
| Component | Science Role | Pro Secret |
|---|---|---|
| Chilled Rice | Structural Base | Use day old rice to ensure the grains don't turn into a gluey mess |
| Chickpea Flour | Binding Agent | Toast the flour in a dry pan for 2 minutes to remove the raw bean taste |
| Avocado Oil | Heat Conductor | This oil has a high smoke point, allowing for a crispier crust without acrid flavors |
| Lemon Juice | pH Balancer | The acid tightens the proteins in the chickpeas, aiding the structural hold |
When looking at your pantry, don't feel locked in. If you don't have fresh parsley, you can use dried, but reduce the amount by half since dried herbs are more concentrated.
- 2 cups (300g) cooked Jasmine rice: Short grain works too. Why this? The starch content provides the necessary stickiness for shaping balls.
- 1 can (15 oz) chickpeas: Rinsed and dried. Why this? They provide the protein and bulk of the recipe.
- 3 cloves garlic: Minced fine.
- 1/2 cup (15g) fresh parsley: Finely chopped.
- 1 tsp ground cumin: For earthiness.
- 1 tsp smoked paprika: For that fire roasted flavor.
- 1/2 tsp sea salt: To pop all the other flavors.
- 1/4 tsp cracked black pepper: For a subtle bite.
- 1 tbsp fresh lemon juice: Vital for binding.
- 2 tbsp chickpea flour: The "glue" of the recipe.
- 2 tbsp avocado oil: For the over high heat browning.
| Original Ingredient | Substitute | Why It Works |
|---|---|---|
| Chickpea Flour | All Purpose Flour | Provides gluten for binding, though it lacks the nutty chickpea depth |
| Jasmine Rice | Brown Rice | Adds a nuttier flavor and more chew, but requires more mashing to stick |
| Avocado Oil | Grapeseed Oil | Similar high smoke point and neutral flavor profile for over high heat baking |
If you decide to use brown rice, be aware that the balls might be slightly more prone to crumbling because the bran layer on brown rice is less "sticky" than white rice.
Crucial Equipment for Reaching Ultimate Crisp
You don't need a professional kitchen, but a few specific tools make the process significantly easier. I highly recommend using a large, rimmed baking sheet. The rim prevents any rolling balls from escaping, and the large surface area ensures the hot air can circulate around each ball.
A food processor is helpful but not mandatory. If you’re doing this by hand, a heavy potato masher is your best friend. You want to avoid a blender, as it will turn the mixture into a smoothie, which is the opposite of the texture we're chasing. Finally, a parchment paper liner or a silicone mat is essential.
These balls are lean, and without a non stick surface, you’ll leave that beautiful crust behind on the metal pan.
Master the Steps for Uniform Results

- Prep the oven: Preheat to 200°C (400°F). Note: A hot oven is critical for immediate surface evaporation.
- Dry the chickpeas: Pat the rinsed chickpeas with a towel until they no longer feel slick.
- Process the base: Pulse chickpeas, garlic, and spices in a processor until a coarse, pebble like meal forms.
- Combine the grains: Fold the chilled rice into the chickpea mixture by hand.
- Add the binders: Stir in the lemon juice, parsley, and chickpea flour.
- Test the mix: Squeeze a handful of the mixture; it should hold its shape without sticking to your palm.
- Shape the balls: Roll into 12-15 golf ball sized spheres, pressing firmly to compact the grains.
- Oil the exterior: Brush or spray each ball with avocado oil until they look lightly glistening.
- Bake the batch: Arrange on the tray and bake for 20 minutes, flipping halfway.
- Final check: Remove from oven until the exterior feels hard and sounds hollow when tapped.
Chef's Tip: If the mixture feels too dry to roll, add 1 teaspoon of water at a time. If it's too wet, add another tablespoon of chickpea flour. Balance is everything here.
Fixing Common Texture and Binding Problems
Why Your Balls Are Falling Apart
If your balls crumble the moment you touch them, the issue is usually moisture or compaction. If the chickpeas weren't mashed enough, there isn't enough "paste" to act as the mortar between the rice "bricks." Alternatively, if you didn't press them firmly enough while rolling, air pockets will cause them to fracture as the steam escapes.
Avoiding the Dreaded Soggy Bottom
A soggy bottom happens when moisture pools underneath the ball. This is usually caused by skipping the parchment paper or not flipping them halfway through. The flip is non negotiable! It ensures that the side in contact with the pan also gets a chance to breathe and crisp up.
| Problem | Root Cause | Solution |
|---|---|---|
| Falling apart | Lack of binder | Add 1 tbsp extra chickpea flour or mash more chickpeas |
| No crunch | Oven too cool | Increase temp to 215°C or use the convection setting |
| Dry/Chalky | Too much flour | Lightly mist the balls with oil before and midway through baking |
Common Mistakes Checklist
- ✓ Never use warm rice; it will turn the mixture into a gummy paste that never crisps.
- ✓ Don't over process the chickpeas; you need some texture for the balls to hold.
- ✓ Always preheat the baking sheet for 5 minutes before adding the balls for a head start on the crust.
- ✓ Give them space; if the balls are touching, they will steam instead of bake.
- ✓ Let them rest for 5 minutes after baking to allow the internal starches to set.
Scaling Rules for Larger Groups
If you're making these for a party, you can easily double or triple the recipe. However, don't just dump everything in a giant bowl and hope for the same results.
Scaling Up (2x or 4x): When doubling, keep the spices at 1.5x initially and taste. Sometimes smoked paprika can become overwhelming in large volumes. You will likely need to work in batches, as overcrowding the oven will drop the temperature too much, leading to soggy balls.
Scaling Down (½): This is very easy. Use half a can of chickpeas and 1 cup of rice. Since the volume is smaller, they might bake 2-3 minutes faster, so keep a close eye on the browning.
Flavor Variations and Creative Dietary Tweaks
Once you've mastered the basic version, it's time to play with the flavor profile. This base is incredibly forgiving.
For a Mediterranean Twist
Swap the smoked paprika for dried oregano and add 2 tablespoons of nutritional yeast for a cheesy, savory flavor without the dairy. This version pairs beautifully with a lemon tahini dip. For another savory chickpea idea, you might enjoy the seasoning profile in my Daniel Fast Snack recipe.
For a Spicy Kick
Add 1/2 teaspoon of cayenne pepper or a tablespoon of finely chopped jalapeños to the mix. The rice acts as a cooling agent, so you can go a little heavier on the heat than you usually would.
Proper Storage and Smart Reheating Methods
- Storage
- These stay good in an airtight container in the fridge for up to 4 days. They will lose their "shatter" crunch as they sit, but the flavor remains excellent.
- Freezing
- You can freeze these either raw or baked. Place them on a tray in the freezer for 1 hour (flash freezing) before moving them to a bag. They last for up to 3 months.
- Reheating
- Avoid the microwave! It will make them rubbery. Instead, pop them in a 190°C (375°F) oven or air fryer for 5-8 minutes. This brings back the original crispness perfectly.
- Zero Waste
- If you have leftover crumbs or a ball that fell apart, don't toss it. Toast the remains in a pan and use them as a "savory granola" topper for salads or roasted vegetables.
Serving Ideas and Flavorful Side Pairings
These baked chickpea and rice balls are versatile enough to be the star or a sidekick. I love serving them in a shallow bowl over a bed of garlicky sautéed kale or stuffed into a warm pita with plenty of cucumber and tomato salad.
If you're serving them as an appetizer, a cooling dip is mandatory. A simple yogurt based sauce with lemon and dill or a spicy sriracha mayo works wonders. They also make a fantastic gluten-free alternative to croutons in a large Caesar salad.
The contrast between the cold greens and the warm, spiced balls is something you've got to try. Trust me, once you see how easy these are to whip up from basically nothing, they'll become a permanent resident in your weekly rotation.

High in Sodium ⚠️
845 mg mg of sodium per serving (37% % of daily value)
The American Heart Association recommends limiting sodium intake to no more than 2,300mg per day for most adults.
Sodium Reduction Tips
-
Rinse Chickpeas Thoroughly-20%
Rinsing canned chickpeas under running water for a minute or two can help remove approximately 20% of the sodium. Pat them dry afterwards.
-
Reduce Added Salt-25%
Reduce or eliminate the 1/2 tsp of sea salt. Taste the dish before adding any salt and use it sparingly. You can always add more, but you can't take it away!
-
Enhance with Lemon-10%
Increase the lemon juice to 2 tbsp. Lemon juice enhances flavors naturally, so you may not need as much salt.
-
Spice it Up!
Experiment with other sodium free herbs and spices like onion powder, garlic powder, dried oregano, or chili powder to add more flavor.
Recipe FAQs
Do rice and chickpeas go together in a baked ball?
Yes, they create an excellent structure. The rice provides the necessary starch skeleton while the chickpeas offer protein, bulk, and binding power when mashed.
How do I get my rice balls to stick together before baking?
Use chilled, day-old rice and compact the mixture firmly while rolling. The cold rice grains are firmer, and adding a binder like chickpea flour helps create a sticky mortar between them.
Can rice balls be baked instead of fried for this recipe?
Yes, baking works well for a healthier, crisp crust. Ensure you brush the exterior generously with oil and bake at a high temperature, around 200°C (400°F), to achieve surface crispness.
Is chickpeas and rice a healthy meal option?
Yes, this combination is generally very healthy. It offers a complete protein source from the legumes, complex carbohydrates from the rice, and is easily made vegan and gluten-free.
What is the secret to making the chickpea flour bind effectively?
The acid level must be correct to tighten the proteins. Adding lemon juice lowers the pH, helping the chickpea flour absorb moisture and form a stronger binding matrix, similar to how acid affects structure in some pastry doughs.
Can I substitute the avocado oil for a different fat when baking?
You can, but choose a high smoke point fat for best results. Grapeseed oil is a good neutral alternative, but avoid butter or olive oil for baking at high heat as they can burn before the balls achieve maximum crunch.
What is the best way to reheat baked chickpea and rice balls to restore crispness?
Reheat in the oven or air fryer, never the microwave. Place them on a baking sheet at 190°C (375°F) for 5 8 minutes; this reactivates the heat, drying out the crust, much like how you refresh day old pastries.
Baked Chickpea Rice Balls
Ingredients:
Instructions:
Nutrition Facts:
| Calories | 289 calories |
|---|---|
| Protein | 8.9 g |
| Fat | 9.2 g |
| Carbs | 42.1 g |
| Fiber | 5.8 g |
| Sugar | 1.8 g |
| Sodium | 845 mg |
