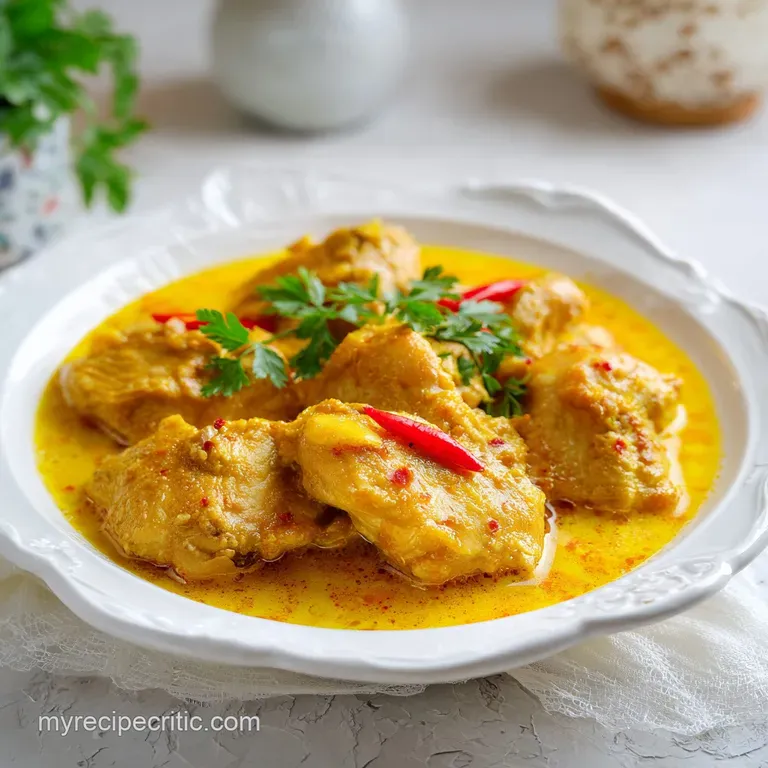
Simple Curry Chicken Thighs: One-Pot and Silky
- Time: Active 10 minutes, Passive 25 minutes, Total 35 minutes
- Flavor/Texture Hook: Shatteringly crisp skin meets a silky, spiced coconut gravy
- Perfect for: Busy weeknights, budget conscious meal prep, or beginner cooks
- Master My Simple Curry Chicken Thighs
- Why This Method Always Wins
- Budget Friendly Ingredients and Swaps
- Best Tools for One Pan Cooking
- Step by Step Cooking Guide
- Troubleshooting Your Curry Sauce
- Easy Flavor and Texture Variations
- Storage and Freezing Safety Tips
- Perfect Pairings for Your Meal
- Recipe FAQs
- 📝 Recipe Card
Master My Simple Curry Chicken Thighs
The first time I really understood the power of a good sear, it was because of a cold, rainy Tuesday and a pack of clearance bin chicken thighs. I stood over my heavy skillet, watching the avocado oil shimmer, and dropped the seasoned chicken skin side down.
That immediate, aggressive sizzle is still one of my favorite sounds in the kitchen. As the turmeric stained skin turned a deep, golden mahogany, the aroma of ginger and garlic started to fill the air, cutting right through the damp afternoon gloom.
I realized then that you don't need a three hour braise to get a sauce that tastes like it has been simmering since sunrise.
This recipe is the result of years of trying to balance a hectic schedule with a serious craving for bold, aromatic heat. We are skipping the expensive pre made jars and sticking to pantry staples that actually work harder for your dollar.
You are going to get that rich, creamy mouthfeel without the heavy price tag of specialty creams, thanks to a few smart techniques involving light coconut milk and deglazing. It is a straightforward process, but the payoff is a velvety sauce that clings to every inch of that juicy meat.
We are going for big flavors and a sink full of dishes because that is how real home cooking happens. I want you to feel the heat of the pan and see the way the tomato paste darkens as it hits the rendered chicken fat. That is where the magic lives.
We are not just making dinner; we are building layers of flavor that make a 35 minute meal feel like a weekend project. Trust me, once you hear that skin crackle and smell the blooming curry powder, you will never go back to the bland stuff.
Why This Method Always Wins
Fat Soluble Flavor: Most spices in curry powder are fat soluble, meaning they need a hot oil environment to release their full aromatic potential before any liquid is added.
Moisture Retention: Leaving the bone in the chicken acts as a thermal conductor, cooking the meat from the inside out while preventing the protein fibers from drying out during the simmer.
Acid Emulsification: Adding lime juice at the very end doesn't just provide brightness; it helps stabilize the coconut milk fats, creating a silky, unified sauce rather than a greasy one.
Gelatin Release: Using bone in thighs allows the natural collagen to seep into the broth, giving the sauce a body and "lip smacking" quality that boneless cuts simply cannot provide.
| Thickness | Internal Temp | Rest Time | Visual Cue |
|---|---|---|---|
| 1 inch | 165°F | 5 minutes | Juices run clear |
| 1.5 inches | 165°F | 5 minutes | Meat pulls from bone |
| 2 inches | 165°F | 8 minutes | Skin is deep gold |
When you are looking for that specific "done" moment, don't just trust the clock. Chicken thighs are incredibly forgiving because of their higher fat content, unlike breasts which turn to sawdust if you look at them wrong for too long.
If you use a meat thermometer, aim for 165°F right near the bone, but don't panic if it hits 175°F; that extra heat actually helps break down the connective tissue even further.
If you are looking for a different spin on comfort, you might enjoy my Mums Chicken Curry recipe which uses a slightly different aromatic base. It is another great example of how simple ingredients can transform into something truly special with just a little patience and a hot pan.
Budget Friendly Ingredients and Swaps
| Ingredient | Science Role | Pro Secret |
|---|---|---|
| Chicken Thighs | Fat & Gelatin | Pat them bone dry for a better sear. |
| Turmeric | Color & Earthiness | Stains the skin for a professional look. |
| Light Coconut Milk | Creamy Emulsion | Shake the can well to redistribute fats. |
| Tomato Paste | Umami & Body | Sauté until dark to remove raw tinny taste. |
The foundation of this dish relies on 1.5 lb bone in, skin on chicken thighs. These are usually the most affordable cut at the butcher counter, yet they carry the most flavor. We season them with 1 tsp Kosher salt and 0.5 tsp cracked black pepper to ensure the seasoning penetrates the skin.
The 0.5 tsp ground turmeric isn't just for health; it provides that iconic golden hue that makes the dish look as vibrant as it tastes.
For the aromatics, we use 1 medium yellow onion, 3 cloves of garlic, and 1 tbsp fresh ginger. If you're on a budget, you can use frozen ginger cubes or even a dash of dried ginger, though fresh is always king for that zing. The 2 tbsp mild curry powder is our primary flavor driver.
We deglaze with 13.5 oz light coconut milk and 0.5 cup low sodium chicken bone broth. Using light coconut milk is a smart budget move it's often cheaper and less heavy than the full fat versions, but we build back the richness by simmering it down.
Adding 1 tbsp tomato paste provides a deep umami backbone that makes the sauce taste like it has been cooking for hours. Finally, 1 red bell pepper adds a much needed crunch and sweetness, while 0.5 lime (juiced) and 0.25 cup fresh cilantro provide the bright finish that cuts through the richness of the coconut.
Ingredient Substitutions:
- Avocado Oil: Ghee or refined coconut oil. Why this? These have high smoke points for a clean, intense sear.
- Light Coconut Milk: Whole milk mixed with a tsp of cornstarch. Why this? Provides similar viscosity but changes the flavor profile significantly.
- Bone Broth: Standard chicken stock or bouillon. Why this? More affordable, though slightly less protein and body in the sauce.
- Red Bell Pepper: Carrots or snap peas. Why this? Offers sweetness and texture while utilizing what's already in your crisper drawer.
Best Tools for One Pan Cooking
For this recipe, a 12 inch heavy bottomed skillet or a 5 quart Dutch oven is your best friend. I personally love using a cast iron skillet because it holds heat like a champion, which is exactly what you need to get that skin side sear perfect.
If your pan is too thin, the heat will fluctuate too much when you add the cold chicken, and instead of searing, you'll end up steaming the meat in its own juices.
You will also want a microplane or a fine grater for that ginger and garlic. Don't bother with a garlic press here; grating them creates a paste that melts into the oil, ensuring you don't get any bitter, burnt chunks of garlic later on.
A sturdy pair of metal tongs is essential for flipping the thighs without tearing that precious skin we worked so hard to crisp up.
Chef's Tip: Freeze your ginger root for 10 minutes before grating. It makes the fibers much firmer and easier to grate without it turning into a stringy mess in your hands.
step-by-step Cooking Guide
1. Achieving the Perfect Sear
Pat the chicken thighs bone dry with paper towels to ensure a crisp sear. Moisture is the enemy of a good crust; if the skin is wet, it will stick to the pan. Season both sides evenly with Kosher salt, black pepper, and ground turmeric. Heat avocado oil in a large deep sided skillet or Dutch oven over medium high heat.
Place chicken skin side down and sear for 5-7 minutes until a deep golden brown crust develops. Remove chicken and set aside. Note: Don't move the chicken too early; it will naturally release from the pan once the crust has formed.
2. Tempering the Aromatics
In the same pan with the rendered chicken fat, add the diced onion and sauté for 3-4 minutes until translucent and soft. Use a wooden spoon to gently scrape up any brown bits stuck to the bottom. Add minced garlic, grated ginger, curry powder, and tomato paste.
Stir constantly for 1-2 minutes until the mixture is fragrant and mahogany colored. This "blooming" process is essential for removing the raw, metallic taste of the tomato paste and waking up the spices.
3. Simmering to Succulence
Deglaze the pan by pouring in the light coconut milk and bone broth, scraping the bottom to release the savory browned bits (fond). This fond is concentrated flavor that will season your entire sauce.
Stir in the red bell pepper strips and return the chicken thighs to the pan, skin side up so the skin stays out of the liquid. Reduce heat to medium low and simmer for 20 minutes until the chicken is tender and cooked through.
Note: Keeping the skin above the liquid line preserves the crunch we created in step one.
4. Balancing the Flavors
Remove from heat. This is the moment where you take the dish from good to great. Stir in the lime juice to emulsify the sauce and provide a necessary hit of acid. The lime juice acts as a bridge between the earthy turmeric and the creamy coconut.
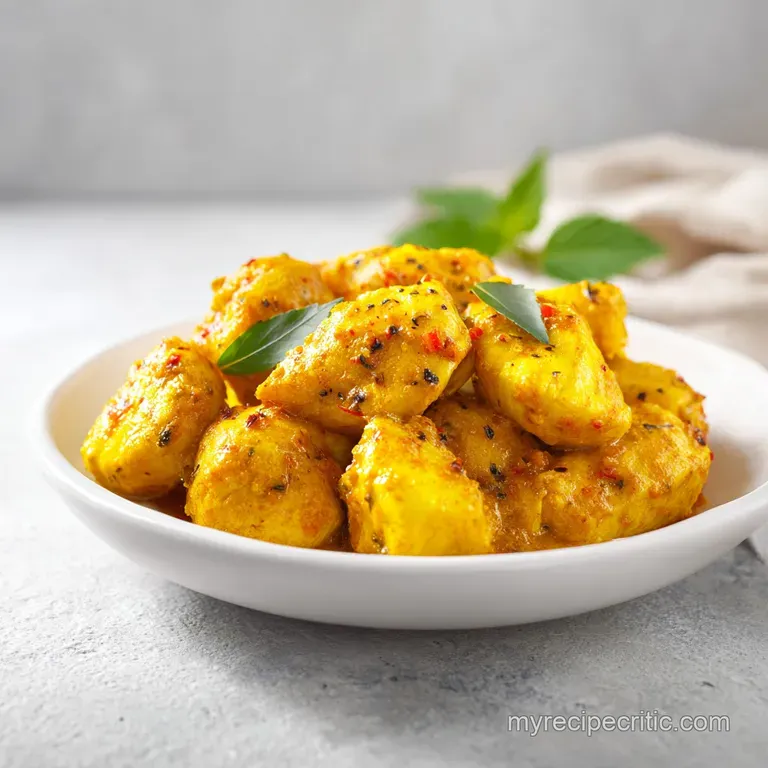
Top with fresh cilantro until the green pops against the orange sauce. Serve immediately while the sauce is at its creamiest.
Troubleshooting Your Curry Sauce
Why Your Sauce Separated
If your sauce looks oily or broken, it usually means the heat was too high during the simmering phase. Coconut milk is an emulsion of fat and water; if you boil it aggressively, those bonds break.
To fix this, remove the pan from the heat and whisk in a tablespoon of room temperature water or a splash more coconut milk. The sudden change in temperature and the addition of fresh emulsifiers can often bring the sauce back together into a silky consistency.
Why the Skin is Soggy
Soggy skin is a common heartbreak. It happens if you submerge the chicken completely in the liquid or if you cover the pan with a tight fitting lid. The steam trapped under the lid turns your crispy skin into a wet sponge.
Always simmer uncovered and keep the skin side of the thighs sitting just above the "tide line" of the curry sauce. This allows the meat to braise while the skin stays exposed to the dry heat.
| Problem | Root Cause | Solution |
|---|---|---|
| Bitter Taste | Burnt Garlic/Spices | Sauté aromatics on lower heat next time. |
| Thin Sauce | Too much broth | Simmer uncovered for 5 extra minutes. |
| Tough Meat | Under cooked | Ensure internal temp reaches 165°F. |
Common Mistakes Checklist:
- ✓ Pat chicken completely dry before searing (prevents steaming)
- ✓ Preheat pan for 3 full minutes before adding oil
- ✓ Don't overcrowd the pan - work in batches if needed
- ✓ Let meat rest 5 minutes before slicing to retain juices
- ✓ Bloom spices in fat, not in the liquid
Easy Flavor and Texture Variations
When you want to scale this recipe down for a solo dinner, it is surprisingly easy. For a half batch (2 servings), use a smaller 8 inch skillet to keep the liquid from evaporating too quickly. Use 0.75 lb of chicken and reduce the simmer time by about 20% since there is less thermal mass in the pan.
If you find yourself needing to use half an egg for a coating in other recipes, beat it first and measure by weight, but for this curry, we don't need binder hacks!
Scaling up for a crowd (8 servings) requires a bit more care. You must work in batches when searing the chicken; if you crowd the pan, the temperature will drop, and the chicken will grey instead of gold.
For the spices and salt, I recommend only going to 1.5x the original amount rather than a full double, then tasting at the end. Spices can become overwhelming when doubled linearly. Also, reduce the total liquid by about 10% when doubling, as less evaporation happens in a larger pot.
If you are looking for a totally different flavor profile using similar techniques, you should check out this Jamaican Brown Stew Chicken which is designed for 6 servings and uses a fantastic browning method that results in a deeply savory gravy.
Achieving a Thai Twist
Substitute the curry powder for 2 tbsp of red curry paste. Swap the cilantro for Thai basil and add a dash of fish sauce instead of some of the salt. This shifts the profile from Indian inspired warmth to a Southeast Asian punch.
Adding Vibrant Greens
Stir in two cups of fresh baby spinach during the last 2 minutes of simmering. The residual heat will wilt the greens perfectly without turning them into mush, adding a nutritional boost and a beautiful color contrast.
Storage and Freezing Safety Tips
This curry actually tastes better the next day because the flavors have time to meld and the spices continue to hydrate. Store any leftovers in an airtight container in the fridge for up to 4 days. When reheating, do it gently on the stovetop over low heat.
Add a splash of water or broth to loosen the sauce, as the coconut milk will thicken significantly once cold.
For freezing, this dish holds up well for about 3 months. However, be aware that coconut milk can sometimes grain out after being frozen and thawed. To fix the texture upon reheating, give the sauce a vigorous stir or a quick pulse with an immersion blender (remove the chicken first!) to re emulsify the fats.
Zero Waste Tip: Don't throw away the cilantro stems! They actually hold more flavor than the leaves. Finely mince them and sauté them along with the onions and garlic at the start of the recipe for an extra layer of herbal depth.
Also, if you have leftover red bell pepper scraps, freeze them in a bag for your next homemade stock.
Perfect Pairings for Your Meal
While this dish is a star on its own, it really shines when served alongside something that can soak up all that liquid gold. A pile of fluffy jasmine rice or basmati is the traditional choice.
If you want to keep it budget friendly and low carb, cauliflower rice works beautifully here because it absorbs the spices without competing with the flavor of the chicken.
One myth I often hear is that searing meat "seals in the juices." That's actually not true! Moisture loss happens regardless of the sear. The real reason we sear is for the Maillard reaction that complex chemical process that creates hundreds of new flavor compounds and that beautiful brown crust.
Another myth is that you must use full fat coconut milk for a "real" curry. While it's richer, our use of tomato paste and a slow simmer with light coconut milk provides plenty of body without the extra calories or cost.
Chef's Tip: If you want an even deeper flavor, add a tiny pinch of espresso powder or cocoa powder to the spice mix. It sounds crazy, but it adds an incredible earthy bass note that mimics the complexity of a long simmered mole.
Enjoy the process, keep your pan hot, and don't worry about the mess. That's just a sign of a meal well made. Happy cooking!

Recipe FAQs
How to ensure the chicken skin gets crispy?
Pat the chicken thighs completely bone dry with paper towels before seasoning. Placing them skin side down in a hot skillet with avocado oil over medium high heat allows the fat to render and create a deep golden brown crust.
How to prevent the curry sauce from splitting?
Remove the skillet from the heat before stirring in the lime juice. If you enjoyed mastering this emulsification technique here, you can apply the same principle of finishing off-heat to stabilize delicate dairy or coconut milk sauces in other one-pot meals.
Is it true I should skip browning the spices?
No, this is a common misconception. You must bloom the curry powder and tomato paste in the rendered fat for 1-2 minutes until fragrant and mahogany colored to unlock the full depth of flavor in the spices.
How to fix a sauce that has thickened too much in the fridge?
Add a small splash of water or bone broth while reheating on the stovetop. Because coconut milk thickens significantly when cold, using low heat and a little extra liquid will restore the desired velvety consistency.
How to properly scrape the pan for maximum flavor?
Pour in the bone broth and coconut milk, then use a wooden spatula to scrape the bottom of the pan. This process releases the savory browned bits, known as fond, which significantly enhances the complexity of the finished curry sauce.
Can I store this curry for long term use?
Yes, you can freeze this dish for up to 3 months. Be aware that the coconut milk may occasionally separate or appear grainy after thawing, but the flavor will remain excellent once gently reheated.
How to determine if the chicken is fully cooked?
Simmer the chicken in the sauce for exactly 20 minutes on medium low heat. This duration ensures the bone-in thighs are tender and cooked through while allowing the red bell pepper strips to soften perfectly.
Simple Curry Chicken Thighs

Ingredients:
Instructions:
Nutrition Facts:
| Calories | 387 calories |
|---|---|
| Protein | 24 g |
| Fat | 28 g |
| Carbs | 8 g |
| Fiber | 2 g |
| Sugar | 3 g |
| Sodium | 715 mg |
