Teriyaki Chicken Bowl with Mahogany Glaze
- Time: Active 10 minutes, Passive 10 minutes, Total 20 minutes
- Flavor/Texture Hook: Sticky mahogany glaze over tender, golden seared chicken
- Perfect for: Busy weeknights when you're craving takeout but want something faster
- Fast Versus Classic Comparison and Crucial Recipe Specs
- The Science of the Mahogany Glaze
- Component Analysis
- The Alchemy of Umami: Selecting Your Elements for This Bowl
- Essential Kitchen Tools for Achieving the Ultimate Pan Sear
- From Prep to Plate: Executing the Perfect Weeknight Dinner
- Avoiding Kitchen Disasters: Troubleshooting Your Homemade Teriyaki Sauce
- Smart Swaps for a Healthy Teriyaki Chicken Bowl Variation
- Debunking Teriyaki Myths
- Guidelines for Long-Term Storage and Effective Reheating Methods
- Perfect Pairing Ideas to Complete Your Homemade Asian Feast
- Critical in Sodium
- Recipe FAQs
- 📝 Recipe Card
You know that specific sound when honey and soy sauce hit a blistering hot pan? That sudden, aggressive sizzle followed by the smell of toasted ginger and garlic? That's the moment I knew I’d finally cracked the code. For years, my homemade attempts at a Teriyaki Chicken Bowl were, frankly, depressing.
I’d end up with what I called "Teriyaki Soup" pale, boiled looking chicken swimming in a thin, watery brown liquid that tasted like salt and regret. I was trying to cook the chicken in the sauce from the start, which is a one way ticket to Rubber Town.
The turning point came during a Tuesday night meltdown when I was starving and determined to beat the delivery driver. I stopped treating the sauce like a braising liquid and started treating it like a finish.
By searing the chicken first until it got those gorgeous, crispy golden edges, and then introducing the sauce only at the very end to let it emulsify and reduce, everything changed. Now, this is the meal I make when I have zero energy but want something that feels like a massive win.
It’s glossy, it’s sticky, and it actually tastes like the version you pay $15 for at the mall, but better.
Fast Versus Classic Comparison and Crucial Recipe Specs
Before we get our pans hot, let's look at why this "quick" version is often superior for home cooks compared to the traditional, slow simmered method. If you've ever tried a Teriyaki Chicken Casserole recipe, you know that different methods yield different textures. This bowl is all about speed and surface area.
| Feature | Fast Method (This Recipe) | Classic Method |
|---|---|---|
| Preparation | Whisk and pour | Simmering aromatics for 1 hour |
| Chicken Texture | Seared and snappy | Soft and tender |
| Sauce Finish | High gloss glaze | Thick, syrupy reduction |
We're going for maximum efficiency here. To ensure you're on the right track, keep these three precision checkpoints in mind while you cook. First, your chicken cubes should be exactly 1 inch. Any smaller and they'll overcook before they brown; any larger and the center stays raw while the outside burns.
Second, ensure your pan hits a medium high heat if you don't hear a loud sizzle the second the meat touches the oil, take it out and wait. Finally, the internal temp of that chicken needs to hit 165°F (74°C).
Chef's Tip: Use a digital thermometer. It’s the only way to guarantee you aren't serving "chicken leather."
The Science of the Mahogany Glaze
Protein Denaturation: High heat causes the chicken proteins to uncoil and rebond, creating a firm texture that "locks" the juices inside once the exterior is sealed.
Starch Gelatinization: The cornstarch molecules in our slurry swell when they hit the boiling point, trapping the water and soy sauce into a velvety, thick matrix that clings to the meat.
The Maillard Reaction: This is the chemical reaction between amino acids and reducing sugars that gives the seared chicken its deep brown color and savory complexity.
Component Analysis
| Ingredient | Science Role | Pro Secret |
|---|---|---|
| Honey | Provides the "tackiness" for the glaze. | Spray your measuring spoon with oil first; the honey will slide right off without sticking. |
| Mirin | Adds acidity and a unique shine. | If you don't have it, a splash of rice vinegar and a pinch of sugar works in a pinch. |
| Cornstarch | Acts as the thickening agent. | Always mix it with cold water first; adding dry starch to a hot pan creates irreversible lumps. |
| Ginger | Breaks down tough fibers. | Freeze your ginger root and grate it while frozen for a much finer, almost melted texture. |
A quick note on the rice: while we're using jasmine here, the technique is similar to what you'd find in a Vegan Teriyaki Noodle Bowl recipe where the starch acts as a sponge for the sauce.
The Alchemy of Umami: Selecting Your Elements for This Bowl
To get that deep, balanced flavor, we need the right players on the field. Don't worry if your pantry isn't fully stocked; there’s almost always a way to pivot without ruining the dish.
- 1.5 lbs chicken breast: Cut into 1 inch bite sized pieces. Why this? Lean protein that cooks fast and absorbs the glaze beautifully.
- Substitute: Chicken thighs (boneless/skinless) for a juicier, more forgiving result.
- 1 tbsp neutral oil: Like canola or grapeseed. Why this? High smoke point prevents the pan from smoking out your kitchen.
- Substitute: Avocado oil or very light olive oil.
- 0.5 tsp fine sea salt & 0.25 tsp black pepper: Why this? Essential for building the base flavor profile of the meat.
- 0.5 cup low sodium soy sauce: Why this? Provides the salt and umami without being overwhelming.
- Substitute: Tamari for a gluten-free option or Coconut Aminos (use less honey if doing this).
- 0.25 cup water: Why this? Thins the sauce just enough to allow it to reduce properly.
- 3 tbsp honey: Why this? The primary sweetener and thickening partner.
- Substitute: Brown sugar or maple syrup (adds a woodsy note).
- 1 tbsp mirin: Why this? Japanese rice wine that adds a subtle tang and gloss.
- Substitute: Rice wine vinegar with a teaspoon of sugar.
- 1 tsp fresh ginger: Grated fine. Why this? Provides a sharp, spicy counterpoint to the sweet honey.
- 2 cloves garlic: Minced. Why this? Because everything is better with garlic.
- 1 tsp cornstarch mixed with 1 tbsp cold water: Why this? The "slurry" that creates the restaurant style thickness.
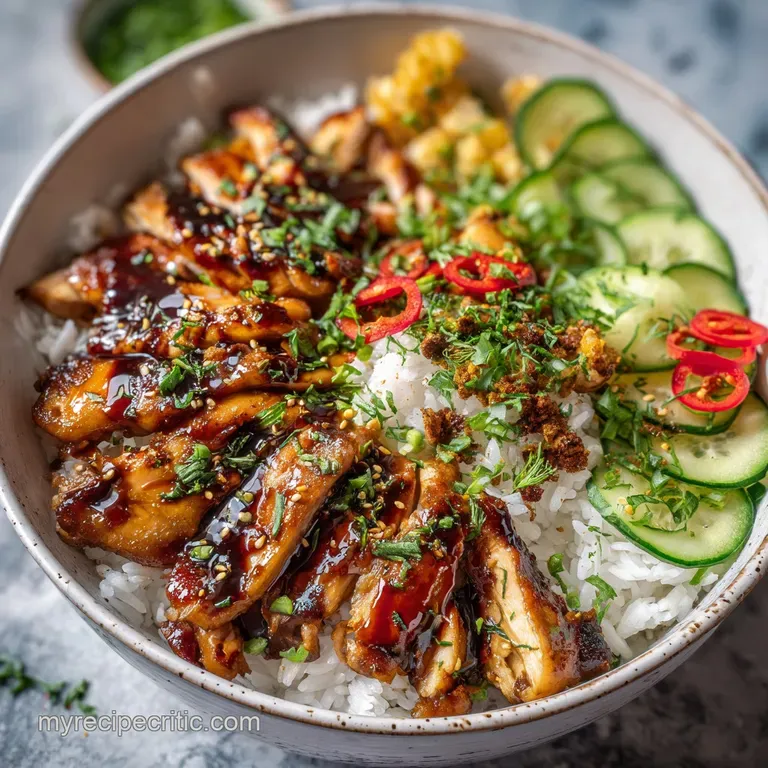
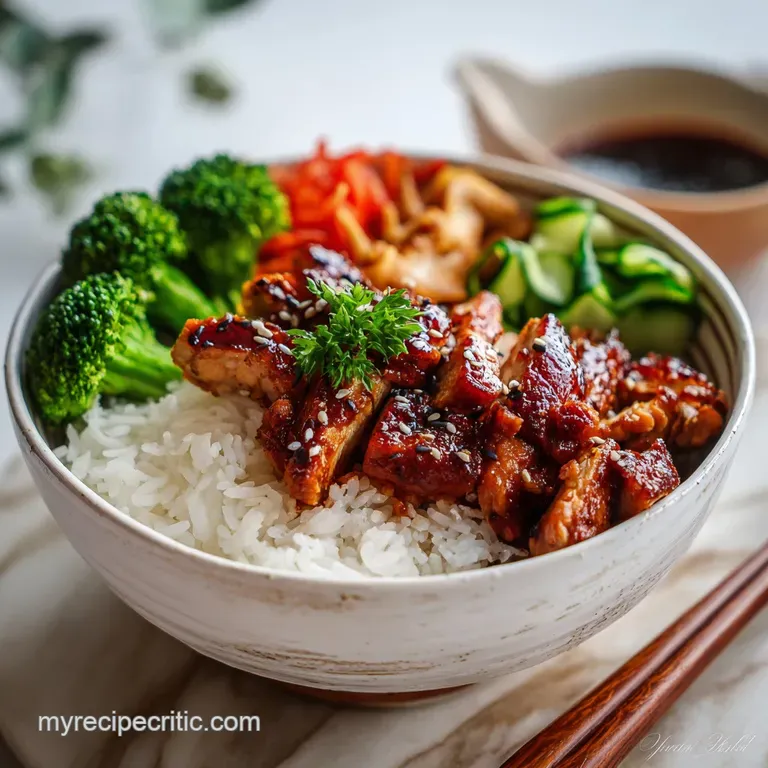
- 3 cups cooked jasmine rice: Why this? The aromatic, floral base for the bowl.
- 2 cups steamed broccoli florets: Why this? Adds crunch and a much needed green element.
Essential Kitchen Tools for Achieving the Ultimate Pan Sear
You don't need a high end kitchen, but a few specific items make this whole process a lot less stressful.
- A Large Skillet or Wok: I prefer a 12 inch cast iron or stainless steel pan. You need space. If the chicken is crowded, it will steam instead of sear.
- A Microplane: This is the best way to get that ginger and garlic into a paste so you don't bite into a huge chunk of raw ginger.
- A Small Whisk: Essential for getting that cornstarch slurry perfectly smooth.
- A Chef's Knife: Sharpness matters here for clean, uniform 1 inch chicken cubes.
From Prep to Plate: Executing the Perfect Weeknight Dinner
Phase 1: The over High heat Sear
- Dry the chicken. Use paper towels to pat the 1.5 lbs of chicken pieces until bone dry. Note: Surface moisture creates steam, which prevents browning.
- Season well. Toss the chicken with the salt and black pepper in a small bowl.
- Heat the pan. Add the neutral oil to your skillet over medium high heat until it shimmers and barely wisps smoke.
- Sear the protein. Add the chicken in a single layer. Let it sit undisturbed for 3 minutes until a golden brown crust forms. Flip and cook for another 2 minutes.
Phase 2: Building the Mahogany Glaze
- Whisk the liquids. In a small jar, combine the soy sauce, water, honey, mirin, grated ginger, and minced garlic.
- Deglaze the pan. Pour the sauce mixture directly over the chicken. Use a wooden spoon to scrape up any brown bits (the fond) from the bottom.
- Simmer and reduce. Let the sauce bubble for 2-3 minutes. You'll see the bubbles transition from thin and watery to larger, "lazy" bubbles.
Phase 3: The Finishing Gloss
- Activate the slurry. Give your cornstarch and water mixture one last stir and pour it into the bubbling pan.
- Thicken. Stir constantly for 1 minute until the sauce turns translucent and clings to the chicken like a blanket.
- Assemble. Divide the 3 cups of rice and 2 cups of broccoli into bowls. Top with the glazed chicken and extra sauce from the pan.
Avoiding Kitchen Disasters: Troubleshooting Your Homemade Teriyaki Sauce
Sometimes things go sideways. Maybe your heat was too high, or maybe the honey was a bit more stubborn than usual. Don't panic; most "ruined" sauces are just one small tweak away from being saved.
Why Your Sauce Is Too Salty
If you used regular soy sauce instead of low sodium, the salt content can be aggressive. This usually happens when the sauce reduces too much, concentrating the sodium.
| Problem | Root Cause | Solution |
|---|---|---|
| Salty/Bitter Sauce | Used full sodium soy or burnt the garlic. | Add a splash of water and 1 tsp extra honey to balance the salt. |
| Sauce Won't Thicken | Slurry wasn't stirred or heat was too low. | Ensure the sauce reaches a full boil for 30 seconds to activate the starch. |
| Pale Chicken | Pan was overcrowded or not hot enough. | Cook in batches next time; ensure the pan is "shimmering" hot. |
Common Mistakes Checklist
- ✓ Pat the chicken completely dry before it touches the pan (prevents a soggy texture).
- ✓ Use a cold liquid for the cornstarch slurry to prevent "clump cities."
- ✓ Don't add the garlic too early; it can burn and turn bitter in the time it takes to sear chicken.
- ✓ Let the rice steam for 5 minutes after cooking so it doesn't turn into mush when the sauce hits it.
Smart Swaps for a Healthy Teriyaki Chicken Bowl Variation
If you're looking to scale this recipe down or change it up for a specific diet, the physics stays the same, but the ingredients can shift. For instance, if you're making this for a crowd, keep the spices at 1.5x the original amount even if you double the meat spices can become overwhelming when scaled linearly.
Scaling Guidelines
- To Scale Down (1-2 servings): Use half a pound of chicken in a smaller 8 inch skillet. Keep the cook times the same, but watch the sauce closely as it will reduce much faster in a smaller volume.
- To Scale Up (6-8 servings): Work in batches for the chicken. If you crowd the pan with 3 lbs of meat, you'll end up with grey, boiled chicken. Double the sauce ingredients but only use 1.5x the salt.
Decision Shortcuts
- If you want it spicy: Add 1 tsp of red pepper flakes or a squeeze of Sriracha to the sauce whisking phase.
- If you want it "Healthy": Swap the jasmine rice for cauliflower rice and the honey for a monk fruit sweetener (though the glaze will be slightly less sticky).
- If you want a deeper flavor: Substitute half the water with a high-quality Chicken Fajita Marinade recipe base or even a splash of orange juice.
Debunking Teriyaki Myths
One of the biggest myths is that you need to marinate the chicken for hours. In reality, because the chicken is cut into small pieces, the surface area is huge. A quick sear and a heavy glaze provide more flavor than an overnight soak ever could.
In fact, long marinating in acidic soy sauce can actually break down the protein fibers too much, making the chicken mushy rather than tender.
Another common misconception is that "authentic" teriyaki sauce must be thick like syrup in the bottle. Traditional Japanese teriyaki (tare) is actually quite thin and is used as a basting liquid.
The thick, gloopy version we love in bowls is a beautiful Western adaptation that relies on cornstarch for that "clump" factor and honestly, for a rice bowl, the thick version is much better for coating every grain.
Guidelines for Long Term Storage and Effective Reheating Methods
Storage: This keeps beautifully in the fridge for up to 4 days. In fact, I think the ginger and garlic flavors actually deepen after 24 hours. Keep the rice and chicken in separate containers if possible to prevent the rice from drinking up all the sauce and getting bloated.
Freezing: You can freeze the cooked teriyaki chicken (without the rice) for up to 2 months. To reheat, let it thaw in the fridge overnight.
Reheating: Avoid the microwave if you can. It tends to turn chicken into rubber. Instead, toss everything into a skillet with a tablespoon of water. Cover it for 2 minutes to let the steam loosen the sauce, then stir until it's glossy again.
Zero Waste Tip: Don't throw away those broccoli stalks! Peel the woody outer layer, dice the tender interior, and toss it into the pan with the chicken. It adds a great crunch and saves you from wasting half the vegetable.
If you have leftover sauce, it's incredible drizzled over a simple fried egg the next morning.
Perfect Pairing Ideas to Complete Your Homemade Asian Feast
While the broccoli and rice make this a complete meal, sometimes you want to go the extra mile. If you're looking for a refreshing side, a quick smashed cucumber salad with rice vinegar and sesame oil cuts through the sweetness of the honey.
For those who want more of a "takeout at home" vibe, I highly recommend serving this alongside some crispy spring rolls or even a simple miso soup. If you find yourself with extra chicken, you can even repurpose the flavors by using a similar base for a Chicken Gyros Recipe — just swap the soy for lemon and oregano. The technique of over high heat searing is universal!
Trust me, once you see that sauce bubble up and turn into a "shatter crisp" glaze on the edges of the chicken, you'll never look at a bottled sauce the same way again. Right then, let's get that pan screaming hot!

Critical in Sodium
1250 mg mg of sodium per serving (54% of daily value)
The American Heart Association recommends limiting sodium intake to about 2,300mg per day for overall cardiovascular health.
Simple Sodium Reduction Tips
-
Swap Soy Sauce-30%
Replace the 0.5 cup of regular soy sauce with a no-sodium or reduced sodium version. This single substitution can significantly reduce the sodium content, without drastically changing the flavor profile. Ensure to check the label and compare sodium levels.
-
Reduce Added Salt-25%
Eliminate or drastically reduce the 0.5 tsp of added sea salt. You may not even miss it with the other flavorful ingredients! Taste as you cook and add salt only if absolutely necessary. Consider using a salt substitute.
-
Dilute Soy Sauce-15%
Reduce the sodium content by diluting the soy sauce. Use ¼ cup low-sodium soy sauce and ¼ cup water. This will lessen the intensity of the sodium without sacrificing the umami flavor.
-
Adjust Honey-10%
Increase the honey slightly, to 3.5 or 4 tablespoons, to compensate for any loss of flavor from reducing the salt and soy sauce. A touch more sweetness can balance the savory elements.
-
Spice It Up
Experiment with sodium free herbs and spices like garlic powder, onion powder, smoked paprika, or red pepper flakes to enhance the dish's flavor without adding sodium.
Recipe FAQs
Should I marinate the chicken before cooking Teriyaki Chicken Bowl?
No, an overnight marinade is unnecessary. Because the chicken is diced small, surface searing and introducing the glaze at the end provides superior texture and flavor penetration.
How to achieve a thick, glossy Teriyaki glaze without making it lumpy?
Whisk the cornstarch into cold water first to create a slurry. Pour this mixture into the sauce only after it has reached a full boil, stirring constantly for one minute until it becomes translucent and clings to the chicken.
Is it true that high heat will dry out the chicken pieces?
No, this is a common misconception when done correctly. Searing the chicken quickly over high heat creates a crust (Maillard reaction) that locks in moisture; overcrowding the pan is the real culprit for dryness.
What is the best substitute for Mirin if I don't have any rice wine?
Substitute with rice wine vinegar plus a teaspoon of sugar. The mirin primarily contributes acidity and gloss to the sauce, which this simple mixture replicates effectively.
How do I stop my sauce from tasting overly salty if I used regular soy sauce?
Balance the excess salt with sweetness and water. Add a splash more water to dilute the concentration and whisk in an extra teaspoon of honey to counteract the bitterness; this technique is similar to balancing flavors when making a base for Instant Pot Chicken recipe broth.
What is the minimum internal temperature the chicken must reach before glazing?
The chicken must reach 165°F (74°C) before the final glaze. Use a digital thermometer for precision, ensuring the chicken is cooked through before the quick reduction step thickens the exterior.
How can I ensure the ginger flavor is incorporated smoothly without harsh chunks?
Grate the fresh ginger root using a microplane immediately before adding it to the sauce. This breaks the fibers down so finely they virtually dissolve into the liquid during the reduction process, similar to how careful whisking creates smooth emulsions.
Quick Teriyaki Chicken Bowl

Ingredients:
Instructions:
Nutrition Facts:
| Calories | 585 kcal |
|---|---|
| Protein | 59 g |
| Fat | 10 g |
| Carbs | 59 g |
| Fiber | 3 g |
| Sugar | 16 g |
| Sodium | 1250 mg |
