Pintsized Perfection Proper Flaky Mini Chicken Pot Pies
- The Magic of Individual Comfort: Why Mini Wins
- A Love Letter to the Flakiest Crust Ever
- Assembling Your Arsenal: Ingredients & Essential Tools
- The Secrets to a Decadent, Creamy Pot Pie Filling
- Step-by-Step Mastery: Crafting the Perfect Mini Pot Pies
- The Grand Assembly: Encasing the Filling
- Troubleshooting and Mastering Your Next Batch
- Serving, Storing, and Flavor Upgrades for Mini Chicken Pot Pies
- Recipe FAQs
- 📝 Recipe Card
The Magic of Individual Comfort: Why Mini Wins
While there is an undeniable majesty to a full, deeply golden classic chicken pot pie, wrestling with slicing a large, messy wedge often diminishes the experience. That’s why embracing the handheld format is a game changer.
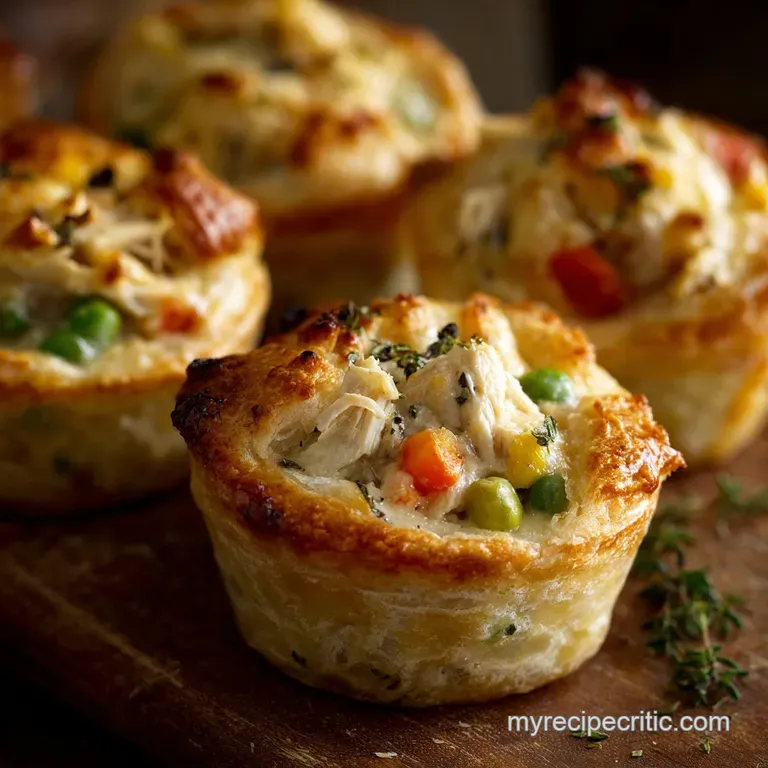
These delightful Mini Chicken Pot Pies capture all the quintessential comfort and richness of the traditional recipe but deliver it in a charming, entirely manageable package.
They are an impeccable solution for elegant entertaining, ideal for packing into lunch boxes, or serving as the ultimate answer to Chicken Pot Pie For One . By shrinking the vessel, we significantly enhance the convenience without sacrificing any depth of flavor.
A Love Letter to the Flakiest Crust Ever
The foundation of any superior pot pie lies in its crust. We opt for a proper, buttery shortcrust pastry the ideal counterpoint to the decadent, creamy filling. Achieving that layered, shatteringly crisp texture is a matter of technique, detailed preparation, and respecting the temperature of the key ingredients.
Portion Control Meets Peak Flavor
The inherent structure of these Muffin Tin Pot Pies ensures that every serving boasts its own perfect ratio of crust to filling. Unlike large pies where the center slice might struggle to maintain integrity, each of these individual servings is sealed and self contained.
This guarantees a beautiful presentation and a crispy edge every single time, making the most of this ingenious Mini Pot Pie Recipe .
Faster Bake Times for Instant Gratification
One of the great logistical advantages of downsizing is the dramatic reduction in cook time. A full pie can easily take over an hour to bake through completely. Thanks to their compact nature, these individual cups only require baking at 400°F (200°C) for a mere 25 to 30 minutes.
This efficiency transforms the luxurious process of making a pot pie from a dedicated weekend project into a completely feasible weeknight meal.
What Makes These Mini Chicken Pot Pies Truly Stand Out?
The secret is the pairing of a rich, savoury filling built upon a roux thickened, thyme infused sauce with truly flawless pastry. While we focus on a shortcrust base, the structure of these Mini Chicken Pot Pies means you could easily experiment with a lighter cap, perhaps adapting the lid using Pot Pie With Puff Pastry for an even airier top, or even using a fluffy biscuit top to create Mini Chicken Pot Pies with Biscuits .
It’s this versatility, rooted in high-quality fundamentals, that sets this recipe apart.
Expert Insights on the Perfect Poultry Filling
A creamy filling should never be bland. We begin by patiently sweating the classic mirepoix (onion, carrots, and celery) to build the deep aromatic base. The key is ensuring that the sauce, made with robust chicken stock and finished with heavy cream, is richly seasoned and deeply savory, ready to be enhanced by the two cups of tender, cooked chicken and sweet frozen peas.
Assembling Your Arsenal: Ingredients & Essential Tools
To construct 12 perfectly formed portions of these individual comforts, you will need a standard 12-cup Muffin Tin Pot Pies mold, which must be diligently greased.
For the pastry the foundation of these Mini Chicken Pot Pies with Pie Crust —we require 2 ½ cups of all-purpose flour and 1 cup of ultra cold unsalted butter, supplemented by 6 8 tablespoons of ice water to bind the mixture without developing gluten.
The heart of the dish relies on 4 tablespoons of butter to sauté the diced aromatics (approximately 1 medium onion, 2 medium carrots, and 2 stalks of celery), before thickening the sauce with a precise ¼ cup of flour.
The liquid component is balanced between 2 cups of chicken stock and ½ cup of heavy cream, finished with 2 cups of shredded, cooked chicken and 1 cup of frozen peas. Precision tools are also critical: specifically, two round cookie cutters one approximately 4 inches (10 cm) for the structural base, and a slightly smaller 3.5 inch (9 cm) cutter for the lid.
The Secrets to a Decadent, Creamy Pot Pie Filling

The quality of the final pie is entirely dependent on the flavor intensity developed in the filling phase. It requires patience and proper sequencing.
Getting Your Mise En Place Ready for Pot Pies
Before you even turn on the stove, ensure all vegetables are diced uniformly small. This small dice is non-negotiable, guaranteeing they cook down evenly and soften completely within the specified time, thus preventing a crunchy texture in the final, comforting bite.
Also, have the pre-measured stock, heavy cream, and cooked chicken readily available.
Crucial Equipment for Forming Perfect Handheld Shapes
The success of Mini Pot Pies Muffin Tins hinges on using the right sized cutters. The larger 4 inch cutter ensures the base pastry adequately covers the bottom and sides of the muffin cup, providing a substantial edge for sealing.
The slightly smaller 3.5 inch lid guarantees a clean overhang when crimped, maintaining the pies’ attractive domed shape.
Choosing the Right Chicken: Raw, Cooked, or Rotisserie?
To maximize efficiency and tenderness, this recipe utilizes 2 cups of pre-cooked chicken, diced or shredded. Using leftover roast chicken or meat pulled from a quality rotisserie bird is ideal, as the meat only needs to be heated through within the sauce, preventing the dryness that can occur when cooking raw chicken directly in the filling.
Achieving Maximum Flakiness: The Best Fats for Your Dough
The key component for a truly flaky Mini Pot Pie Recipe is maintaining the temperature of the fat. The 1 cup of butter must be ice-cold and cut into the 2 ½ cups of flour until the mixture is primarily coarse crumbs with some noticeable pea-sized pieces of butter remaining.
These discrete fat particles melt during baking, creating steam that lifts the layers of dough, resulting in the desired light, shatteringly crisp texture.
Related Recipes Worth Trying
- Proper Mini Chicken Pot Pies Recipe No Soggy Bottoms Made in a Muffin Tin — Make perfect individual Mini Chicken Pot Pies in your muffin tin Flaky shortcrust pastry prevents the dreaded soggy bottom giving way to a rich thymeinfused...
- The Best Creamy Sausage Kale Soup with Potatoes A Hearty Winter Supper — Skip the takeaway this Creamy Sausage Kale Soup is pure comfort Our rich creamy tuscan sausage kale soup uses potatoes for thickness and luxurious double...
- Flawless Chicken Noodle Soup with Egg Noodles A Rich Broth Recipe — The ultimate Chicken Noodle Soup with Egg Noodles recipe for cozy meals Learn the trick for a deep savory broth and perfectly tender never mushy noodles A...
step-by-step Mastery: Crafting the Perfect Mini Pot Pies
The initial step involves preparing the dough: whisking the dry ingredients, cutting in the cold butter, and incorporating just enough ice water until the mixture is shaggy. The dough must then be formed into two flat discs and chilled for a mandatory minimum of 30 minutes.
While the dough rests, attention turns to the creamy filling. Melt the butter and gently sauté the finely diced onion, carrots, and celery for 8– 10 minutes until they are soft and slightly translucent, but not browned, establishing a sweet, earthy base.
The Grand Assembly: Encasing the Filling
Once the core components are prepared, the assembly process must be executed swiftly and methodically to maintain the integrity of the cold pastry.
Sautéing Aromatics and Building the Cream Base
With the vegetables softened, incorporate the ¼ cup of flour and fresh thyme, cooking this roux for two minutes to eliminate any raw flour taste. Gradually whisk in the 2 cups of low-sodium chicken stock, bringing the sauce to a simmer for five minutes until it achieves significant thickening.
Finally, stir in the ½ cup of heavy cream, the 2 cups of cooked chicken, and the frozen peas, adjusting the seasoning liberally. It is absolutely crucial to remove the filling from the heat and allow it to cool slightly before marrying it with the raw dough.
Rolling and Cutting the Individual Crusts
Remove the first chilled dough disc and roll it out to an even ⅛ inch thickness. Use the 4 inch round cutter to create 12 bases, gently pressing them into the cups of the well greased muffin tin. Repeat this process with the second dough disc, using the slightly smaller 3.5 inch cutter for the tops.
Filling the Cups and Sealing the Edges Tight
Spoon the cooled chicken and vegetable mixture evenly into the lined pastry cups. Brush a small amount of water or egg wash onto the exposed rim of the base pastry this acts as the culinary glue. Place the smaller lid on top and press the edges firmly together, creating a tight seal.
Crimping the edges with a fork adds both a decorative touch and ensures maximum enclosure.
Achieving that Golden Brown Finish: Baking Temperatures and Time
Before moving to the oven, brush the top crusts with an egg wash (one large egg beaten with 1 tablespoon of milk or water) to guarantee a glossy, deep golden finish. Use a small, sharp knife to pierce 2 3 vents in the center of each pie to allow steam to escape.
Bake the Muffin Tin Chicken Pot Pies at 400°F (200°C) for 25 to 30 minutes, or until the filling is bubbling visibly through the vents and the crust is perfectly browned.
Troubleshooting and Mastering Your Next Batch
Even expert bakers encounter hiccups, but understanding the science behind the pie ensures you master every batch.
Handling Soggy Bottoms: Prevention Strategies
The enemy of a crisp base is moisture introduced before baking. The most effective defense is simple: ensure the filling is completely cool, or at least barely warm, when it is spooned into the raw pastry shells.
The relatively high baking temperature (400°F) also helps, as it quickly sets the bottom layer of fat before it can absorb steam from the filling.
make-ahead Marvels: Freezing Instructions
These Mini Chicken Pot Pies are outstanding candidates for future meals. Assemble the pies completely in the muffin tin, including applying the egg wash and venting, but stop before baking. Freeze them until solid, then remove them and store them in an airtight bag or container for up to three months.
To bake from frozen, simply place them back in the greased muffin tin and increase the bake time by about 10– 15 minutes until fully heated through.
Diet Adaptations: gluten-free and Vegetarian Options
This recipe can be easily adapted. For a gluten-free pie, substitute the wheat flour in both the pastry and the roux with a high-quality gluten-free all-purpose blend. For a vegetarian variation, replace the 2 cups of chicken with a robust mixture of sautéed wild mushrooms and leeks, utilizing quality vegetable stock instead of chicken stock to maintain the richness of the savory sauce base.
Frequently Asked Questions About Mini Chicken Pot Pies
A common question concerns crust material. While our recipe features shortcrust, many wonder if Pot Pie With Puff Pastry is viable. Puff pastry works superbly for the lid, offering lightness and impressive rise.
However, for the base that requires stability and must withstand the moist filling, a shortcrust or standard Mini Chicken Pot Pies with Pie Crust provides better structural integrity in the muffin tin.
Serving, Storing, and Flavor Upgrades for Mini Chicken Pot Pies
These individual pies are rich and satisfying, clocking in at an estimated 380 420 calories each. For a balanced meal, pair them with a light, crisp side salad tossed in a sharp Dijon vinaigrette, which cuts through the creamy richness beautifully.
For storage, baked pies can be kept airtight at room temperature for up to two days, or refrigerated for up to five days. To reheat, a short time in a 350°F (175°C) oven will re-crisp the crust better than a microwave.
For a sophisticated flavor upgrade, stir a tablespoon of dry sherry into the finished filling just before adding the cream and chicken it deepens the savory notes wonderfully.

Recipe FAQs
How do I avoid that dreadful 'soggy bottom' when baking these?
Ah, the nemesis of all proper pie makers! To ensure a crisp bottom, the most crucial step is to guarantee your filling is completely cool, or at least lukewarm, before placing it into the pastry shells. If the filling is hot, it creates immediate steam which hydrates the bottom crust.
Additionally, preheating your baking sheet in the oven and placing the filled muffin tin directly onto the hot sheet can give the pastry a helpful blast of heat from underneath.
Can I make these Mini Chicken Pot Pies ahead of time and freeze them?
Absolutely, these little beauties freeze like a dream, which makes them perfect for meal prepping! You can freeze them unbaked or fully baked. If unbaked, freeze them solid on a tray, then transfer them to an airtight bag; bake straight from frozen (adding about 10 15 minutes to the cooking time) without defrosting.
If freezing them baked, make sure they are completely cooled before wrapping them up tight.
I don't fancy chicken, are there any lovely alternatives for the filling?
Of course! The beauty of this recipe is its versatility. For a comforting vegetarian option, swap the chicken for sautéed wild mushrooms and leeks, using vegetable stock for the sauce base a dash of dry sherry is a very good idea here.
Alternatively, for a richer, pub-grub feel, substitute the chicken with pre-cooked beef and use a mix of beef stock and a robust ale (like a proper stout) instead of the cream and chicken stock.
What is the best way to reheat these little champions without drying them out?
The microwave is a big no-no, unless you enjoy sad, floppy pastry. The best method is to pop them into a conventional oven or a toaster oven at a modest 350°F (175°C) for about 10 15 minutes.
This gently warms the filling through while reactivating the butter in the pastry, ensuring the crust is beautifully crisp and flaky, just as it was when fresh.
Do I have to use fresh pastry, or can I use store-bought puff pastry instead?
While we advocate for the scratch shortcrust pastry for the ultimate flavour and stability, a ready-made, high-quality puff pastry or shortcrust can certainly save you a spot of bother. If using puff pastry, only use it for the lids, as the base might become too inflated and spill the filling.
Remember to adjust your cooking temperature slightly lower (around 375°F / 190°C) as puff pastry browns quite quickly.
Pintsized Mini Chicken Pot Pies

Ingredients:
Instructions:
Nutrition Facts:
| Calories | 314 kcal |
|---|---|
| Protein | 7.7 g |
| Fat | 18.3 g |
| Carbs | 33.3 g |
| Fiber | 6.3 g |
| Sodium | 3432 mg |
