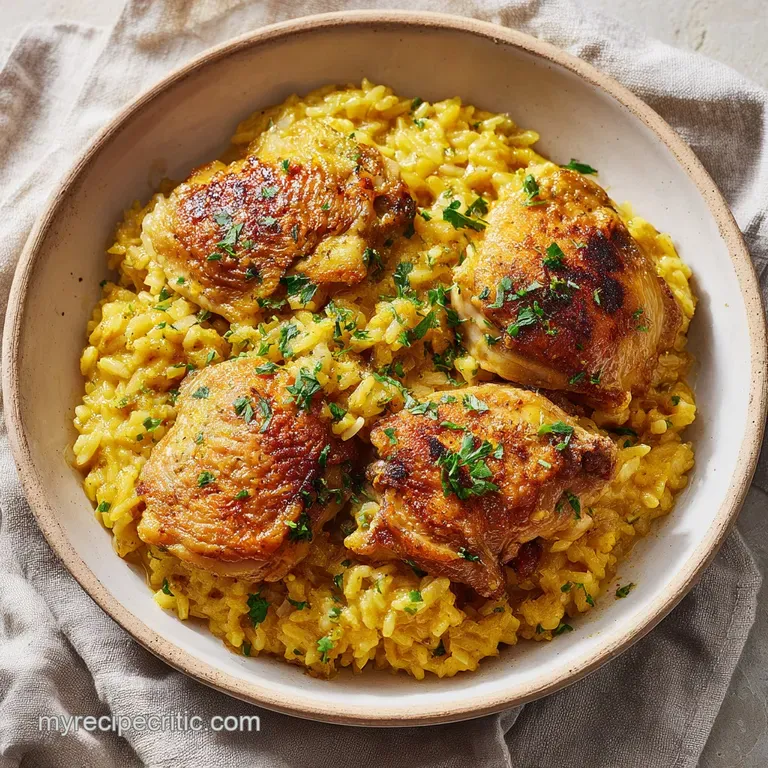
One Pot Chicken and Rice Recipe
- Time: Active 15 minutes, Passive 35 minutes, Total 50 minutes
- Flavor/Texture Hook: Savory, golden crisp chicken with velvety, aromatic rice
- Perfect for: Weeknight dinners where you want maximum flavor with minimal cleanup
- The One Pot Golden Chicken and Rice Recipe
- Why This One Pan Meal Works
- Essential Components for Maximum Flavor
- Recommended Gear for Success
- Detailed Ingredient Breakdown
- Mastering the Perfect Cook Flow
- Avoiding Soggy Rice Disasters
- Easy Customizations and Variations
- Pro Tips for Scaling
- Myths About One Pan Cooking
- Proper Storage and Keeping Fresh
- Perfect Sides for This Dish
- Recipe FAQs
- 📝 Recipe Card
The One Pot Golden Chicken and Rice Recipe
Imagine the sound of cold chicken thighs hitting a hot cast iron skillet. That sharp, aggressive sizzle is the first sign of a great meal. I used to think a chicken and rice recipe was just something you threw together when the pantry was bare, basically a sad bowl of beige mush. I was so wrong.
One night, I forgot to set a timer and accidentally let the chicken skin render until it was literally like a cracker. That mistake changed everything because that rendered fat became the foundation for the best rice I’ve ever eaten.
The secret isn't just in the spices, it's in the patience. You want that skin to shatter when you bite into it. When we cook everything in one pan, we aren't just saving on dishes, we're building layers of flavor.
Every bit of brown stuff stuck to the bottom of the pan is a concentrated flavor bomb waiting to be released. This is the kind of dinner that makes your whole house smell like a cozy hug, and honestly, it’s the recipe I make when I need a win in the kitchen.
You'll find that using bone in, skin on thighs is non negotiable here. The bone keeps the meat succulent while the skin provides all that liquid gold fat we need to toast the rice. We're going to use a heavy 12 inch skillet, get the heat right, and let the physics of the kitchen do the heavy lifting for us.
Trust me, once you see those golden grains soaking up the chicken stock, you'll never go back to the boxed stuff.
Why This One Pan Meal Works
The Physics of the Fond: Searing the chicken creates caramelized proteins on the pan surface that dissolve into the stock. This deglazing process seasons every single grain of rice with concentrated chicken essence.
Starch Gelatinization Control: Rinsing the rice removes excess surface starch, which prevents the grains from sticking together. This ensures the final texture is fluffy rather than a gummy block of starch.
Maillard Reaction Depth: The high heat transforms the amino acids in the chicken skin into complex flavor compounds. This creates a savory profile that simple boiling can never replicate.
Thermal Residual Cooking: Letting the pan rest off the heat allows the rice to finish absorbing moisture through steam. This gentle finish prevents the bottom from burning while the top grains reach perfect tenderness.
| Thickness | Internal Temp | Rest Time | Visual Cue |
|---|---|---|---|
| 1 inch (Thighs) | 165°F (74°C) | 5 mins | Juices run clear |
| 1.5 inch (Thighs) | 165°F (74°C) | 7 mins | Meat pulls from bone |
| 0.75 inch (Breasts) | 160°F (71°C) | 5 mins | Opaque throughout |
If you are looking for ways to intensify that chicken flavor even further, adding a spoonful of a Liquid Gold Homemade recipe to your stock will make a world of difference. It adds a body and silkiness to the rice that store-bought broth just can't match.
Essential Components for Maximum Flavor
| Component | Science Role | Pro Secret |
|---|---|---|
| Chicken Thighs | Fat Source | Always start skin side down in a cold ish pan to render more fat |
| Long grain Rice | Structural Base | Toast the dry rice in the chicken fat until it smells nutty |
| Chicken Stock | Hydration | Use low sodium so you can control the salt levels yourself |
| Lemon Wedges | Acid Balance | A squeeze of fresh acid at the end cuts through the heavy fats |
Choosing the right rice is the most important part of this chicken and rice recipe. You want a long grain variety like Jasmine or Basmati because they have a lower amylopectin content, which means they won't turn into a sticky mess.
I once tried this with short grain sushi rice because it was all I had, and let’s just say it was a very expensive mistake that ended in a texture similar to wallpaper paste. Stick to the long grain stuff for that individual grain definition we're after.
Recommended Gear for Success
You really want a heavy bottomed skillet for this, ideally a 12 inch cast iron or a heavy stainless steel pan. If your pan is too thin, the heat won't distribute evenly and you'll end up with burnt rice in the center and crunchy, undercooked rice at the edges. A tight fitting lid is also mandatory.
If steam escapes, your rice will never cook through, and you'll be left adding splashes of water every five minutes, which ruins the texture.
- 12 inch Skillet: Provides enough surface area to sear all chicken at once.
- Fine Mesh Sieve: Essential for rinsing the rice until the water runs clear.
- Instant read Thermometer: The only way to know for sure the chicken is safe without cutting it open.
- Wooden Spoon: Best for scraping up that flavorful fond during deglazing.
If you are cooking for a larger crowd, you might be tempted to use a deeper pot, but the wide surface area of a skillet is actually better. It allows more of the rice to come into contact with the flavored fats and prevents the bottom layers from getting crushed under the weight of the chicken. If you love the idea of a one pan meal but want something with a bit more of a cheesy kick, my Broccoli Casserole recipe is another heavy hitter that uses similar techniques for a velvety finish.
Detailed Ingredient Breakdown
- 1.5 lb bone in, skin on chicken thighs: Why this? The skin provides essential fat for toasting the rice and flavor.
- Substitute: Boneless thighs (reduce cook time by 10 mins).
- 1 tsp kosher salt: Why this? Coarse grains help draw out moisture for a crispier sear.
- Substitute: 0.5 tsp table salt.
- 0.5 tsp cracked black pepper: Why this? Freshly cracked provides a floral heat that pre ground lacks.
- Substitute: White pepper for a more subtle heat.
- 1 tsp smoked paprika: Why this? Adds an earthy depth and a beautiful golden hue.
- Substitute: Sweet paprika or a pinch of chipotle powder.
- 1 tbsp neutral oil: Why this? High smoke point prevents burning during the initial sear.
- Substitute: Grapeseed oil or Avocado oil.
- 150g yellow onion, finely diced: Why this? Melts into the rice for a foundational sweetness.
- Substitute: Shallots for a more delicate flavor.
- 3 cloves garlic, minced: Why this? Releases aromatic oils that permeate the cooking liquid.
- Substitute: 1 tsp garlic powder in the spice rub.
- 100g carrot, diced: Why this? Provides texture and a natural sugar balance.
- Substitute: Celery for a classic mirepoix vibe.
- 1 tsp dried thyme: Why this? Holds up better to long simmering than fresh herbs.
- Substitute: Dried oregano or rosemary.
- 300g long grain white rice: Why this? Stays fluffy and distinct after absorbing the stock.
- Substitute: Jasmine rice (reduce stock by 50ml).
- 530ml low sodium chicken stock: Why this? Allows for precise seasoning control.
- Substitute: Water with 2 tsp chicken bouillon base.
- 75g frozen peas: Why this? Adds a pop of brightness and sweetness at the end.
- Substitute: Chopped spinach or small broccoli florets.
- 1 tbsp fresh parsley, chopped: Why this? Cuts through the richness with a fresh finish.
- Substitute: Fresh cilantro or chives.
- 1 lemon, cut into wedges: Why this? Essential acid to brighten the savory flavors.
- Substitute: A teaspoon of apple cider vinegar in the stock.
Mastering the Perfect Cook Flow

- Prep the chicken. Pat the 1.5 lb chicken thighs completely dry with paper towels. Note: Dry skin is the only way to get a real crunch.
- Season thoroughly. Mix the salt, pepper, and smoked paprika, then rub it all over the chicken, making sure to get under the skin.
- Start the sear. Heat the 1 tbsp oil in a 12 inch skillet over medium high heat. Place chicken skin side down. Cook for 7 minutes until the skin is deep golden and releases easily.
- Finish the sear. Flip the chicken and cook for another 3 minutes. Remove the chicken from the pan and set it aside on a plate. Note: The chicken won't be cooked through yet; we're just building flavor.
- Sauté the aromatics. Lower the heat to medium and add the 150g onion, 100g carrot, and 3 cloves garlic to the chicken fat. Sauté for 5 minutes until the onions are translucent and fragrant.
- Toast the rice. Add the 300g rinsed rice and 1 tsp thyme to the pan. Stir constantly for 2 minutes until the rice grains look translucent at the edges and smell like toasted popcorn.
- Deglaze and simmer. Pour in the 530ml chicken stock, scraping the bottom of the pan to loosen the fond. Bring to a boil until bubbles cover the surface.
- Combine and cover. Place the chicken thighs back on top of the rice, skin side up. Reduce heat to the lowest setting and cover with a tight lid. Bake for 20 minutes until the liquid is fully absorbed.
- The final rest. Turn off the heat. Quickly lift the lid, scatter the 75g frozen peas on top, and put the lid back on. Let it sit for 5 minutes until the peas are bright green and the rice is perfectly steamed.
- Garnish and serve. Fluff the rice around the chicken with a fork, sprinkle with parsley, and serve with lemon wedges.
| Fresh Ingredient | Shortcut | Flavor Impact |
|---|---|---|
| 150g Fresh Onion | 2 tbsp Onion Powder | Flatter flavor, less texture |
| 530ml Homemade Stock | store-bought Broth | More salt, less body |
| 3 Fresh Garlic Cloves | 1 tsp Jarred Garlic | Slightly more acidic/bitter |
Avoiding Soggy Rice Disasters
Why Your Rice Is Mushy
If your rice turns into a paste, it’s usually because of one of two things: too much liquid or too much stirring. Stirring activates the starch, which creates that velvety feel in risotto but is a disaster for a fluffy chicken and rice recipe. Once the lid goes on, don't touch it.
Why Your Rice Is Crunchy
Crunchy rice often happens because the lid wasn't tight enough, allowing the steam to escape before the grains could hydrate. If you find the rice is still hard after the timer goes off, add two tablespoons of boiling water and cover it again for 5 minutes.
Never add cold water, as it drops the temperature too quickly and ruins the cook.
| Problem | Root Cause | Solution |
|---|---|---|
| Burnt Bottom | Heat too high or thin pan | Use a heat diffuser or lower the flame to the absolute minimum |
| Greasy Rice | Too much chicken fat | Blot excess fat with a paper towel after searing, leaving about 1 tbsp |
| Bland Flavor | Lack of salt in the stock | Taste your stock before adding it; it should taste like a seasoned soup |
Common Mistakes Checklist
- ✓ Skipping the rice rinse (leads to gummy grains)
- ✓ Peeking under the lid (escaped steam ruins the texture)
- ✓ Not drying the chicken skin (prevents a proper sear)
- ✓ Forgetting to toast the rice (loses the nutty depth)
- ✓ Overcrowding the pan (steams the chicken instead of searing)
Easy Customizations and Variations
For a Creamy Chicken and Rice Recipe
If you want a richer, more velvety texture, swap out 100ml of the chicken stock for heavy cream or full fat coconut milk. Add this at the very end of the simmering process. It mimics the comfort of a slow cooked casserole but keeps the one pan simplicity.
Instant Pot Chicken and Rice Recipe
To do this in a pressure cooker, use the sauté function for the chicken and aromatics. Add the rice and liquid, then pressure cook on high for 8 minutes with a natural release for 10 minutes. Use 50ml less stock since there is zero evaporation in an Instant Pot.
Slow Cooker Chicken and Rice Recipe
For the crockpot version, you still need to sear the chicken in a pan first trust me, it’s worth the extra dish. Place the aromatics and rice at the bottom, add the stock, and lay the seared chicken on top. Cook on low for 4 to 5 hours.
Just be aware the rice will be softer in this version.
Pro Tips for Scaling
Scaling Down (1/2 batch): Use a smaller 8 inch or 10 inch skillet. Keep the cook time for the chicken the same to ensure a good sear, but reduce the rice simmering time by about 3 to 5 minutes. Watch the liquid levels closely as smaller batches can evaporate faster.
Scaling Up (2x batch): Do not try to double this in one skillet unless you have a massive 15 inch pan. It’s better to sear the chicken in batches. Use 1.5x the spices and 1.8x the liquid (about 950ml stock for 600g rice) because larger volumes of rice actually require slightly less liquid proportionally to reach the same level of hydration.
Myths About One Pan Cooking
"Rinsing rice removes all the nutrients." This is largely a myth for modern, enriched rice. While some surface vitamins might wash away, the structural benefit of removing excess starch is what prevents your dinner from becoming a gluey mess. The texture trade off is absolutely worth it.
"You must boil the stock before adding it to the rice." While some chefs swear by this, it isn't strictly necessary for a one pan meal. As long as you bring the entire pan to a boil before covering it, the rice will hydrate perfectly. Cold stock just takes an extra minute to reach the boiling point.
Proper Storage and Keeping Fresh
Storage: This keeps beautifully in the fridge for up to 4 days. Store it in an airtight container once it has cooled to room temperature. When reheating, add a tablespoon of water to the rice to help it re steam in the microwave, which prevents the grains from drying out.
Freezing: You can freeze this for up to 3 months. However, the peas might get a bit mushy upon thawing. I recommend freezing the chicken and rice and adding fresh peas when you reheat it.
Zero Waste: Don't throw away those lemon rinds! Toss them into a jar with some white vinegar for a natural kitchen cleaner. Also, if you have leftover rice but no chicken, fry it up the next morning with an egg for a quick breakfast fried rice.
Perfect Sides for This Dish
Since this chicken and rice recipe is quite rich and savory, you want something bright or crunchy on the side. A simple arugula salad with a sharp balsamic vinaigrette works wonders. The peppery greens cut right through the chicken fat and clean your palate between bites.
If you want something more substantial, roasted green beans with a bit of garlic and red pepper flakes are a great shout. You can even throw the beans on a sheet tray and pop them in the oven at 400°F (200°C) while the rice is simmering.
Everything finishes at the same time, and you've got a complete, balanced meal with very little effort. Just remember to add a final squeeze of lemon over everything right before you eat.

Recipe FAQs
How to make chicken and rice more flavorful?
Sear the chicken aggressively in a hot pan first. The high heat Maillard reaction on the skin creates deep, caramelized fond that flavors the entire stock base. If you enjoy building deep, savory bases, you should see how we use similar techniques to achieve incredible depth in our Homemade Chicken Parmesan recipe.
What are the 4 core ingredients in a simple chicken and rice casserole?
The four absolute core ingredients are: chicken, rice, liquid (broth/water), and seasoning. Any version described as a "casserole" usually adds a binder like cream of mushroom soup or cheese, but these are additions, not core structural components.
Can you cook raw chicken and uncooked rice together safely in one pot?
Yes, cooking raw chicken and uncooked rice simultaneously is safe and recommended. The key is to sear the chicken first for flavor, remove it, then toast the rice, and finally let the rice absorb the chicken juices as it cooks underneath the poultry.
What are some common mistakes in chicken and rice?
The most common mistake is stirring the rice after the liquid is added, which releases starch and creates mush. Also, skipping the initial rice rinse removes excess starch, leading to gluey grains instead of fluffy, separated ones.
What kind of rice is best for fluffy chicken and rice?
Use long grain white rice, like Basmati or Jasmine. These varieties have less surface starch (amylopectin) than short grain rice, ensuring the grains remain separate and fluffy after absorbing the cooking liquid.
How long should the chicken rest after searing before adding it back to the rice?
Rest the chicken for about 5 to 8 minutes while you sauté the aromatics and toast the rice. This brief rest allows the juices to redistribute slightly before the long, steamy cooking process begins.
Is it true that I must use bone-in, skin-on chicken for the best flavor?
No, this is an overstatement, but bone-in skin-on is superior for this specific recipe. The fat from the skin renders out to flavor the rice, and the bone adds richness to the stock absorption; however, boneless thighs work if you are short on time.
One Pot Chicken And Rice

Ingredients:
Instructions:
Nutrition Facts:
| Calories | 728 kcal |
|---|---|
| Protein | 39.8 g |
| Fat | 28.5 g |
| Carbs | 68.8 g |
| Fiber | 2.5 g |
| Sugar | 3.8 g |
| Sodium | 745 mg |
