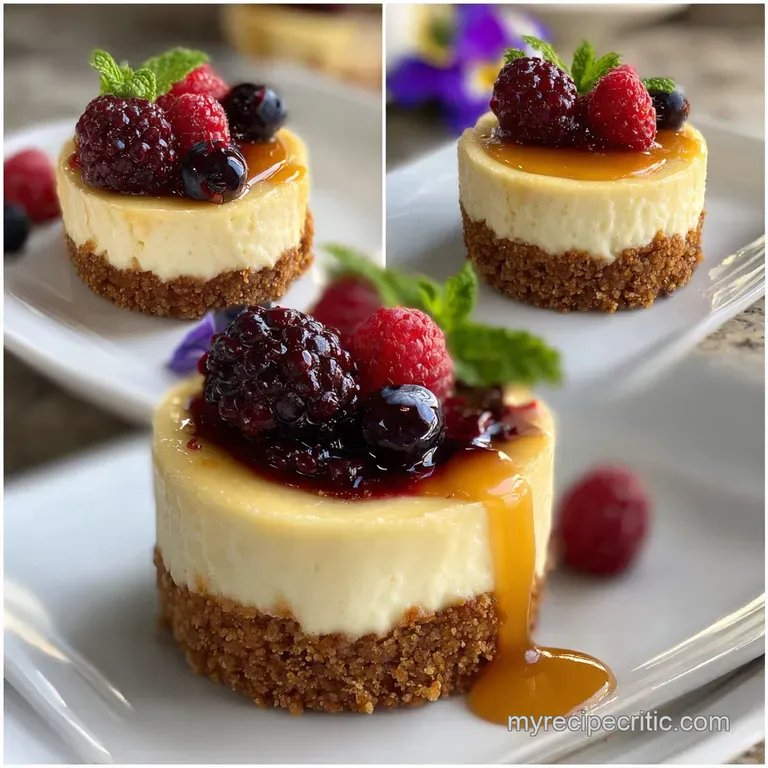
Mini Cheesecakes No Bake
- Time: Active 25 minutes, Passive 4 hours, Total 4 hours 25 mins
- Flavor/Texture Hook: Silky, tangy filling with a buttery, salted sweet crunch
- Perfect for: Summer parties, baby showers, or stress free meal prep
Effortless Mini Cheesecakes No Bake
The air in my kitchen always changes when I start crushing graham crackers. It’s that nutty, toasted scent mixing with the pool of melted butter in the bowl. I remember the first time I tried making these; it was mid August, about 95 degrees outside, and the thought of turning on the oven for a party felt like a personal insult.
I needed something that felt like a decadent indulgence but behaved itself in the heat.
When I pulled that first batch of mini cheesecakes no bake out of the fridge, the aroma of fresh lemon juice and vanilla paste hit me instantly. They looked so professional in their little paper liners, but the real test was the texture.
One bite through the velvety cream and into the base that gave a satisfying snap, and I was hooked. It’s become my go to "emergency" dessert because it’s nearly impossible to mess up if you follow a few temperature rules.
You'll love how these don't require the stress of a water bath or the fear of the dreaded surface crack. We’re going for a pure, clean flavor profile where the quality of the cream cheese really shines. It’s a repeatable sweetness that feels sophisticated but remains incredibly simple to pull off.
Let's get into the specifics of how to make these little gems work for you.
Key Recipe Specifications
The Acid Protein Firming Effect: Lemon juice acts as a natural coagulant, causing the proteins in the cream cheese to tighten and "set" the filling without the need for eggs or baking. This ensures the centers remain stable at room temperature for serving.
| Method | Time | Texture | Best For |
|---|---|---|---|
| No Bake | 4 hours 25 mins | Mousse like, silky | Hot weather, light finish |
| Stovetop | 30 minutes | Custard heavy | Pudding style jars |
| Oven Baked | 1 hour 30 mins | Dense, New York style | Traditionalists |
While the oven baked version offers that classic density, this no bake method is far superior when you want a refreshing, light as-air finish. The stovetop method usually involves tempering eggs, which adds a lot of dishes and complexity we just don't need today.
This recipe focuses on high fat aeration to get the job done efficiently.
Filling And Crust Elements
Selecting the right ingredients is the difference between a filling that stands tall and one that puddles on the plate. I always look for the heaviest cream possible, usually labeled as "heavy whipping cream," because that fat content is what traps the air bubbles we need for lift.
If you use a lower fat version, the filling won't have the structure to support itself once you peel back the liner.
| Ingredient | Science Role | Pro Secret |
|---|---|---|
| Cream Cheese | Provides structural base | Use full fat bricks only |
| Heavy Cream | Incorporates air/volume | Keep it ice cold |
| Lemon Juice | Denatures proteins | Use fresh squeezed only |
| Vanilla Paste | Deepens flavor profile | Look for flecks of bean |
For the base, the 150g graham cracker crumbs need to be processed until they look like coarse sand. If the crumbs are too large, the crust will crumble and won't hold that beautiful edge.
The 85g unsalted butter should be melted but allowed to cool slightly before mixing, ensuring the sugar doesn't dissolve immediately, which helps maintain a little crunch.
For the Shattering Crust
- 150g graham cracker crumbs Why this? Provides the classic toasted honey flavor base.
- 50g granulated sugar Why this? Bonds with the butter to harden the crust.
- 85g unsalted butter, melted Why this? The "glue" that keeps the crumbs together.
- 0.25 tsp sea salt Why this? Cuts through the sweetness of the filling.
For the Velvety Filling
- 450g full fat cream cheese, softened Why this? Essential for a smooth, lump free emulsion.
- 120g powdered sugar Why this? Dissolves instantly for a silky mouthfeel.
- 240ml heavy whipping cream, cold Why this? Adds the necessary lift and lightness.
- 15ml fresh lemon juice Why this? The chemical catalyst for the set.
- 5ml pure vanilla paste Why this? Stronger aroma than standard extract.
| Original Ingredient | Substitute | Why It Works |
|---|---|---|
| Graham Crackers | Digestive Biscuits | Similar dry texture. Note: Slightly less sweet than grahams. |
| Vanilla Paste | Vanilla Extract | Same flavor. Note: You lose the visual bean flecks. |
| Lemon Juice | Lime Juice | High acidity. Note: Will add a distinct citrus zing. |
Substituting the crackers is an easy way to change the vibe of the dish. If you're looking for something more festive, using crushed gingersnaps or even chocolate sandwich cookies works wonders. Just keep the butter ratio the same so the crust continues to behave during the chilling process.
Essential Equipment List
You don't need a professional bakery setup for this, but two specific tools make the process much smoother. A standard 12 cup muffin tin is the perfect vessel. I highly recommend using paper liners, not just for hygiene, but because they allow the cheesecakes to release cleanly without you having to dig them out with a knife.
2 Must Have Tools
- Stand Mixer or Electric Hand Mixer: You simply cannot get the 240ml heavy whipping cream to the necessary stiff peaks by hand without a serious workout. A stand mixer, like a KitchenAid, allows you to multitask while the cream aerates.
- Flat Bottomed Measuring Cup: This is my favorite trick for a compact crust. Using the bottom of a small cup or even a shot glass to press the crumbs into the muffin tin ensures the base is even and won't fall apart when bitten.
Detailed Preparation Steps

- Prep the tin. Line a 12 cup muffin tin with paper liners. Note: This ensures a clean release later.
- Mix the base. Combine 150g graham cracker crumbs, 50g sugar, 85g melted butter, and 0.25 tsp sea salt. Stir until it feels like wet sand.
- Press the crust. Divide the mixture among the 12 liners, about one heaped tablespoon each. Use a flat bottomed cup to press firmly until the surface is flat.
- Chill the base. Place the tin in the freezer for 15 minutes. Note: This sets the butter so the crust doesn't mix with the filling.
- Whip the cream. In a cold bowl, beat 240ml heavy cream until stiff peaks form. When you lift the whisk, the cream should stand straight up without drooping.
- Cream the cheese. In a separate large bowl, beat 450g softened cream cheese and 120g powdered sugar until no lumps remain. The texture should look like thick frosting.
- Add aromatics. Mix in 15ml fresh lemon juice and 5ml vanilla paste. The mixture will smell bright and floral.
- Fold the mixtures. Gently fold the whipped cream into the cream cheese mixture using a spatula. Stop once the white streaks disappear.
- Fill the liners. Spoon the filling over the chilled crusts. Smooth the tops with the back of a spoon until they are level with the rim.
- The Cold Cure. Refrigerate for at least 4 hours. You'll know they're ready when the centers feel firm to a light touch.
I usually make these the night before. There is something so satisfying about opening the fridge the next morning and seeing those perfectly smooth tops. If you are in a rush, you can pop them in the freezer for about 1 hour 30 mins, but the texture is always superior when they have a slow, steady chill in the refrigerator.
Fixing Common Mistakes
The most frequent hurdle people face with this Mini Cheesecakes Recipe is the temperature of the ingredients. If your cream cheese is even slightly cold, you will end up with tiny white lumps that refuse to incorporate. I usually leave my cream cheese blocks on the counter for at least 2 hours before I even think about starting.
Why Your Filling Is Runny
If your cheesecake refuses to set, it usually comes down to the whipping stage. If the heavy cream wasn't whipped to stiff peaks, there isn't enough structural support to hold the heavy cream cheese.
Also, ensure you are using full fat brick cream cheese; the "spreadable" kind in tubs has a higher water content and will never firm up properly.
Why Your Filling Is Lumpy
Lumps happen when cold cream is added to room temperature cheese too quickly, or if the cheese wasn't soft enough to begin with. To fix this, you can sometimes pass the cream cheese and sugar mixture through a fine mesh sieve before folding in the whipped cream, though it's much easier to just be patient with the softening process.
| Problem | Root Cause | Solution |
|---|---|---|
| Soggy Crust | Butter was too hot | Let melted butter cool for 5 mins before mixing. |
| Filling "Cracks" | Over whipped cream | Stop as soon as peaks are stiff; don't let it turn to butter. |
| Grainy Texture | Granulated sugar in filling | Always use powdered sugar for the filling; it dissolves better. |
Common Mistakes Checklist
- ✓ Ensure cream cheese is at room temperature (around 70°F) before mixing.
- ✓ Use a chilled bowl for whipping the heavy cream to get maximum volume.
- ✓ Avoid over mixing during the "folding" stage to keep the air in the batter.
- ✓ Let the cheesecakes chill for the full 4 hours; do not rush the set.
- ✓ Pat the lemon dry before juicing to avoid getting bitter rind oils in the mix.
Customizing Your Batch
Once you've mastered the base recipe, it's easy to play around. If you're hosting a romantic dinner, you might want to try a Valentines Mini Cheesecakes recipe which often incorporates a swirl of raspberry or strawberry puree. The beauty of the no bake method is that you can add mix ins without worrying about how they will react to heat.
3 Flavor Variations
- Oreo Crunch: Swap the graham crackers for 150g of crushed Oreos and fold extra cookie chunks into the filling.
- Citrus Bomb: Add the zest of two lemons and a teaspoon of lemon extract to the filling for a sharper, more vibrant aroma.
- Salted Caramel: Drizzle a tablespoon of warm caramel over the crust before adding the filling, then top with flaky salt.
2 Dietary Swaps
- gluten-free: Use gluten-free graham cracker crumbs. The filling is naturally gluten-free, so no other changes are needed.
- Lower Sugar: You can reduce the powdered sugar to 80g if you prefer a more tart, cheese forward flavor, but the texture may be slightly softer.
For a really fancy twist, you could even try a Creme Brulee Mini Cheesecakes recipe. It involves sprinkling a little extra sugar on top of the set cheesecakes and using a kitchen torch to create that signature crackling sugar crust right before you serve them.
Storage And Freezing Guide
These little cakes are incredibly sturdy once they've had their initial chill. In the fridge, they stay perfect for up to 4 days. I recommend keeping them in the muffin tin or an airtight container so they don't pick up any "fridge smells," which fat heavy desserts are notorious for doing.
Freezing Instructions: You can freeze these for up to 2 months. Freeze them on a tray first until they are rock solid, then wrap them individually in plastic wrap and store them in a freezer bag. To serve, let them thaw in the fridge for about 2 hours.
They actually taste quite wonderful semi frozen on a hot day!
Zero Waste Tip: If you have leftover graham cracker crumbs, don't toss them. Toast them in a dry pan for 2 minutes and use them as a "dusting" over yogurt or vanilla ice cream.
Any leftover heavy cream can be shaken in a jar for a few minutes to make a small batch of fresh butter for your morning toast.
Pretty Presentation Tips
The visual appeal of a mini cheesecake is all in the clean edges. To get that perfect look, I always use a small offset spatula or even the back of a warm spoon to smooth the tops after filling the liners. The aroma of the vanilla paste is wonderful, but a visual garnish tells your guests what to expect.
1. The Clean Release
Wait until the very last second to peel off the paper liners. If you peel them while the cheesecake is still slightly warm or under set, the sides will stick to the paper and look messy. A cold cheesecake will release with a smooth, matte finish that looks like it came from a high end bakery.
2. Height and Texture
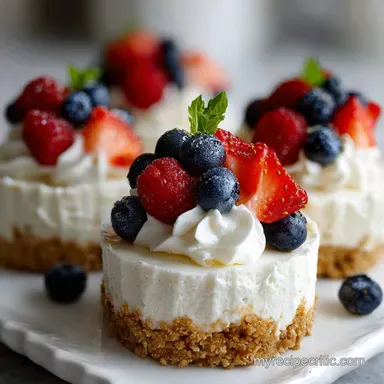
Adding a dollop of extra whipped cream on top gives the dessert more height. I like to add a single fresh raspberry or a sprig of mint for a pop of color. If you want to get really technical, a light dusting of Graham cracker crumbs around the edge of the whipped cream provides a nice "frame" for the dessert and hints at the crunch waiting at the bottom.
Chef's Tip: If you find the crust is sticking to the bottom of the paper, try spraying the inside of the liners with a tiny bit of coconut oil spray before adding the crumbs. It ensures a "shatter perfect" release every single time.
This recipe is all about the balance of that silky, tangy center and the firm, buttery base. By following the cooling cues and being patient with the chill time, you'll create a dessert that people will swear you spent hours hovering over a hot oven to finish.
Enjoy the process and the smell of that fresh lemon it's half the fun!

Recipe FAQs
Is it better to bake or not bake a cheesecake?
For mini cheesecakes, no-bake is often better for ease and texture. Baked cheesecakes offer a denser, custard like texture, while no-bake versions are lighter, airier, and require less effort, making them ideal for hot weather or when time is short.
What are common no-bake cheesecake mistakes?
The most common mistake is using ingredients that are too warm or not full fat. Cream cheese must be fully softened to avoid lumps, and heavy cream needs to be ice-cold to whip to stiff peaks for structure. Also, chilling time is crucial; rushing this step prevents the filling from setting properly.
Can you eat Philadelphia no-bake cheesecake filling?
Yes, Philadelphia no-bake cheesecake filling is safe to eat raw. It's designed to be a no-bake product, meaning all ingredients are safe for consumption without cooking, unlike traditional cheesecake recipes that require baking to cook eggs and set the batter.
Can you make mini no-bake cheesecakes in a muffin tin?
Yes, a muffin tin is perfect for making mini no-bake cheesecakes. Line the tin with paper or foil liners for easy removal. This method allows for quick preparation and yields perfectly portioned, attractive individual desserts.
How long do no-bake mini cheesecakes need to chill?
No-bake mini cheesecakes typically need at least 4 hours to chill and set. This allows the cream cheese and whipped cream to firm up, creating that signature smooth, creamy texture. For best results, chilling overnight is recommended.
Can I use graham crackers for the crust of no-bake mini cheesecakes?
Yes, graham crackers are the classic choice for no-bake cheesecake crusts. Their slightly sweet, toasty flavor and crumbly texture blend perfectly with melted butter to create a firm base. If you enjoyed mastering crust texture here, you'll find the principles apply to our The Best Classic Scottish Shortbread Recipe MeltInYourMouth too.
What is the best way to get a smooth filling for no-bake cheesecakes?
Ensure your cream cheese is fully softened to room temperature and beat it with powdered sugar until completely smooth before adding other ingredients. Folding in the whipped cream gently, rather than vigorously mixing, also helps maintain a silky, lump free texture.
Mini No Bake Cheesecakes
Ingredients:
Instructions:
Nutrition Facts:
| Calories | 358 kcal |
|---|---|
| Protein | 3.5 g |
| Fat | 26.6 g |
| Carbs | 27.2 g |
| Fiber | 0.4 g |
| Sugar | 18.5 g |
| Sodium | 248 mg |
