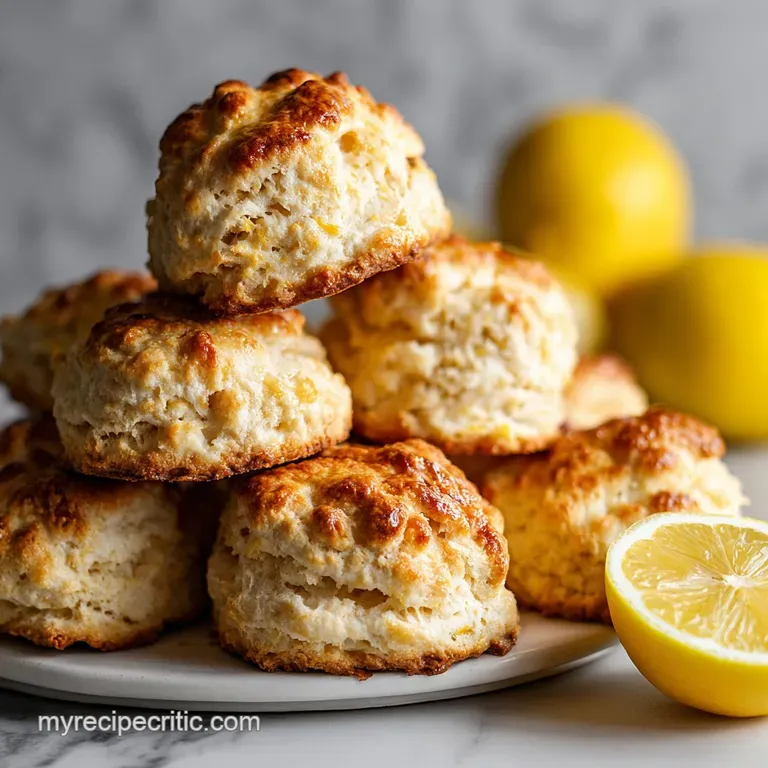
Lemon Scones with Lemon Glaze
- Time: Active 15 minutes, Passive 18 minutes, Total 33 minutes
- Flavor/Texture Hook: Zesty, buttery, and shatter crisp
- Perfect for: Lazy Sunday brunch or a quick morning treat
- The Secret Behind Flaky Lemon Scones
- The Science of Why it Works
- Measuring the Specs for Success
- Analyzing the Essential Citrus Elements
- Tools Needed for Golden Crusts
- Mixing and Baking Your Dough
- Fixing Common Baking Mistakes Fast
- Creative Flavor Swaps and Ideas
- Storing and Freezing for Freshness
- Finishing Your Bakes with Style
- Recipe FAQs
- 📝 Recipe Card
The Secret Behind Flaky Lemon Scones
That first bite of a scone should shatter into buttery shards, not crumble into dry dust. I used to think the local bakery had some high tech oven I couldn't replicate, but the truth is much simpler. It’s all about how the fat behaves when it hits the heat.
I remember a rainy Tuesday when I rushed the process with room temperature butter and ended up with lemon flavored pancakes. It was a mess, but it taught me everything about the importance of keeping things cold.
The aroma of these bakes is something else. When that lemon zest hits the warm oven air, your entire kitchen smells like a sun drenched grove. These aren't the heavy, leaden rocks you find wrapped in plastic at the gas station. We are aiming for something light, lifted, and deeply infused with citrus oil.
Trust me, once you see those layers pulling apart, you'll never go back to store-bought.
We're going to use a specific technique to rub the lemon zest directly into the sugar. This isn't just for show. It bruises the zest, releasing the essential oils so the flavor is woven through every single crumb. It’s a small step that makes a massive difference in the final result.
Right then, let’s get into the details of why this actually works in your oven.
The Science of Why it Works
Leavening Power: Cold butter contains water that evaporates instantly in a hot oven, creating steam pockets that lift the dough into flaky layers. Acidic Tenderizing: Buttermilk breaks down long gluten strands, ensuring the crumb remains soft rather than becoming tough or bread like.
| Method | Time | Texture | Best For |
|---|---|---|---|
| Standard Oven | 18 minutes | Shatter crisp edges | Traditional tea time vibes |
| Air Fryer (350°F) | 12 minutes | Extra golden crust | A quick morning batch for two |
| Mini Scones | 12 minutes | High glaze to crumb ratio | Brunch parties and platters |
If you are looking for more citrus inspiration, this technique reminds me of how we balance acidity in a bright Sunshine in a recipe. Both rely on the essential oils of the fruit to carry the flavor.
Measuring the Specs for Success
Success in baking is often about the variables we can't see, like the temperature of our hands or the age of our leaveners. I’ve found that weighing your flour is the only way to be 100% sure you aren't packing too much into the cup.
If you don't have a scale, fluff the flour with a fork before spooning it into your measuring cup. It sounds like a lot of effort, but it's the difference between a cloud and a brick.
| Ingredient | Science Role | Pro Secret |
|---|---|---|
| Frozen Butter | Lamination agent | Grate it with a box grater so it distributes evenly without melting. |
| Buttermilk | Gluten inhibitor | Use it straight from the fridge to keep the dough temperature low. |
| Baking Powder | Rise inducer | Always use a fresh tin; it provides the primary lift for the scone. |
The way these ingredients interact is a beautiful thing. The butter stays in discrete little pebbles throughout the dough. When the heat hits those pebbles, they melt, leaving a void that is immediately filled by expanding air. That's how we get those visible layers.
If the butter is too warm, it just soaks into the flour, and you lose all that lovely lift.
Analyzing the Essential Citrus Elements
For this recipe, we need high-quality staples that will allow the lemon to shine. I always reach for unsalted butter because it gives me total control over the seasoning. If you only have salted, just skip the extra half teaspoon of salt in the mix.
- 2 cups all purpose flour: Why this? Provides enough protein for structure without making the scones chewy like bread.
- 1/3 cup granulated sugar: Why this? Adds sweetness and helps the edges caramelize into a golden brown crust.
- 1 tablespoon baking powder: Why this? This is a high amount, but it is necessary for that classic tall rise.
- 1/2 teaspoon salt: Why this? Sharpens the citrus notes and balances the sugar.
- 1 tablespoon fresh lemon zest: Why this? Contains the concentrated oils that provide the primary flavor profile.
- 1/2 cup unsalted butter, frozen: Why this? Must be frozen to create the steam needed for flakiness.
- 1/2 cup buttermilk, cold: Why this? Adds tang and reacts with the powder for extra lift.
- 1 large egg, cold: Why this? Acts as a binder and adds richness to the dough.
- 1 teaspoon vanilla extract: Why this? Rounds out the sharp citrus with a floral, sweet finish.
- 1 cup powdered sugar: Why this? Creates a smooth, pourable glaze that sets firm.
- 2 tablespoons fresh lemon juice: Why this? Thins the glaze while adding a punch of tartness.
- 1 teaspoon lemon zest: Why this? For the final aesthetic and a burst of fresh aroma on top.
| Original Ingredient | Substitute | Why It Works |
|---|---|---|
| Buttermilk | Plain Yogurt (1/2 cup) | Similar acidity level. Note: Makes a slightly thicker dough that may need a splash of milk. |
| Granulated Sugar | Coconut Sugar (1/3 cup) | Adds a caramel note. Note: Will darken the internal color of the scone significantly. |
| All Purpose Flour | 1:1 gluten-free Blend | Rice based blends work well here. Note: Let the dough rest 10 minutes before baking to hydrate. |
Tools Needed for Golden Crusts
You don't need a kitchen full of gadgets, but a few specific tools make this much easier. A box grater is my secret weapon for the butter. It’s much faster than using a pastry cutter and keeps the butter colder because you aren't touching it as much with your warm fingers.
A heavy duty baking sheet is also non negotiable. If your pan is too thin, the bottoms of your scones will burn before the centers are fully baked. I also love using parchment paper or a silicone mat. It prevents sticking and helps the bottoms get that perfect, even golden color without you having to scrub pans later.
Chef's Tip: Freeze your box grater and your mixing bowl for 10 minutes before you start. It sounds extra, but it keeps the butter from softening while you work.
Mixing and Baking Your Dough
1. Scent the Sugar and Prep Dry Mix
Whisk your 2 cups all purpose flour, 1/3 cup sugar, baking powder, and salt in a large bowl. Add the 1 tablespoon of lemon zest and use your fingertips to rub it into the sugar. Stop when the sugar smells like a lemon candy. This ensures the oils are fully released into the dough.
2. The Frozen Butter Grate
Take your 1/2 cup frozen butter and grate it directly into the flour mixture using the large holes of a box grater. Toss the butter shreds gently with a fork to coat them in flour. Note: This prevents the butter from clumping back together into a solid mass.
3. Combine the Wet Ingredients
In a separate small bowl, whisk together the 1/2 cup cold buttermilk, the egg, and the vanilla extract. Pour this into the center of your dry ingredients. Use a spatula to fold the mixture together until a shaggy dough begins to form.
4. Hydrate and Fold
Turn the dough onto a lightly floured surface. Gently pat it into a rectangle and fold it in half. Repeat this 3-4 times. Do not kneed like bread. We want to see streaks of butter. This folding creates the layers that will eventually shatter when you bite into them.
5. Shape and Chill
Pat the dough into a disc about 1 inch thick. Cut it into 8 wedges using a sharp knife or bench scraper. Place the wedges on your prepared baking sheet and put them in the freezer for 10 minutes. Note: Chilling the shaped dough relaxes the gluten and firms the butter back up.
6. The Golden Bake
Preheat your oven to 400°F. Bake for 18 minutes until the tops are golden and the edges feel firm to the touch. While they bake, you'll start to hear the butter sizzle slightly against the pan.
7. The Finishing Glaze
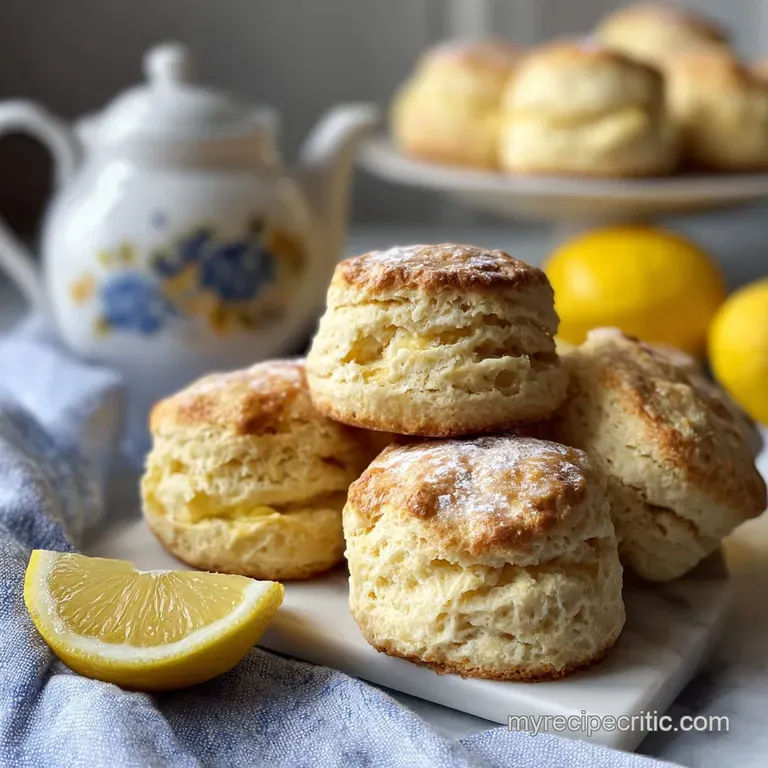
Whisk 1 cup powdered sugar with 2 tablespoons lemon juice and the extra zest. Once the scones have cooled for at least 10 minutes, drizzle the glaze over the top. Let it sit for 5 minutes to set into a crackly crust.
Fixing Common Baking Mistakes Fast
Why Your Scones Are Flat
This usually happens because the butter melted before the scones reached the oven. If the dough feels soft or sticky while you are shaping it, that's a sign the fat is too warm. Always use frozen butter and never skip the 10 minute freezer rest before baking. It keeps the structure tall and the layers distinct.
Why Your Scones Are Tough
Overworking the dough is the number one culprit here. When you stir or knead too much, you develop gluten, which is great for chewy sourdough but terrible for flaky scones. You want the dough to just barely hold together. A few dry crumbs at the bottom of the bowl are perfectly fine.
| Problem | Root Cause | Solution |
|---|---|---|
| Dark bottoms | Thin baking sheet | Double up your baking pans or use a silicone mat for insulation. |
| Dry crumb | Overbaking | Start checking for doneness at 15 minutes; they should be just barely golden. |
| No rise | Expired powder | Test your baking powder in a splash of hot water; it should bubble instantly. |
Common Mistakes Checklist:
- ✓ Pat the dough gently; don't use a rolling pin which can crush the air pockets.
- ✓ Ensure the oven is fully preheated to 400°F before the scones go in.
- ✓ Use cold buttermilk straight from the fridge never room temp.
- ✓ Avoid over mixing; stop as soon as the flour is mostly moistened.
- ✓ Use a sharp knife to cut wedges; a dull blade seals the edges and prevents rising.
Creative Flavor Swaps and Ideas
1. gluten-free Lemon Adaptations
If you're making these for someone with a gluten sensitivity, use a high-quality 1:1 flour blend. Because gluten-free flour lacks the structure of wheat, I suggest adding an extra 1/4 teaspoon of xanthan gum if your blend doesn't include it. This helps the scones hold their shape instead of spreading into a puddle.
2. The "Blueberry Burst" Variation
Lemon and blueberry are a classic duo. You can easily adapt this by folding in 1/2 cup of fresh blueberries right after you add the butter. If you use frozen berries, don't thaw them first, or they will streak the dough purple. This variation is quite similar to the flavors in my Lemon Blueberry Cake recipe.
If you want a more savory lean, you can actually drop the sugar to 1 tablespoon and add 1/2 cup of sharp cheddar cheese and some cracked black pepper. It’s a completely different vibe but the base dough behaves exactly the same way.
Storing and Freezing for Freshness
Storage: Scones are best the day they are made, but you can keep them in an airtight container at room temperature for up to 2 days. To refresh them, pop them in a 350°F oven for 5 minutes. This restores that "shatter" factor to the crust.
Avoid the microwave, as it will make them rubbery and soft.
Freezing: You can freeze the baked scones for up to 2 months. However, I prefer freezing the unbaked wedges. Lay them on a tray until solid, then toss them into a freezer bag. You can bake them straight from frozen; just add 2-3 minutes to the total bake time.
It’s the ultimate hack for having fresh bakes on a random Wednesday morning.
Zero Waste: Don't toss those squeezed lemon halves! Throw them into a pot of simmering water with a cinnamon stick to make your house smell incredible, or use the flesh side to scrub your wooden cutting boards. The acidity helps neutralize odors and naturally sanitizes the surface.
Finishing Your Bakes with Style
Presentation is where you can really show off. I like to wait until the scones are slightly warm not hot before glazing. If they are too hot, the glaze will just melt and run off. If they are cold, it won't settle into the nooks and crannies as well.
Aim for that middle ground where the glaze stays thick but spreads slightly.
For a little extra flair, you can top the wet glaze with a sprinkle of coarse sanding sugar or even some dried edible flower petals. The contrast between the bright yellow zest and the white glaze is already beautiful, but a little sparkle never hurts. Much like the presentation of a Scallops Pasta recipe, the final garnish is what makes the dish feel special.
Scone Myths to Ignore
- You need heavy cream for the best scones: While cream is rich, buttermilk provides an acidity that reacts with the baking powder, giving you a much higher lift and a more tender crumb.
- The dough must be smooth: A smooth dough is an overworked dough. If it looks a little shaggy and messy, you are doing it exactly right. Streaks of butter are your friend.
- Egg washes are mandatory: While an egg wash adds shine, it can sometimes make the top crust a bit tough. For these lemon bakes, the glaze provides all the beauty and sweetness you need without the extra step.
Decision Shortcut: If you want a crunchier top, sprinkle granulated sugar over the wedges before they go into the oven. If you want a richer flavor, swap the buttermilk for heavy cream (but expect a slightly lower rise).
If you want maximum lemon punch, add 1/4 teaspoon of lemon extract to the wet ingredients.

Recipe FAQs
Can I use room temperature butter instead of frozen?
No, absolutely not. Using room temperature butter will cause it to melt into the flour, creating a dense scone instead of a flaky one. Frozen butter is key to creating steam pockets during baking for that essential lift and texture.
What's the best way to incorporate the lemon zest for maximum flavor?
Rub the lemon zest directly into the sugar. This technique, much like in our Sunshine in a recipe, breaks down the zest's oils, releasing their aromatic essence and infusing the entire scone with bright citrus flavor.
My scones are flat. What went wrong?
The butter likely melted before baking. This happens if the dough is too warm or if the butter isn't sufficiently cold to begin with. Always use frozen butter and consider chilling the shaped dough for 10 minutes before baking to ensure a proper rise.
How can I make my lemon scones gluten-free?
Use a good quality 1:1 gluten-free flour blend. Since gluten-free flours lack the structure of wheat, it's beneficial to add an extra 1/4 teaspoon of xanthan gum if your blend doesn't already contain it, helping the scones maintain their shape.
Can I substitute the buttermilk?
Yes, plain yogurt works well as a substitute. Use 1/2 cup of plain yogurt, and if the dough seems too thick, add a splash of milk to reach the correct consistency. It provides a similar tanginess and tenderizing effect.
How do I store leftover lemon scones?
Store in an airtight container at room temperature for up to 2 days. For the best texture, refresh them in a 350°F oven for 5 minutes to restore crispness; avoid microwaving as it makes them rubbery.
What is the secret to getting flaky layers in scones?
Keeping the fat cold and minimizing handling. The key is using frozen butter grated into the dry ingredients, which melts during baking to create steam pockets. Folding the dough gently multiple times builds these distinct layers, similar to how we handle dough in St Patricks Day Desserts: Irish Stout Salted Caramel Bars.
Lemon Scones

Ingredients:
Instructions:
Nutrition Facts:
| Calories | 324 kcal |
|---|---|
| Protein | 4.5 g |
| Fat | 12.5 g |
| Carbs | 47.7 g |
| Fiber | 1.0 g |
| Sugar | 23.9 g |
| Sodium | 231 mg |
