Homemade Hot Cocoa Mix: the Ultimate Luxury Bench-Tested Recipe
- The Ultimate Homemade Hot Cocoa Mix: Ditching the Store-bought Tins
- The Science of Velvety Texture: Why This Mix is So Luxurious
- Essential Ingredients for the Best Homemade Hot Cocoa Mix
- Step-by-Step Guide: Preparing, Blending, and Storing Your Mix
- Chef’s Troubleshooting Guide: Common Mistakes and Mixing Secrets
- Storing Your Luxury Hot Cocoa Mix: Shelf Life and Optimal Conditions
- Beyond Marshmallows: Creative Serving Ideas and Pairings
- Recipe FAQs
- 📝 Recipe Card
The Ultimate Homemade Hot Cocoa Mix: Ditching the store-bought Tins
Imagine the smell of rich, dark chocolate steam curling up from your favourite mug on a miserable afternoon. Seriously, just take a minute to picture that velvety smooth texture coating your tongue.
store-bought tins just don't capture that depth, often leaving you with a gritty, lacklustre, and frankly, disappointing experience.
This homemade hot cocoa mix is my emergency winter stash, and it’s a total lifesaver. It takes less than 10 minutes to prep a massive batch, it’s ridiculously cheaper than the gourmet stuff, and it makes the absolute best, most thoughtful gifts for friends. I promise you'll never go back to those chalky packets again once you try this incredible, easy blend; it really is superior to even my original Homemade Hot Cocoa Mix: The Velvet Mug Gourmet Recipe .
We are talking about pure, intensely chocolatey bliss here, the kind that warms you right to the core. So grab your sifter and let’s crack on because we need to replace those dusty old tins immediately.
The Science of Velvety Texture: Why This Mix is So Luxurious
This recipe isn't just throwing sugar and cocoa into a jar; we are building a deeply complex, incredibly smooth beverage base. The luxurious texture and flavour payoff comes down to three crucial, non-negotiable steps. Trust me on this.
The Difference Between Hot Chocolate and Hot Cocoa
This is a hot cocoa mix, which means it uses cocoa powder, not melted solid chocolate, as the base. Hot chocolate uses melted chocolate chunks (often requiring high fat milk or cream) for intense richness.
Our cocoa mix achieves a similar luxury level by introducing thickening agents and dairy powder, which provide body and smoothness without the hassle of tempering chocolate.
Why We Use Dutch Process Cocoa Powder for Depth
Dutch process cocoa is alkaline, meaning it has been treated to reduce acidity. This neutral pH makes the chocolate flavour incredibly smooth, dark, and rounded. Using natural (acidic) cocoa powder in a mix often results in a sharper, sometimes slightly metallic taste that leaves your mouth feeling dry.
We want deep, gorgeous cocoa flavour, not a baking soda reaction, so Dutch process is the only way to go.
Overview of Difficulty, Prep Time, and Yield
You simply measure, sift, and mix; this is an incredibly easy project. Prep takes about 10 minutes max, and the reward is 15 18 enormous servings of luxury hot cocoa mix ready for gifting or drinking.
It's the ultimate low-effort, high reward recipe for when you need something fast and comforting.
Amplifying Chocolate: The Instant Espresso Secret
If you want the best chocolate flavour, you need to add a pinch of instant espresso powder. Coffee is a phenomenal flavour booster for chocolate; it doesn't make the cocoa taste like coffee, but it intensifies the chocolate notes, making the drink taste richer and darker.
A simple tablespoon makes all the difference.
Achieving Smoothness: Preventing Cocoa Clumping and Separation
The key to a perfectly smooth drink is two-fold. First, we must sift everything to break up those stubborn cocoa and powdered sugar lumps. Second, the small addition of cornstarch acts as a stabilizer and thickener, preventing the drink from separating and giving it that desired velvety mouthfeel.
Balancing Sweetness and Intensity with a Pinch of Fine Salt
Salt might seem weird in a sweet drink, but it is absolutely essential. Fine sea salt cuts through the richness and balances the overwhelming sweetness of the sugar and dairy powder. Just a small teaspoon ensures the chocolate flavour is bright and fully present on your palate.
Essential Ingredients for the Best Homemade Hot Cocoa Mix
Every ingredient here plays a specific role, but the beauty of a mix is how easily you can customize it for dietary needs. This recipe is designed to be highly flexible!
Quality Check: Sourcing the Best Dutch Process Cocoa
As mentioned, the quality of your cocoa matters more than anything else here. Spend a couple of extra dollars on a high end brand if you can (like Droste or Valrhona). If you can’t source Dutch process, use regular unsweetened cocoa, but you might want to add a tiny pinch of baking soda (1/4 tsp) to neutralize the acidity when mixing your final mug.
Sweeteners: Granulated Sugar vs. Powdered Sugar Options
We specifically use powdered sugar (icing sugar) because it dissolves instantly in hot liquid, unlike granulated sugar, which can sometimes leave a grainy residue. If all you have is granulated sugar, pulse it briefly in a food processor first until it’s finely ground.
Dairy & Texture Add-Ins (Optional Dry Milk or Starch)
The non-fat dry milk powder is the primary secret to making this taste like it's made with fresh milk, even when you mix it with water. If you want a non-dairy mix, you must include a reliable thickening agent.
Chef's Note: If you are trying to make a non-dairy cocoa mix, skip the milk powder but double the cornstarch to ensure you still get that satisfying, thick body.
Ingredient Swaps: Making the Recipe dairy-free or Vegan
| Ingredient | Substitute | Why it Works |
|---|---|---|
| Powdered Sugar | Coconut Sugar (Pulse) or Erythritol/Monk Fruit Mix | Use less of non-sugar alternatives, as they are often sweeter than sugar. |
| Dutch Process Cocoa | Natural Cocoa Powder + 1/4 tsp Baking Soda (per batch) | Neutralizes acidity for a smoother flavour. |
| Dry Milk Powder | Coconut Milk Powder or simply Omit | Coconut powder gives a creamy mouthfeel, or omit and thicken with extra starch. |
| Instant Espresso | Finely Ground Chicory or omit | If caffeine is an issue, chicory adds depth without caffeine. |
step-by-step Guide: Preparing, Blending, and Storing Your Mix

This is so easy, it’s criminal. Just remember that the success of the resulting drink depends entirely on how well you mix these dry ingredients. It's not unlike preparing a Ranch Seasoning Make the Best Dry Mix 5Minute Prep , where blending intensity is key.
Prepping the Dry Ingredients (Sifting is Key to Smoothness)
Set up your largest mixing bowl and place a fine mesh sieve right over it. Measure the powdered sugar, cocoa powder, and cornstarch, and pour them into the sieve. Gently tap the sides, urging the powders through. If you see stubborn lumps, gently press them with the back of a spoon until they fully disintegrate.
The Importance of a Thorough Blend or Pulse
Once sifted, add the dry milk powder, instant espresso powder, and salt. Use a balloon whisk and whisk vigorously for at least 60 seconds until the mix is a totally uniform, dark brown colour. There should be absolutely no streaks of white milk powder left.
You can also pulse this mixture a few times in a large food processor if you are batch scaling.
How to Convert Dry Mix to the Perfect Drink (Heating Liquids)
Do not just dump the mix into a mug of hot milk! You will get clumps. Heat your milk (dairy or non-dairy) until it is steaming but not boiling. Then, you need to create a slurry.
Ratio Guide: The Ideal Mix-to-Liquid Proportions
For a standard 8 ounce mug (240ml):
- Place 3 heaping tablespoons of the cocoa mix (about 35g) into the mug.
- Pour in just 2 tablespoons of the hot milk.
- Whisk this small amount of liquid and powder together until you have a completely smooth, thick chocolate paste. This is the slurry.
- Pour the remaining hot milk over the slurry while stirring constantly. This guarantees perfect smoothness every time.
Chef’s Troubleshooting Guide: Common Mistakes and Mixing Secrets
Avoiding the Grainy Texture Problem (The Solubility Issue)
If your cocoa is grainy, you probably skimped on the sifting or you used granulated sugar. Next time, make sure your sugar is finely powdered and that you always create the paste/slurry first .
If you dump the dry powder straight into a large volume of hot liquid, the starches and sugars won't dissolve properly.
Customizing the Spice Level (Cinnamon, Nutmeg, and Chili Tips)
Want to spice things up? I highly recommend adding 1 teaspoon of ground cinnamon and a tiny pinch (1/4 teaspoon) of cayenne pepper to the entire batch for a Mexican inspired kick. Add these spices before the final blend to ensure they are evenly distributed.
Batch Scaling: Adjusting the Recipe for Large Quantity Gifting
This recipe is designed to be easily doubled or tripled. When scaling, use a very large bowl or divide the ingredients into two separate batches to ensure you get a thorough blend. Gifting homemade treats is so rewarding; check out my Homemade Protein Bars Easy NoBake Peanut Butter Chocolate Recipe for another quick gift idea!
Storing Your Luxury Hot Cocoa Mix: Shelf Life and Optimal Conditions
Airtight Containers: Protecting Against Moisture Absorption
The greatest enemy of any dry mix is moisture. Powdered sugar and cocoa are hygroscopic they love to absorb water from the air. You must store your finished mix in a completely airtight container, like a mason jar with a secure lid, or a sealed plastic canister.
Shelf Life and Freshness: When Should You Toss the Batch?
Stored properly in a cool, dark pantry away from heat sources (like the stove), this mix will remain fresh and potent for up to six months . While technically safe beyond that, the cocoa flavour will start to fade dramatically after the six-month mark. I usually make a fresh batch every fall.
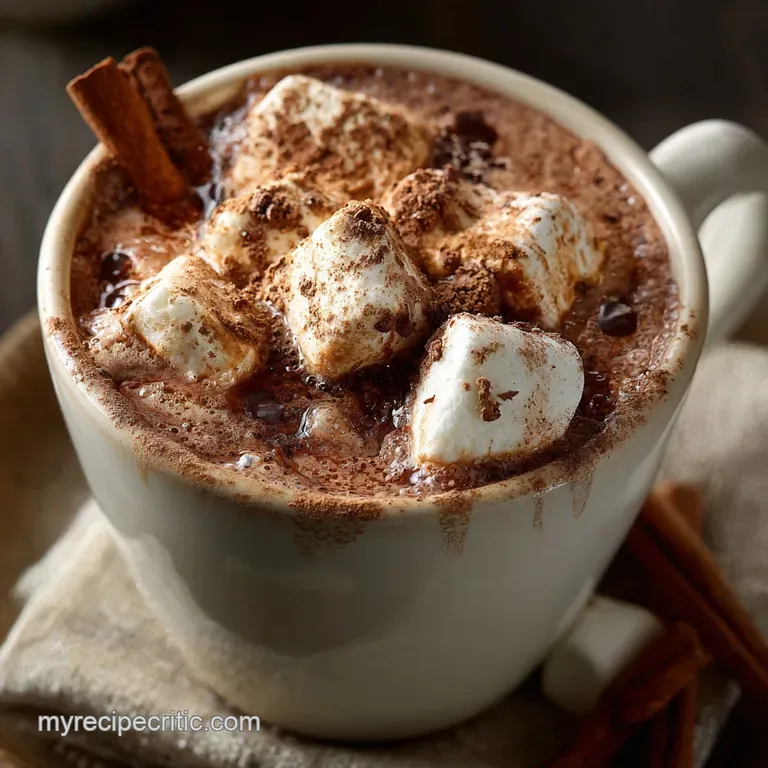
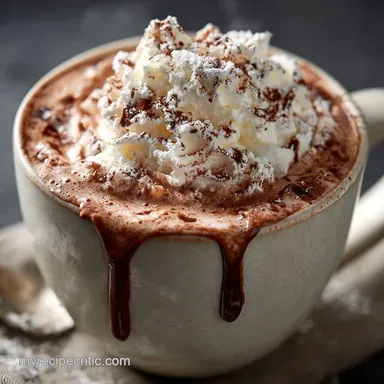
Beyond Marshmallows: Creative Serving Ideas and Pairings
Alcohol Pairings: Best Liqueurs for Adult Hot Cocoa
For a sophisticated twist, stir in a shot of Amaretto for an almond nuance, or use a good quality dark rum for warmth. A splash of peppermint schnapps is fantastic for a holiday twist, or stick to the classic Irish cream for extra richness.
Topping the Mug
Forget the canned whipped cream. Seriously, make your own. For tips on achieving the perfect, airy dollop, check out my recipe for Hot Chocolate with Whipped Cream: The Best Rich Velvet Mug Recipe . Finish it off with finely grated dark chocolate or a sprinkle of flaky sea salt.

Recipe FAQs
How should I store the homemade hot cocoa mix, and how long will it keep?
Store the mix in an airtight container away from direct heat and moisture. When kept properly in a cool, dark pantry, this dry mix will remain fresh and potent for up to 6 months. Be sure the container is completely dry before adding the ingredients to prevent moisture absorption and clumping.
Can I use natural (non-Dutch process) cocoa powder instead?
While you can substitute it, we highly recommend using Dutch process cocoa as specified for the best results. Dutching mellows the natural acidity of the cocoa, resulting in the richer, darker colour and the smoother, less bitter flavour profile essential for this luxury mix.
Why does my prepared hot chocolate taste slightly gritty or powdery?
Grittiness usually occurs when the mix is insufficiently dissolved in the liquid. For the smoothest, most velvety texture, first mix the cocoa powder with a few tablespoons of hot milk or water to form a thick slurry, and then add the rest of your liquid and heat.
I don't like coffee; will the instant espresso powder make my cocoa taste like coffee?
No, the espresso powder is included purely as a flavour amplifier, not a coffee component. The minute amount simply boosts the natural bitterness and intensity of the chocolate, resulting in a deeper, more robust chocolate flavour without any discernible coffee taste.
How can I make this hot cocoa mix suitable for vegan or dairy-free diets?
The dry mix itself is naturally vegan, assuming you use vegan sugar. When preparing the drink, use a full fat non-dairy milk such as oat, cashew, or soy milk instead of traditional cow's milk for the best creamy consistency. Avoid thin liquids like rice milk, which may compromise the luxury texture.
What are some good additions if I want to spice up the basic recipe?
For a beautiful warming variation, add 1/2 teaspoon of ground cinnamon, a pinch of nutmeg, and a tiny dash of cayenne pepper to the overall dry mix for a "Mexican hot chocolate" flavour. You could also infuse the milk you use for preparation with a vanilla bean or a strip of orange zest.
What is the recommended ratio of mix to liquid when preparing the drink?
For an intensely rich and luxurious cup (8 ounces), we recommend using 1/4 cup (4 tablespoons) of the mix. Adjust this amount slightly down if you prefer a lighter, more everyday cocoa. Always heat the liquid gently and stir constantly to fully incorporate the sugar and cocoa solids.
Homemade Luxury Hot Cocoa Mix
Ingredients:
Instructions:
Nutrition Facts:
| Calories | 170 kcal |
|---|---|
| Protein | 2.0 g |
| Fat | 6.0 g |
| Carbs | 30.0 g |
