Homemade Hot Cocoa Mix: the Ultimate Gourmet Recipe (Ready in 10 Mins)
- Unlocking The Ultimate Velvet Mug: A Gourmet Homemade Hot Cocoa Mix
- The Science of Smooth: Why This Hot Cocoa Mix is Grit-Free
- Essential Components for the Perfect Batch: Ingredients Breakdown
- Mastering the Mix: Step-by-Step Instructions for Your Blend
- Troubleshooting and Expert Tips for Your Homemade Hot Cocoa Mix
- Shelf Life and Preservation: Storing Your Mix Safely
- Elevating the Experience: Serving Your Velvet Mug
- Recipe FAQs
- 📝 Recipe Card
Unlocking The Ultimate Velvet Mug: A Gourmet Homemade Hot Cocoa Mix
That first whiff of rich, dark chocolate when the steam hits your nose? Nothing beats that feeling. Forget those sad, dusty packets lurking on the supermarket shelf; we’re making something that is genuinely velvety, incredibly smooth, and gorgeously deep brown. You deserve better than watery, weak cocoa.
This specific mix is an absolute winter lifesaver, especially when gifting season rolls around. It takes less than ten minutes to whip up a huge batch for your pantry, ready whenever a craving hits.
Plus, making your own gourmet blend is drastically cheaper than buying the fancy pre-mixed tins, and you completely control the quality of every single ingredient.
Stop settling for gritty cocoa that leaves a sludge at the bottom of your mug, honestly, it’s criminal. I'm going to share the few crucial secrets I’ve learned and the mistakes I made early on that guarantee a perfect, luxurious mug every single time.
Let's crack on with creating this superior blend.
The Science of Smooth: Why This Hot Cocoa Mix is Grit Free
This recipe isn't just a random dump of ingredients; it’s carefully formulated to dissolve beautifully and stay suspended in your mug. The difference between a gritty mess and a velvet dream is all in the details. Pay attention to the cornflour and the cocoa choice!
Ditching the Dust: Why Packet Mixes Fall Short
Pre-made packets are often mostly sugar padded out with cheap, low-fat, non-alkalised cocoa. That mixture often translates to a thin texture and a weak flavour profile. When you try to mix that sad combination into hot milk, the low-quality solids don't want to dissolve properly; they just float or settle immediately.
Our homemade version uses specific techniques and ingredients to ensure a full bodied, rich experience.
The Role of Dutch Processed Cocoa in Depth and Color
This is a non-negotiable step for achieving true depth in your cocoa. Dutch processing, or alkalising, neutralizes some of the acidity naturally found in the cocoa bean. This process is key because it gives you that gorgeous, deep mahogany colour and imparts a much milder, less bitter chocolate flavour.
Crucially, Dutch processed cocoa also dissolves better in liquid , contributing significantly to the mix’s overall smoothness.
Gifting Potential: Packaging Your Gourmet Blend
I swear, I make huge batches of this every year just for holiday gifting. It’s so easy! Put the mix in a cute Mason jar, tie a ribbon around the neck, and include a simple tag with the single serving instructions. It’s a thoughtful, consumable gift that your friends will genuinely use and love.
The Cornflour Secret: Achieving Optimal Velvet Texture
Okay, this is my real secret weapon, the one I learned after years of accidentally making gritty cocoa. A tiny bit of cornflour (corn starch) acts as a suspension agent and a very subtle thickener. This means it slows down the rate at which the heavier cocoa solids sink to the bottom. Result?
The smooth, velvet texture you crave, right until the last sip.
Espresso Powder: Enhancing Cocoa’s Natural Bitterness
Don't panic if you hate coffee, this won’t taste like a mocha! Instant espresso powder, or strong instant coffee granules, simply intensify the existing chocolate flavour beautifully. It works like sea salt does, boosting the overall profile without becoming dominant.
It brings the inherent richness of the cocoa way up.
Hot Cocoa vs. Hot Chocolate: Understanding the Essential Difference
Technically, hot chocolate is made by melting solid chocolate, which contains cocoa butter (fat), into hot milk or cream. Hot cocoa, however, is traditionally made from cocoa powder, which has had most of the fat removed. Since we are using cocoa powder and dry milk, we are firmly in the "Hot Cocoa Mix" camp.
But honestly, ours is so incredibly rich that it tastes like the real deal!
Essential Components for the Perfect Batch: Ingredients Breakdown
You don't need fancy tools, but you absolutely need good ingredients. When you’re only using five or six items, the quality really matters.
Choosing high-quality Dutch Processed Cocoa
If you can find it, look for a brand that specifies "European Style" or "Alkalised." Higher fat content in the cocoa powder translates directly to a creamier mouthfeel in the finished drink.
If you must substitute, use standard natural cocoa, but be aware the flavour will be slightly tangier and the colour will be lighter.
The Function of Cornflour as a Suspension Agent
As discussed, this stops the sludge! If you don't have cornflour on hand, arrowroot powder or potato starch can be used in equal measure. This is a non-negotiable thickening element.
Sugar Alternatives and Sweetness Adjustments
I recommend using plain granulated sugar, or even caster sugar, because it dissolves cleanly. If you need to cut back on refined sugar, you can use fine coconut sugar, which adds a slight caramel note, or finely milled erythritol for a sugar-free option.
Be careful not to use brown sugar; the moisture content makes the dry mix prone to clumping over time.
Substitutions for Espresso Powder (or Omission)
The espresso is an enhancer, not a star. If you don’t have espresso powder, you can use instant coffee granules, making sure they are finely crushed so they don’t remain gritty. You can also omit it entirely, though I promise you, the overall depth suffers slightly if you do.
| Ingredient | Substitute | Note on Usage |
|---|---|---|
| Dutch Processed Cocoa | Standard Natural Cocoa | Lighter colour, tangier flavor. |
| Dry Milk Powder | Non-Dairy Creamer Powder | Alters texture and flavor, useful for dairy-free. |
| Cornflour | Arrowroot or Potato Starch | Use equal amounts for thickening/suspension. |
| Granulated Sugar | Coconut Sugar | Adds a slight caramel flavour and colour. |
Mastering the Mix: step-by-step Instructions for Your Blend

This process is about efficiency and preventing lumps, so grab your finest sieve!
- Sift the Dry Base Ingredients: Place your large, fine mesh sieve over a spacious mixing bowl. Sift the cocoa powder, dry milk powder, and the cornflour directly into the bowl. This step is completely non-negotiable it breaks up clumps in the cocoa and cornflour, which are notorious for refusing to dissolve later.
- Add Sweetener and Enhancers: Now, add your granulated sugar, the essential instant espresso powder, fine sea salt, and any optional spices like vanilla powder or cinnamon. Don’t sift the sugar; it’s too heavy and doesn't need it.
- Whisk Thoroughly: Using a balloon whisk, mix all the ingredients vigorously for at least two minutes. You want the mixture to look perfectly uniform, with no streaks or pockets of white powder remaining.
- Transfer and Store: Transfer the finished Homemade Hot Cocoa Mix: Rich, Velvety, and Ready in 10 Minutes into an airtight container, label it clearly, and store it away from heat and light.
Chef's Note: When I make a big batch for gifting, sometimes my arms get tired! For huge quantities, use a stand mixer fitted with the paddle attachment it provides a thorough mix with zero effort, just like when I create a giant supply of Ranch Seasoning Make the Best Dry Mix 5Minute Prep .
Troubleshooting and Expert Tips for Your Homemade Hot Cocoa Mix
Even the simplest recipes have traps. I’ve stepped in all of them so you don't have to!
Proper Sifting Techniques for a Clump Free Base
Sifting is mandatory for the cocoa powder and cornflour, which are highly prone to clumping due to moisture. Sift those first, breaking up any balls with the back of a spoon if necessary.
Then, add the granulated sugar and salt; they rarely need sifting and help weight down the powders when you whisk everything together.
Optimal Mixing Ratios for a Single Serving
The gold standard for a properly rich, full bodied mug is 4 heaping tablespoons (about 60g) of mix per 1 cup (240ml) of hot milk. If you prefer a lighter, less intense drink, start with 3 tablespoons and adjust from there.
Scaling Up: Creating a Big Batch of Homemade Hot Cocoa Mix
If you plan on making this for a holiday fair or a huge family, simply multiply the recipe quantities by three or four. Use a large bowl or a clean bucket for mixing, ensuring you whisk longer to guarantee everything is uniformly dispersed throughout the huge volume.
Avoiding Powder Clumping and Settling
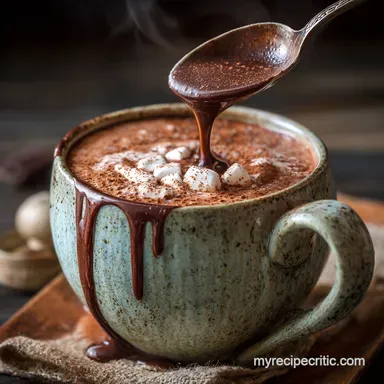
The primary failure point is adding the dry mix directly to hot liquid. Do not do this. You must always start by mixing your cocoa powder serving with a tiny splash (about 2 tablespoons) of cold milk or water first to create a smooth, thick paste the slurry technique.
Once the slurry is perfect, then you can add the rest of your hot liquid.
The Best Liquid for Preparation (Milk vs. Water)
Look, you can use water, but don't. Please use milk. Whole milk gives the best richness and creamy texture because of its higher fat content. If you use water, the drink will taste thin and slightly metallic. For a dairy-free option, use oat milk or coconut milk for added creaminess.
Adding Micro Flavors: The Touch of Sea Salt
Fine sea salt is absolutely crucial in this recipe, even though it's technically a sweet drink. It acts as a counterpoint to the sweetness and bitterness, dramatically brightening the overall chocolate flavour. Don’t skip the salt!
Shelf Life and Preservation: Storing Your Mix Safely
Since this is a dry mix, storage is easy, but you have to protect it from moisture.
Ideal Air-Tight Containers for Maximum Freshness
I prefer glass Mason jars with sturdy two-piece lids or any canister with a rubber gasket. The key is preventing any air exchange. Keeping oxygen out reduces the chances of the dry milk oxidizing or the cocoa flavor becoming stale.
How Long Does Homemade Hot Cocoa Mix Maintain Quality?
Stored correctly in a cool, dark pantry, your mix will easily maintain peak quality for up to six months . The limiting factor is usually the dry milk powder, which can start to taste flat after prolonged storage. If you don't use powdered milk, the shelf life extends almost indefinitely.
Preventing Moisture Absorption in Long Term Storage
Keep your jars away from high humidity areas, like shelves near the kettle, stove, or dishwasher. Humidity is the absolute enemy of dry mixes; moisture causes clumping and dramatically reduces the shelf life.
If your mix clumps, it may still be fine to use, but you'll have to break up the pieces by rubbing them between your fingers before preparing.
Elevating the Experience: Serving Your Velvet Mug
The mix is great on its own, but we are here for gourmet indulgence, right? Let's take it up a notch.
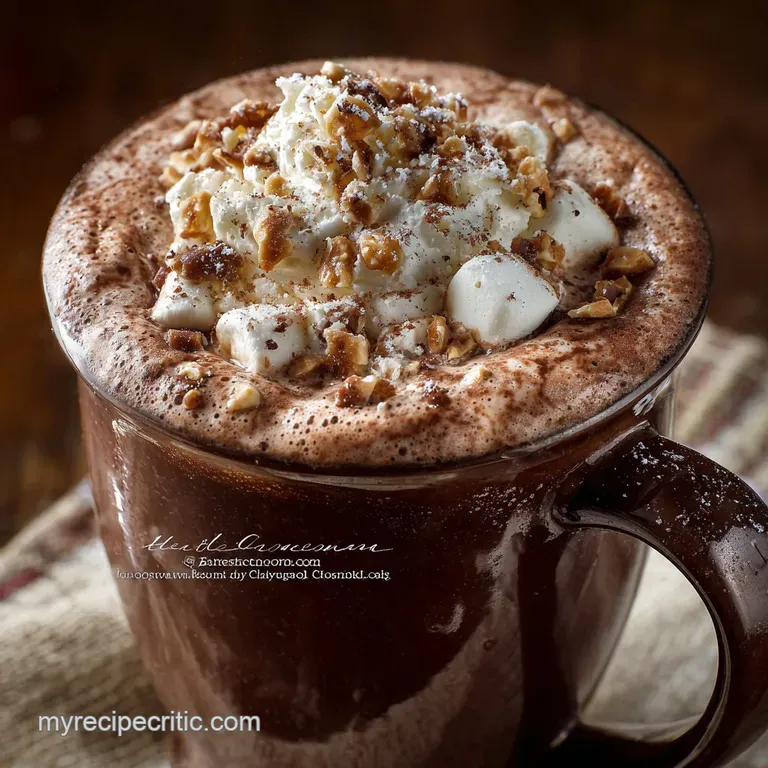
Recommended Toppings and Garnishes (Marshmallows, Cream, Shavings)
Go wild here! Freshly whipped double cream is my absolute favourite topping. Dust it with cinnamon or finely shaved dark chocolate for presentation. Or, if you're feeling nostalgic, use small, chewy mini marshmallows that melt slightly on top. If you need inspiration for the perfect cloud of cream, you might want to look at my guide for Hot Chocolate with Whipped Cream: The Best Rich Velvet Mug Recipe .
Perfect Pairings: What Snacks Complement Hot Cocoa?
Hot cocoa pairs beautifully with anything crisp and buttery. Think shortbread cookies, ginger snaps, or a simple slice of panettone. For a slightly more substantive pairing, sometimes I enjoy this alongside something chocolatey and filling, like one of my Homemade Protein Bars Easy NoBake Peanut Butter Chocolate Recipe for a double dose of comfort and energy.
Preparing Mixes for Cold Beverages and Milkshakes
This mix works just as well in the summer! To make a fantastic cold chocolate drink or milkshake, follow the slurry technique first, dissolving the mix in a tiny bit of hot milk. Let that cool for a minute, then blend it with cold milk and ice cubes for a thick, frosty treat.
It prevents the mix from staying sandy in your cold beverage.

Recipe FAQs
How long will the Homemade Hot Cocoa Mix stay fresh?
When stored correctly in a completely airtight container, like a sealed mason jar, this mix will maintain peak freshness for 6 months to 1 year. Always keep the mix in a cool, dark place away from any moisture or fluctuating temperatures.
Can I make this mix vegan, and which milk alternative works best?
Yes, the dry mix is inherently vegan, provided you ensure your sugar source is certified vegan. When preparing the hot cocoa, oat milk offers the best creamy, full bodied texture that closely mimics whole dairy milk. Soy or cashew milk are also excellent alternatives.
My final hot cocoa drink tastes gritty even though I stirred it thoroughly. Why is this happening?
The cornflour in the mix requires proper activation to prevent grittiness and act as a thickener. To ensure a smooth drink, always mix the powder with a very small amount of hot liquid first to form a thick, smooth paste (a slurry) before adding the rest of your hot milk or water.
What is the benefit of adding espresso powder, and can I omit it?
Espresso powder does not make the cocoa taste like coffee; rather, it greatly intensifies the dark, rich flavor of the chocolate. You can absolutely omit it if necessary, but we recommend replacing the missing amount with extra cocoa powder to try and maintain the depth of flavor.
What is the ideal ratio of mix to liquid for a standard mug?
For a standard 8-ounce cup of rich hot cocoa, start with 2 to 3 tablespoons of the mix. If you prefer a lighter, less sweet beverage, use 2 tablespoons, or use 3 tablespoons for an ultra rich, indulgent treat.
Can I use natural cocoa powder instead of the required Dutch processed cocoa?
While substitution is possible, Dutch processed cocoa is recommended because it is less acidic and provides a darker, smoother flavor. Using natural cocoa powder will result in a slightly tangier flavor profile, which you may need to balance with a tiny pinch of baking soda upon preparation.
Are there any easy additions to spice up the flavor profile of the mix?
For a warming spice, add 1/2 teaspoon of cinnamon and a small pinch of cayenne pepper per cup of mix for a Mexican style cocoa. Adding a small amount of peppermint extract or orange zest when preparing the drink also provides a refreshing twist.
Gourmet Homemade Hot Cocoa Mix Recipe
Ingredients:
Instructions:
Nutrition Facts:
| Calories | 170 kcal |
|---|---|
| Protein | 2.0 g |
| Fat | 6.0 g |
| Carbs | 30.0 g |
