Hot Fudge Sundae Brownie Cheesecake
- Time: Active 25 minutes, Passive 55 minutes, Total 1 hours 20 mins
- Flavor/Texture Hook: A fudgy, dark chocolate base contrasted by tangy, silky cheesecake and salty roasted peanuts.
- Perfect for: Birthday celebrations, dinner parties, or any special occasion requiring a high impact dessert.
- Constructing the Best Hot Fudge Sundae Brownie Cheesecake
- Science Behind the Creamy Contrast
- Component Analysis for Baking Success
- Essential Components for Rich Flavor
- Required Tools for Perfect Layers
- Detailed Steps for Dessert Perfection
- Fixing Common Baking Textural Issues
- Innovative Ways to Modify Flavor
- Vital Statistics for Recipe Success
- Myths Debunked
- Storing Your Leftovers for Freshness
- Serving Ideas for Visual Impact
- Recipe FAQs
- 📝 Recipe Card
Constructing the Best Hot Fudge Sundae Brownie Cheesecake
Do you remember that specific aroma of an old school ice cream parlor? That scent of warm, slightly scorched chocolate sauce meeting cold whipped cream is something I have chased in my kitchen for years. I once tried to make a version of this using a boxed brownie mix, and honestly, the results were lackluster.
The base was too thin, and the cheesecake didn't have that signature tang I was craving. It was a lesson in why the foundation matters just as much as the toppings.
After a few trials in my own kitchen, I discovered that the secret lies in the weight of the brownie. It needs to be sturdy enough to hold up the creamy weight of the cheesecake without becoming a soggy mess.
When you pull this from the oven, the house smells like a chocolate factory, and the way the warm fudge ripples over the chilled cheesecake is pure magic. It's the kind of treat that makes everyone at the table go quiet for a few seconds while they take that first bite.
We are going for a repeatable sweetness here, where the salt from the peanuts cuts through the richness of the sugar. This isn't just a dessert; it's a structural masterpiece of textures.
From the slight crackle of the brownie edges to the velvety finish of the cream cheese, every layer is designed to behave perfectly on your fork. Trust me, once you see that maraschino cherry sitting on top of the whipped cream, you'll know the effort was worth it.
Science Behind the Creamy Contrast
The Physics of the Dense Foundation
Structural Integrity: Using a high ratio of cocoa to flour in the brownie base ensures a dense, fudge like texture that supports the heavy cheesecake layer without collapsing.
Protein Denaturation: Room temperature eggs are vital because they emulsify more easily, creating a stable protein network that prevents the cheesecake from cracking during the cooling phase.
The Maillard Reaction: Melting the 115g of unsalted butter before mixing with sugar helps the sugar dissolve slightly, which leads to that beautiful, slightly shiny crackle on the brownie surface.
Lipid Emulsification: The full fat sour cream introduces lactic acid which weakens the egg protein bonds just enough to ensure the cheesecake remains silky rather than rubbery.
| Method | Time | Texture | Best For |
|---|---|---|---|
| Traditional Oven | 1 hours 20 mins | Dense and velvety | Pure flavor depth |
| No Bake Hybrid | 45 minutes | Light and airy | Last minute guests |
| Individual Jars | 30 minutes | Soft and spoonable | Party portions |
This comparison highlights that while a no bake version is faster, the traditional baked method provides the necessary structural contrast between the chewy brownie and the set cheesecake. If you enjoy experimenting with different textures, you might also find the technique used in The CrinkleTop Fudgy recipe helpful for mastering that perfect brownie base.
Component Analysis for Baking Success
| Ingredient | Science Role | Pro Secret |
|---|---|---|
| Cream Cheese | Structural base | Use full fat only to ensure the cake sets properly without becoming watery. |
| Dutch Process Cocoa | Flavor and color | Neutralized acidity allows for a darker color and a smoother, more intense chocolate profile. |
| Sour Cream | Moisture agent | The fat content prevents the cheesecake from drying out during the long bake time. |
Essential Components for Rich Flavor
- Unsalted butter (115g): Melted and cooled to room temperature. Why this? Provides the fat needed for a fudgy, dense brownie texture.
- Substitute: Salted butter (reduce added salt by half).
- Granulated sugar (350g total): Divided between the brownie and cheesecake. Why this? Essential for sweetness and moisture retention in the crumb.
- Substitute: Caster sugar for a finer texture.
- Unsweetened Dutch process cocoa powder (45g):Why this? Delivers a deep, dark color and smooth chocolate flavor.
- Substitute: Natural cocoa powder (will be more acidic and lighter).
- Full fat cream cheese (680g): Softened completely. Why this? Creates the rich, velvety body of the cheesecake.
- Substitute: Mascarpone for a richer, less tangy flavor.
- Full fat sour cream (120g):Why this? Adds a necessary tang and softens the protein structure.
- Substitute: Full fat Greek yogurt.
- Vanilla bean paste (5g):Why this? Provides intense flavor and beautiful black bean flecks.
- Substitute: Pure vanilla extract (2.5g).
- Large eggs (5 total): Room temperature. Why this? Acts as the primary binding agent for both layers.
- Substitute: Flax eggs (note: will significantly alter the cheesecake set).
- All purpose flour (65g):Why this? Just enough to provide structure to the brownie base.
- Substitute: 1 to-1 gluten-free flour blend.
- Premium hot fudge sauce (120ml): Warmed for drizzling. Why this? The iconic "sundae" element that ties it all together.
- Substitute: Chocolate ganache.
- Salted roasted peanuts (60g): Chopped. Why this? Provides a necessary salty crunch to balance the sugar.
- Substitute: Toasted pecans or walnuts.
- Whipped cream (120ml) and 13 Maraschino cherries: For garnish. Why this? Completes the visual and flavor profile of a sundae.
Required Tools for Perfect Layers
To achieve the best results with this Hot Fudge Sundae Brownie Cheesecake, you really need a 9 inch springform pan. It allows you to remove the sides without damaging the delicate cheesecake. A stand mixer or electric hand mixer is also vital for getting the cream cheese perfectly smooth.
If you don't have a stand mixer, a sturdy whisk and some elbow grease will work for the brownie, but the cheesecake truly needs the power of a motor to avoid lumps.
I also recommend using a digital scale to measure your ingredients in grams. Baking is a science, and even a small error in flour or cocoa can make the brownie too dry or the cheesecake too soft. If you are a fan of cheesecake but want something a bit lighter for summer, you might want to look at a No Bake Strawberry recipe for a different technique.
Detailed Steps for Dessert Perfection
1. Constructing the Fudgy Foundation
Preheat your oven to 175°C and grease your springform pan. In a medium bowl, whisk together 115g of melted butter and 200g of granulated sugar until the mixture looks grainy and combined.
2. Incorporating the Dry Components
Sift in 45g of Dutch process cocoa powder and 1.5g of salt. Stir this in until it forms a dark, glossy paste. Add 2.5g of vanilla extract and two large eggs, one at a time.
3. Folding the Flour
Gently fold in 65g of all purpose flour. Stop mixing as soon as the last white streak disappears to ensure the brownie behaves and stays fudgy.
4. Setting the Base
Pour the brownie dough texture into the pan and bake for 15 minutes. It should be slightly set but still look damp in the center. Note: This partial bake prevents the cheesecake from sinking into raw dough.
5. Emulsifying the Cheesecake Batter
While the base bakes, beat 680g of softened cream cheese and 150g of sugar in a stand mixer. Mix until the texture is silky and completely lump free.
6. Adding the Creamy Elements
Stir in 120g of sour cream and 5g of vanilla bean paste. Add three eggs one-by-one, mixing on low speed until just incorporated. Note: Overmixing at this stage adds air which causes cracks.
7. Layering and Swirling
Pour the cheesecake mixture over the pre baked brownie. Drizzle about half of the warmed fudge sauce over the top and use a knife to create a marbled pattern through the batter.
8. Mastering the Controlled Bake
Lower the oven to 160°C and bake for 40-45 minutes. You are looking for the edges to be set while the center still has a slight wobble.
9. Managing the Cooling Sequence
Turn off the oven and crack the door. Let the cheesecake sit inside for 30 minutes. This slow temperature drop is the secret to preventing a deep crater or crack in the surface.
10. Finishing and Serving
Chill for at least 6 hours. Before serving, top with whipped cream, the remaining hot fudge, chopped peanuts, and those iconic maraschino cherries.
Fixing Common Baking Textural Issues
Preventing the Center Crack
Cracks usually happen because of sudden temperature changes or over incorporating air. When you beat the eggs into the cream cheese, do it on the lowest setting. Also, the "rest period" in the oven after it's turned off is non negotiable.
Handling Sticky Crust Issues
If your brownie base is sticking to the bottom of the pan, you likely didn't grease it well enough or didn't let it cool sufficiently before slicing. Using a piece of parchment paper at the bottom of the springform pan is a lifesaver for clean releases.
| Problem | Root Cause | Solution |
|---|---|---|
| Lumpy Cheesecake | Cold cream cheese | Ensure cheese is at room temperature for at least 2 hours before mixing. |
| Runny Center | Underbaked | Bake until only a 2 inch circle in the middle wobbles slightly. |
| Dry Brownie | Overbaked base | Do not exceed the 15 minute initial bake for the brownie foundation. |
Common Mistakes Checklist
- ✓ Always use room temperature eggs and cream cheese to ensure a smooth emulsion.
- ✓ Do not skip the cooling period in the oven; it's vital for structural stability.
- ✓ Tap the cheesecake pan on the counter before baking to release trapped air bubbles.
- ✓ Use full fat ingredients only, as low-fat versions contain more water and will not set.
- ✓ Wipe your knife with a warm, damp cloth between every slice for professional looking cuts.
Innovative Ways to Modify Flavor
The Peanut Butter Variation
If you want to lean into the "sundae" theme even more, you can swirl 1/4 cup of creamy peanut butter into the cheesecake batter along with the hot fudge. This creates a flavor profile similar to a Peanut Butter Cheesecake recipe.
gluten-free Adaptation Strategy
To make this gluten-free, simply swap the 65g of all purpose flour for a high-quality gluten-free 1 to-1 baking blend. Because the flour amount is so low, the difference in texture is almost unnoticeable.
Chef's Tip: To get a really deep chocolate flavor, add 1 teaspoon of espresso powder to the brownie batter. It doesn't make it taste like coffee; it just makes the chocolate taste more like itself.
Vital Statistics for Recipe Success
| Metric | Measurement | Checkpoint |
|---|---|---|
| Oven Temp | 160°C (325°F) | For the main cheesecake bake phase. |
| Cream Cheese | 680g | Weigh this to ensure the correct fat to egg ratio. |
| Chill Time | 6 hours | Minimum time required for the fats to solidify properly. |
Myths Debunked
Myth: You must use a water bath for all cheesecakes. While water baths help with moisture, this specific recipe uses a brownie base and sour cream which provide enough protection and fat to prevent cracking without the hassle of a water bath.
Myth: Room temperature ingredients are just a suggestion. If you use cold cream cheese, you will get lumps that will never whisk out, no matter how hard you try. Cold eggs can also cause the melted butter in the brownie to seize.
Storing Your Leftovers for Freshness
Fridge Storage: Store this Hot Fudge Sundae Brownie Cheesecake in an airtight container for up to 5 days. Keep the toppings separate if possible to prevent the whipped cream from deflating.
Freezer Instructions: This cheesecake freezes beautifully! Wrap individual slices in plastic wrap and then foil. They will stay fresh for up to 2 months. Thaw in the fridge overnight before eating.
Zero Waste Tip: If you have leftover brownie scraps or a slice that broke, crumble it up and use it as a topping for vanilla ice cream the next day. You can also blend it into a "cheesecake milkshake" for a truly over the-top treat.
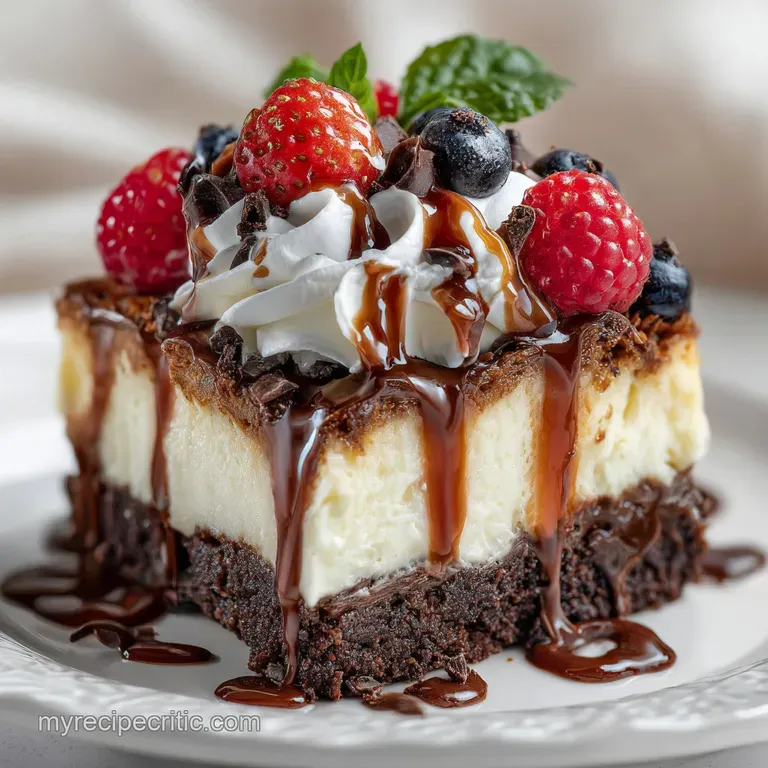
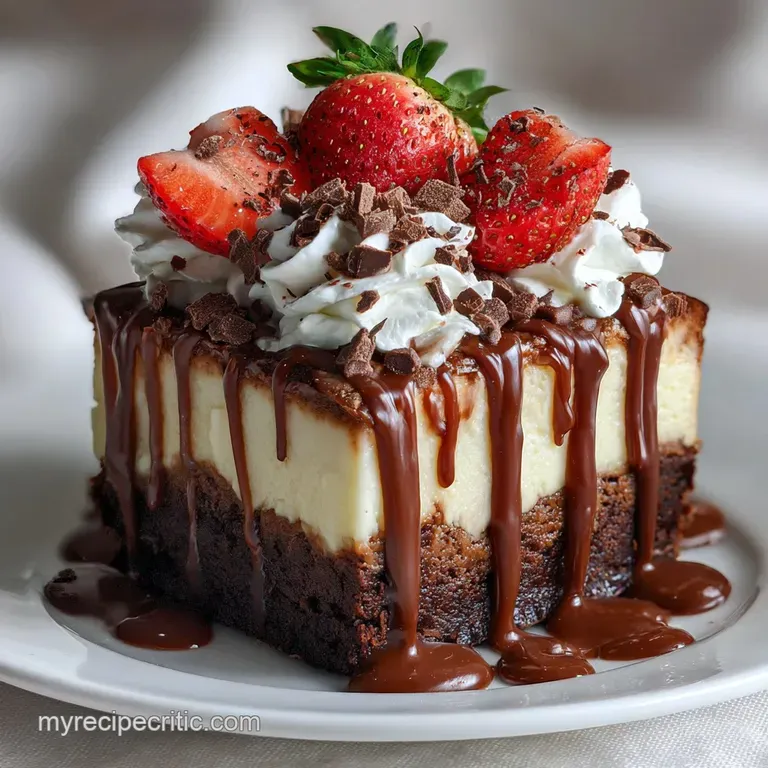
Serving Ideas for Visual Impact
When you are ready to serve, don't just plop the toppings on. Start with the whipped cream I like to use a piping bag with a star tip for that classic diner look. Drizzle the warm fudge sauce so it runs down the sides of the cheesecake, then immediately sprinkle the chopped peanuts so they stick to the sauce.
The final touch is always the cherry. Make sure to pat the maraschino cherries dry with a paper towel before placing them on the whipped cream; otherwise, the red syrup will bleed into the white cream and make it look messy.
This dessert is a showstopper, and the visual contrast of the dark brownie, white cheesecake, and bright red cherry is exactly what makes it a "sundae" in spirit. Enjoy every fudgy, creamy bite!

Recipe FAQs
Can I substitute natural cocoa powder for Dutch process cocoa?
No, stick with Dutch process. Natural cocoa is acidic and will react negatively with the baking soda in the brownie base, resulting in a lighter color and potentially a slight metallic taste.
How to prevent the cheesecake layer from cracking during cooling?
Turn off the oven and crack the door immediately. Let the cheesecake cool slowly inside the oven for 30 minutes; this gradual temperature reduction prevents thermal shock, which is the primary cause of surface cracking.
Is it true that the brownie base must be partially baked before adding the cheesecake?
Yes, a short initial bake is essential. Baking the brownie for 15 minutes first sets its structure, preventing the heavier, liquid cheesecake batter from sinking into it and creating a dense, soggy layer.
How to achieve a perfectly silky, lump free cheesecake texture?
Ensure all dairy products are completely at room temperature. Cold cream cheese traps air and leaves lumps that baking cannot fix; if you enjoyed mastering the stable binding of ingredients here, the same attention to temperature is crucial for preventing lumps.
Can I skip chilling the finished dessert?
No, chilling for a minimum of 6 hours is mandatory. The cheesecake needs this time in the refrigerator for the proteins and fats to fully set around the brownie structure, ensuring clean slices.
What is the best way to cut clean slices for serving?
Use a long, thin knife dipped in hot water between each cut. Wipe the knife dry immediately after rinsing it in the hot water to ensure a clean break through the fudge layer and set cheesecake.
How can I make this a lighter dessert without sacrificing chocolate flavor?
Substitute the sour cream with full fat Greek yogurt. This swaps some fat for protein while retaining necessary tanginess, similar to how dairy substitutes are handled in the NoBake Chocolate Fudge recipe.
Fudge Brownie Cheesecake Recipe

Ingredients:
Instructions:
Nutrition Facts:
| Calories | 499 kcal |
|---|---|
| Protein | 8.8 g |
| Fat | 33.2 g |
| Carbs | 44.8 g |
| Fiber | 1.8 g |
| Sugar | 36.2 g |
| Sodium | 308 mg |
