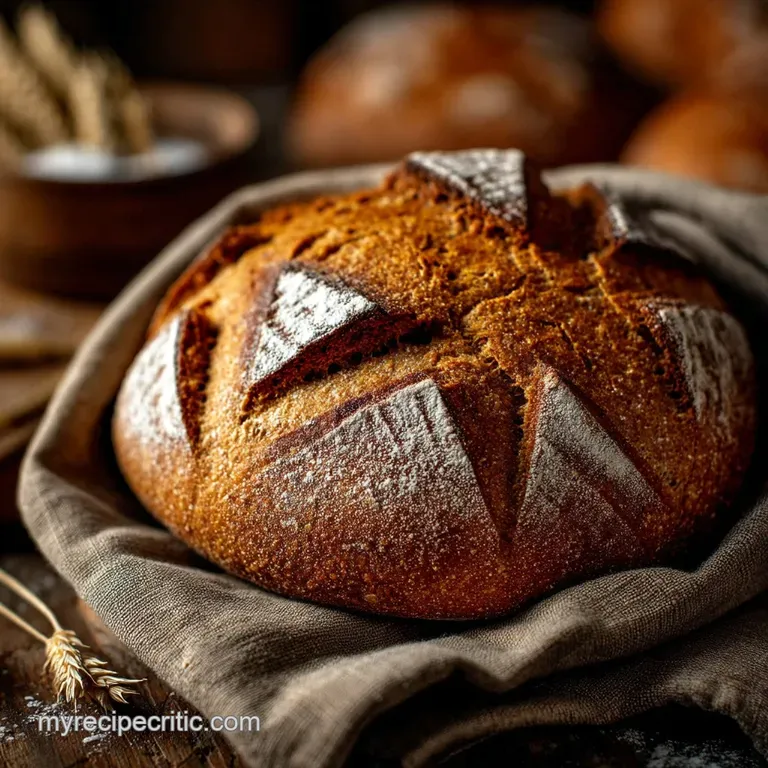
The Sunday Loaf Easy Noknead Caraway Rye Bread
- The Easiest Way to Bake a Rustic Sunday Loaf
- Achieving Artisan Results with No Knead Rye Bread
- Gathering Your Simple Toolkit and Ingredients
- The Essential Components of a Perfect Rye Crumb
- Step-by-Step Guide to Baking Perfect No Knead Rye Bread
- Mastering Your Loaf: Troubleshooting and Pro Tips
- Serving Suggestions and Storage Secrets
- Recipe FAQs
- 📝 Recipe Card
The Easiest Way to Bake a Rustic Sunday Loaf
Baking truly great bread often carries the intimidating reputation of involving complex processes, messy countertops, and hours of tireless kneading. We're here to shatter that myth.
This Easy Rye Bread Recipe relies on the simple magic of time and hydration to produce a hearty, substantial loaf that rivals anything from a professional bakery.
This method is the ultimate hands off approach, requiring only about ten minutes of active effort before you let nature take its course. The reward is a beautiful, deeply flavoured loaf with a thick, burnished crust and a dense, moist crumb perfect for those slow Sunday mornings or accompanying a rich, winter stew.
This Rustic Bread Recipe Dutch Ovens method proves that artisan baking doesn't require muscle; it simply requires patience.
Achieving Artisan Results with No Knead Rye Bread
The secret to professional grade bread lies not in aggressive manipulation, but in long, slow fermentation. This is the cornerstone of great baking, allowing the flour and water to interact fully, developing complex flavour compounds and a robust gluten structure without any heavy lifting on your part.
Why This No-Fuss Method Works Wonders
The No Knead Rye Bread technique utilizes high hydration (a large amount of water relative to the flour) and a lengthy Slow Rise Bread period, typically spanning 12 to 18 hours.
During this extended rest, the yeast works slowly, and enzymes naturally present in the flour break down complex starches. This not only builds incredible depth of flavour but also strengthens the gluten matrix automatically.
By minimizing active kneading, we avoid the risk of overworking the delicate rye flour while still achieving a remarkably chewy and satisfying internal structure.
Unlocking the Deep Flavor of Dark Rye
Rye flour, particularly the dark variety, brings a distinctly malty, slightly sour complexity that commercial white breads cannot touch. When combined with a protracted, cool fermentation, these flavours deepen significantly.
Our approach enhances this natural earthiness by incorporating specific ingredients designed to accentuate the robust character of the grain, creating a depth of colour and taste that only slow rising bread can achieve.
A Loaf That Requires Zero Muscle
One of the great joys of this recipe is the minimal active involvement. The initial mixing stage where you simply combine the dry ingredients with the wet until a shaggy mass forms takes less than ten minutes. After that, your only job is waiting.
Because we rely on the passage of time rather than physical effort, this recipe is ideal for busy bakers who want spectacular results without sacrificing their day to the kitchen.
Gathering Your Simple Toolkit and Ingredients
Success in this highly hydrated, No Knead Rye Bread method begins with selecting the correct proportions of flour and ensuring you have the right equipment to harness the necessary heat and steam.
Related Recipes Worth Trying
- Authentic DeliStyle Rye Bread The Secret to that Classic Deli Tang — Forget supermarket loaves Learn to bake rich authentic Jewish Deli Style Rye Bread at home This recipe delivers a chewy crust and deep tang the secret is...
- The Best Classic Zucchini Bread Recipe Moist Spiced and Easy — This easy zucchini bread recipe is foolproof delivering a profoundly moist tender crumb without fail Packed with warm spice its a vintage zucchini loaf...
- The Only Moist Banana Bread Recipe Youll Ever Need — Forget dry loaves This easy banana bread recipe guarantees a deeply moist texture thanks to a secret ingredient Its the best banana bread recipe for using...
The Essential Components of a Perfect Rye Crumb
The beautiful, chewy interior (the crumb) of a rye loaf is dependent on a careful balance between the structure provided by bread flour and the flavour imparted by the darker rye grain.
Choosing the Right Flours (Dark vs. Light Rye)
This recipe calls for a specific blend: strong bread flour (high protein, around 12% or more) and dark rye flour. The bread flour provides the structural integrity and gluten strength necessary to contain the yeast gases during the long rise.
Dark rye flour, often labelled pumpernickel, is used specifically for its intense flavour and colour. Using a 1:1.75 ratio (one part dark rye to nearly two parts bread flour) ensures a robust rye profile without the dough becoming overly dense or sticky, which is a common challenge when baking with 100% rye.
Key Flavor Boosters: Caraway and Molasses
For that classic deli style complexity, we incorporate two non-negotiable enhancements. The first is caraway seeds , which infuse the loaf with a warm, slightly peppery aroma and textural pop.
The second is molasses —specifically blackstrap molasses which contributes to the deep mahogany hue of the crust and adds a subtle, earthy sweetness and bitterness that complements the rye beautifully.
Baking a no knead rye bread with caraway seeds and no knead rye bread with molasses ensures the finished flavour profile is authentic and unforgettable.
Essential Equipment for Hands Off Baking (Dutch Oven Focus)
While you could attempt baking this No Knead Rye Bread in a loaf pan , the best results, especially concerning crust development, are achieved using a specialized vessel.
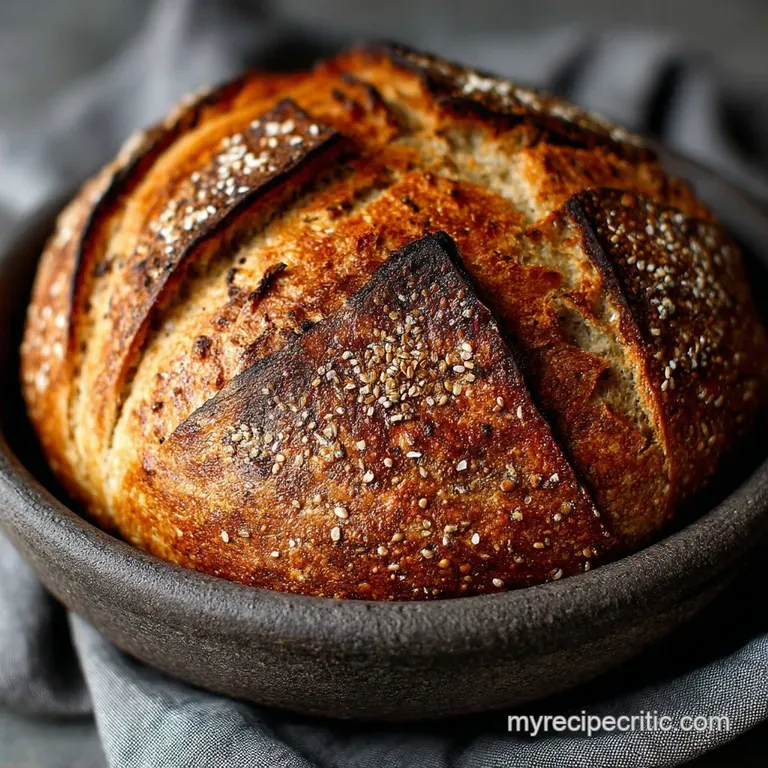
The no knead rye bread dutch oven method is essential for trapping steam around the loaf during the initial bake. A heavy, lidded 5- to 6-quart cast iron Dutch oven acts as a micro oven, mimicking professional steam injection ovens.
This retained moisture keeps the crust soft long enough for the loaf to rise fully, resulting in the coveted thick, blistered, and perfectly chewy crust.
step-by-step Guide to Baking Perfect No Knead Rye Bread
The process is broken down into three simple, non-intensive stages: mixing, resting, and baking.
The Initial Shaggy Mix: Combining the Dry and Wet
Start by whisking all the dry elements the bread flour, dark rye flour, coarse salt, instant yeast, and caraway seeds in a large mixing bowl. Separately, dissolve the blackstrap molasses into lukewarm water.
Combine the wet mixture into the dry, using a wooden spoon or spatula until just combined. You are looking for a shaggy, wet, and incredibly sticky dough. Avoid the urge to knead or mix vigorously; the goal is simply to hydrate the flour. This active preparation phase takes a mere ten minutes.
The Long Sleep: Overnight Proofing and Dough Development
Cover the bowl tightly with plastic wrap and set it aside at a cool room temperature (ideally 18°C 21°C / 65°F 70°F). This is when the Slow Rise Bread process truly begins. Allow the dough to ferment for 12 to 18 hours.
During this long bulk fermentation, the dough will roughly double in volume, develop countless tiny bubbles, and take on a pleasant, mildly alcoholic aroma signs that the yeast and gluten are working their magic.
Shaping Without Kneading: The Fold Over Technique
The high hydration of the dough means it will be sticky and loose when you scrape it out onto a generously floured work surface. To shape it gently without deflating the precious gas bubbles, perform a quick, easy fold over technique.
Fold the edges of the dough into the center, much like folding an envelope into thirds. Flip the dough over so the seams are on the bottom, gently rounding it. This rapid manipulation builds surface tension.
Place the shaped dough seam side up into a heavily floured banneton (or a bowl lined with a floured tea towel) for its final proof, lasting 1.5 to 2 hours.
High Heat Baking for the Ultimate Crust
Preheat your oven and your lidded Dutch oven simultaneously to a scorching 230°C (450°F). It is critical that the pot preheats for a full 30 minutes after the oven registers temperature to ensure maximum heat transfer.
Carefully invert the proofed dough onto a sheet of parchment paper, score the top if desired, and use the parchment as a sling to lower it into the searing hot no knead rye bread dutch oven . Bake covered for 30 minutes to capture maximum steam.
Then, remove the lid and reduce the temperature to 210°C (410°F), baking uncovered for another 15 to 20 minutes until the crust reaches a deep, dark brown.
Mastering Your Loaf: Troubleshooting and Pro Tips
The most important step after baking is one of delayed gratification: the cooling phase . Rye flour contains specific starches (pentosans) that absorb significant amounts of water and need time to gelatinize and set after baking.
Slicing the bread when it is still warm, even slightly, will result in a sticky, gummy, or raw-feeling crumb. Allow the loaf to cool completely on a wire rack for at least two hours ideally longer to ensure a clean, dry, and perfect crumb texture.
If you need to speed up the bulk fermentation time, use slightly warmer water during the initial mix; conversely, use cold water to extend the fermentation if your kitchen is hot.
Serving Suggestions and Storage Secrets
This dense, flavourful rye loaf is robust enough to stand up to strong cheeses and cured meats.
FAQ: Why Is My Dough Too Sticky or Dense?
The dough is inherently very wet due to its high hydration level, so stickiness during handling is normal; ensure you use copious amounts of flour on your hands and work surface during shaping.
If the final baked crumb is dense or gummy, the most common culprit is slicing the bread before it has had adequate time to cool completely. Another potential factor is failing to use high protein bread flour, which provides the necessary strength for the slow rise.
Spice It Up: Easy Rye Bread Variations (Seeds and Herbs)
Once you master this primary Easy Rye Bread Recipe , variations are simple to implement. For added texture and nutrition, mix in half a cup of sunflower, pumpkin, or flax seeds along with the dry ingredients.
Alternatively, for an Eastern European style dark loaf, swap out the molasses for 1 tablespoon of cold, strong coffee and 1 teaspoon of unsweetened cocoa powder. If you prefer a milder loaf, you may simply omit the caraway seeds entirely.
Proper Storage for Maximum Freshness
Rye bread tends to stay fresh longer than standard white loaves due to its structure and ingredients. Store the cooled loaf, unsliced, in a clean linen bag or wrapped tightly in parchment paper at room temperature. Avoid refrigerating, as this accelerates staling.
The loaf should remain fresh and flavorful for 4 to 5 days. For longer storage, slice the cooled loaf and freeze the slices in an airtight container for up to three months.
Nutritional Information and Serving Ideas
Each slice (based on 12 servings) provides roughly 210 calories, 7g of protein, and 4g of fibre, making this a satisfying and nutritious choice. This bread is excellent served warm alongside a hearty bowl of borscht or beef goulash.
For a traditional pairing, toast thick slices and top them with high-quality cream cheese, smoked salmon, capers, and fresh dill. It also makes an exceptional base for a classic German Butterbrot (butter bread) spread simply with good, salted butter.

Recipe FAQs
My dough is incredibly sticky am I doing something wrong with this high hydration rye?
Sticky is splendid! Rye dough is naturally high hydration and quite loose, so don't fret; it's meant to be more shaggy than smooth. This isn't like handling a neat white loaf. To handle it without turning into a sticky monster, use plenty of rye flour (or a mix of rye and bread flour) on your hands and work surface during shaping it’s the flour, not the elbow grease, that prevents sticking.
How long will this gorgeous No Knead Rye Bread stay fresh, and what is the best way to store it?
This robust No Knead Rye Bread is a keeper! Stored correctly wrapped tightly in a linen bag, tin foil, or beeswax wrap at room temperature it will be lovely for 4 to 5 days. Rye naturally holds moisture longer than pure white bread, which is a bonus for a proper Sunday loaf.
Crucially, avoid the fridge, though, as it will accelerate staling (known as 'starch retrogradation'), turning your lovely bake into a rubbery disappointment, which is a tragedy.
Why did my rye loaf turn out gummy or sticky inside, even though the crust looks great?
Ah, the bane of baking rye! Rye flour starches are a bit sensitive, and if you slice the loaf while warm, it gets dreadfully sticky, almost like chewing gum. You absolutely must practice extreme patience, like waiting for the kettle to boil, and let the loaf cool completely on a wire rack for at least two hours before attacking it with a knife.
Do I absolutely need a cast iron Dutch oven for this recipe, or can I just use a baking sheet?
While you can technically bake it on a tray, using the Dutch oven is the secret sauce for that proper, thick, blistered crust that makes this bread so special. It traps all the steam released by the dough, mimicking a professional bakery oven no faffing about with water trays required!
If you don't have a Dutch oven, try baking it inside a deep, lidded casserole dish or even a metal pan tightly covered with an inverted, oven safe metal bowl.
I don't have 18 hours for the rise. Can I shorten the bulk fermentation time?
You can, but only slightly! This no-knead method relies entirely on time for the development of deep, complex flavour, so rushing it is a bit like skipping the cream in a scone recipe.
If you're truly under the gun, use slightly warmer water during the mix and place the covered bowl in a warmer spot (like on top of your fridge or near a radiator) to aim for 8 10 hours instead of the full 18.
Easy No Knead Rye Bread Dutch Oven
Ingredients:
Instructions:
Nutrition Facts:
| Calories | 6322 kcal |
|---|---|
| Protein | 81.8 g |
| Fat | 49.9 g |
| Carbs | 328.7 g |
| Fiber | 74.3 g |
| Sodium | 43058 mg |
