Creme Brulee Mini Cheesecakes: Torched Perfection in an Individual Serving
- The Ultimate Fusion Dessert: Crème Brûlée Mini Cheesecakes
- Essential Ingredients for Perfect Crème Brûlée Mini Cheesecakes
- Step-by-Step Guide to Baking and Torching Your Mini Delights
- Mastering the Texture Contrast: Why These Cheesecakes Are So Creamy
- Troubleshooting Torched Perfection: Chef's Tips for Flawless Crème Brûlée Mini Cheesecakes
- Making Ahead and Storage Solutions for Mini Cheesecakes
- Elegant Serving Pairings for Crème Brûlée Mini Cheesecakes
- Recipe FAQs
- 📝 Recipe Card
The Ultimate Fusion Dessert: Crème Brûlée Mini Cheesecakes
The moment you strike that final layer of caramelized sugar and hear the satisfying crack , you know you’ve won dessert. That sound, that texture it’s pure magic.
These mini crème brûlée cheesecakes take the rich, buttery density of the world's best New York style cheesecake and crown it with that iconic, glassy crunch. It's the ultimate dessert hybrid; creamy, bright, and intensely vanilla forward.
If you’re anything like me, you love desserts that look fancy but don't require surgical precision or hours of fiddly work. This recipe is a lifesaver for dinner parties, honestly.
Because they are baked in individual muffin tins, there is zero worry about slicing, cracks, or serving awkwardly, making them the most irresistible mini crème brûlée cheesecakes around. They are cheap to make, travel well, and taste far more luxurious than their ingredient list suggests.
We are going to conquer the two biggest fears associated with these classics: the cheesecake crack, and the dreaded soft brûlée topping. I’ve made all the mistakes so you don’t have to, and I promise, once you nail this simple muffin tin method, you’ll never go back.
Let’s crack on and create some individual desserts that will wow everyone.
Why Mini Cheesecakes are the Perfect Individual Dessert Solution
Using the muffin tin method is simply genius. It completely eliminates the terror of the water bath and the anxiety of structural integrity. You get beautifully uniform portions every single time. It feels incredibly satisfying to present guests with their very own perfect dessert.
You also gain amazing texture control with smaller portions. The crust-to-filling ratio is absolutely perfect here, giving you maximum crunch contrasted with maximum creamy filling. Plus, they stack well in the fridge, making them a dream for prepping ahead of time, which is something I totally rely on when I’m making things like my famous Strawberry Mini Cheesecakes: Easy Individual Desserts .
The Anatomy of a Crème Brûlée Cheesecake: Base, Filling, and Torched Crown
Every perfect bite starts with the right foundation. Our base needs to be robust, buttery, and fully pre-baked to prevent any dreaded sogginess. The filling is the soul of the dish; we are aiming for dense, smooth, and velvety, relying heavily on full fat dairy and vanilla.
Finally, the crown. The crème brûlée topping is just sugar. We need a thin, even layer of pure sugar that will be hit with intense heat to achieve that crisp, amber shell. Get this right, and you have cheesecake gold.
Essential Equipment Checklist Before Starting
You can technically make this recipe with just a bowl and a whisk, but you’ll want a mixer to ensure absolute smoothness. The one piece of equipment you truly cannot substitute, however, is the kitchen torch.
Chef's Note: While you can use the broiler, a kitchen blow torch gives you pinpoint control over the caramelization process. It allows you to crisp the sugar without heating the chilled cheesecake underneath. It is worth the $20 investment, trust me.
- Standard 12 cup Muffin Tin
- Paper or Silicone Cupcake Liners
- Electric Hand Mixer or Stand Mixer (for a lump free filling)
- Kitchen Blow Torch (Non-negotiable for the best result!)
Essential Ingredients for Perfect Crème Brûlée Mini Cheesecakes
Don't skip the full fat ingredients here; this is a luxurious dessert, not diet food. Getting the ingredients right, and knowing what to swap if you're in a pinch, is half the battle won.
The Best Biscuit Base: Digestive vs. Graham Cracker Crumb Comparisons
I’m a digestive biscuit purist. They provide a deeper, slightly wheaty flavor and aren't overly sweet, which balances the richness of the filling beautifully.
| Ingredient | My Preference | Viable Substitute |
|---|---|---|
| Crumb Base | Digestive Biscuits | Graham Crackers, Vanilla Wafers, or Shortbread Cookies |
| Sweetener | Caster Sugar (Superfine) | Standard Granulated Sugar |
| Fat | Unsalted Butter, melted | Salted Butter (adjust salt content slightly) |
Dairy Decisions: Why Full Fat Cream Cheese is Non-Negotiable
Seriously, skip the low-fat stuff this time. Full fat cream cheese provides the necessary structure and richness we need to achieve that characteristic density in the filling. low-fat cheeses contain more water, which risks a runnier filling and a greater chance of shrinkage and cracking during cooling.
Substitution Tip: If you want an even more decadent texture, you can substitute one block of cream cheese with an equal weight of Mascarpone. This makes the filling impossibly silky.
The Sugar Crown: Selecting the Right Sugar for a Hard Caramel Shell
We use regular granulated sugar for the crust, and caster sugar (superfine) for the filling. But for the actual brûlée topping, you have options. Coarse granulated sugar gives a thicker, almost glassy crunch.
Caster sugar, however, melts faster and provides a thinner, crisper, more delicate crack that I prefer.
Scaling the Recipe: Adjusting Ingredient Ratios for Batch Sizes
This recipe is perfectly scaled for 12 mini cheesecakes, the standard muffin tin size. If you want to double the batch, the most critical rule is to only increase the eggs gradually. Two eggs are enough for three blocks of cream cheese. If you move up to four blocks (a double batch), use three eggs, maybe four at most.
Too many eggs equal a spongey, overly airy texture that will definitely crack.
step-by-step Guide to Baking and Torching Your Mini Delights
These irresistible mini crème brûlée cheesecakes require patience, particularly in the mixing and cooling stages. Follow these steps precisely for perfection.
Creating a Stable, Buttery Base in Muffin Tins
First things first: preheat your oven to 325°F (165°C). Line those muffin tins with liners paper or silicone works well. Crush your biscuits finely; I use a food processor for speed, but a bag and a rolling pin work just fine. Mix the crumbs with the melted butter and sugar until it looks like wet sand.
Press about 1.5 tablespoons firmly into the bottom of each liner. Use the bottom of a shot glass or a small measuring cup to really compact it. Then, pre-bake for 8 minutes. This sets the base, ensuring no soggy bottom!
The Smooth Filling Method: Preventing Lumps and Overmixing
Room temperature cream cheese is vital for a lump free filling. Beat the softened cream cheese on medium speed until it is utterly smooth, scraping the bowl down constantly. Gradually add the sugar and salt until just combined, then add the vanilla and heavy cream.
Here is where people mess up: the eggs. Add the cold eggs one at a time. Mix on the absolute lowest speed, or use a rubber spatula to fold them in. Stop mixing the second the yolk streak disappears.
Overmixing incorporates air, and air causes the filling to rise quickly and then collapse, resulting in massive cracks.
Post Bake Cooling and Setting Protocol for Structure
Bake the cheesecakes for 22– 25 minutes. The edges should be set, but the center should still have a noticeable wobble, like a loose jelly. This is perfect. Now, the trick: turn the oven off immediately.
Prop the oven door open slightly and let the cheesecakes cool inside for 15 minutes. This slow, gentle temperature decrease prevents rapid shrinking and guarantees a smooth top.
After 15 minutes, remove them and let them cool on the counter until they reach room temperature. Then, transfer them to the refrigerator to chill for at least 4 hours, or ideally overnight, until they are firm. Patience is everything here!
The Art of the Brûlée: Achieving the Ideal Caramelized Crack
Once fully chilled, gently peel off the liners and place the cheesecakes on a baking sheet. Sprinkle about a teaspoon of your chosen sugar (caster is great) evenly over the top of each individual crème brûlée cheesecake. The coating should be thin and even.
Hold the torch a few inches above the sugar and move it constantly in small circular motions. Watch the sugar melt, bubble, and turn a rich, amber colour. If it smokes, you're too close! Work quickly so the heat doesn't sink into the chilled filling.
Mastering the Texture Contrast: Why These Cheesecakes Are So Creamy

The incredible creaminess of these mini crème brûlée cheesecakes comes down to two major elements: the high fat dairy and the low, slow cook. We aren't introducing excess air, thanks to our gentle egg incorporation technique. This creates a dense, custard like texture that sets beautifully firm.
We're mimicking the French method of cooking custard slow and gentle. When you combine that velvety filling with the thin, sharp crack of the caramelized sugar, the texture contrast is simply heaven.
Troubleshooting Torched Perfection: Chef's Tips for Flawless Crème Brûlée Mini Cheesecakes
If you run into issues, don't panic. I've encountered all of these, usually late at night when I'm desperate for a sweet treat.
Avoiding Cracks: The Slow Cool Down Technique
The biggest mistake is thermal shock. If you yank the hot cheesecakes out of the oven and put them on a cold counter, they will shrink and crack every single time. Always use the slow cool down method —oven off, door ajar.
That 15 minutes of slow acclimatization makes all the difference.
No Torch? Alternative Methods for Caramelizing the Sugar
Look, I insist on the torch, but if you absolutely cannot get one, you can use your broiler (grill). Move the oven rack to the highest position. Sprinkle the sugar on the chilled cakes and place them under the hot broiler for 30 60 seconds. You must watch it the entire time.
If you look away, you will burn the sugar, turning your perfect dessert into bitter charcoal.
When to Brûlée: Storing Un-Torched Desserts Safely
Always brûlée right before serving. The sugar shell will start to weep and soften within about 30 minutes in the humidity of a refrigerator or kitchen.
Store the chilled, un-torched cheesecakes safely in the fridge for up to 4 days, then sugar and torch them when guests arrive.
Making Ahead and Storage Solutions for Mini Cheesecakes
These are ideal make-ahead desserts, provided you follow the golden rule about the topping.
Store the un-torched cheesecakes in an airtight container in the refrigerator for up to 4 days. If stacking them, use a sheet of parchment paper between the layers to prevent sticking or damage. Do not cover the cheesecakes tightly until they are completely chilled, or condensation will form.
Freezing Cream Cheese Desserts: Proper Thawing Techniques
Yes, you can freeze them! Freezing is a great way to save a massive batch. Ensure the cheesecakes are fully chilled and un-torched. Wrap each cheesecake individually in plastic wrap, then place them in a freezer safe zip-top bag or container. They last beautifully for up to 2 months.
Thaw them slowly in the refrigerator overnight do not thaw at room temperature, as this can change the texture of the filling.
Elegant Serving Pairings for Crème Brûlée Mini Cheesecakes
Since these mini crème brûlée cheesecakes are rich and intensely flavored, you need something bright to cut through the density.
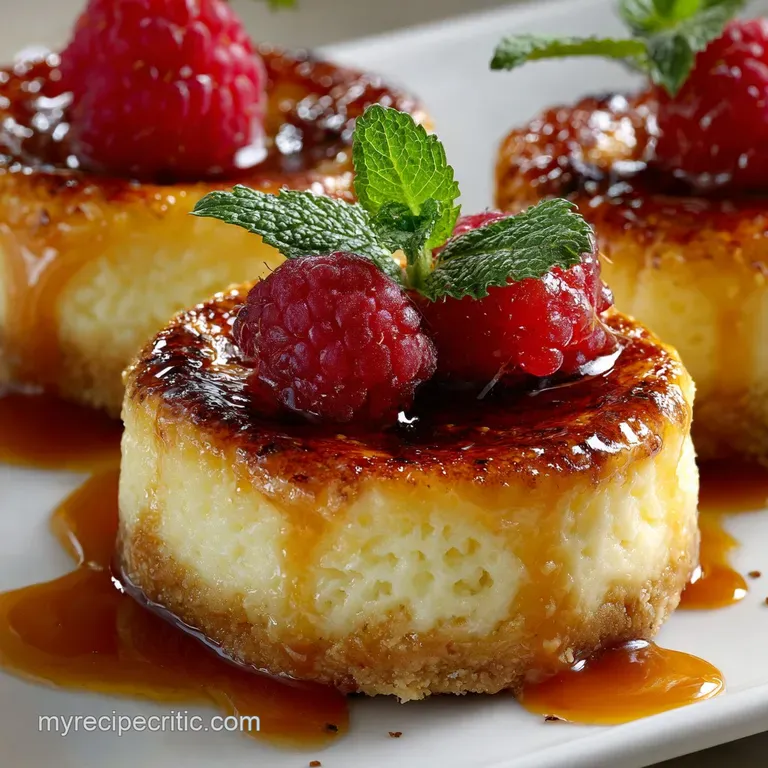
- Berries: A simple garnish of raspberries or sliced strawberries adds vital acidity and colour.
- A Coffee Finish: Serve with small espresso shots or a robust, dark roast coffee. The bitterness is a perfect counterpoint to the caramelized sweetness.
- Wine Pairing: Look for something fizzy and crisp, like a Cava or dry Prosecco. Alternatively, a sweeter dessert wine like a late harvest Riesling works beautifully.

Recipe FAQs
Is a kitchen torch mandatory for the caramelized topping?
Yes, a kitchen torch is essential for achieving the signature hard, glassy crust of a true crème brûlée without ruining the creamy filling. Attempting to caramelize the sugar under a broiler is highly discouraged, as the heat will melt the delicate cheesecake filling long before the sugar reaches the proper temperature.
How is this recipe different from a standard Crème Brûlée or a regular Cheesecake?
This dessert is a hybrid: it utilizes a dense, baked cream cheese filling characteristic of a cheesecake, instead of the traditional egg-custard base of a classic crème brûlée.
The only true brûlée element is the top layer of perfectly torched sugar, which provides the contrasting texture necessary for the full experience. It offers a more structured and decadent filling than a standard custard.
Can I prepare the “no-bake” crème brûlée mini cheesecakes version instead?
While standard cheesecakes can often be made no-bake, the rich, dense filling required for these individual mini cheesecakes benefits greatly from being baked and cooled slowly. A no-bake version would require robust stabilization (like gelatin) and would likely lack the signature creamy texture achieved by precise baking.
My cheesecake filling cracked during baking. How can I prevent this next time?
Cracking usually results from overbaking or rapid temperature changes after the cakes are done. To prevent this, ensure you do not open the oven door while baking, and always allow the mini cheesecakes to cool down completely inside the turned off oven with the door slightly ajar before moving them to the refrigerator.
How far in advance can I make these, and should I store them with the sugar crust applied?
You can bake and chill the mini cheesecakes up to 3 days in advance, storing them tightly covered in the refrigerator. The caramelized sugar crust must be applied and torched immediately before serving, as moisture from the fridge will quickly dissolve the sugar, eliminating the iconic crunch.
What is the best type of sugar to use for the perfect torching experience?
While fine granulated white sugar works, turbinado sugar or superfine caster sugar yields the best results. These sugars melt quickly and evenly under the torch, helping to achieve a thin, glossy, and beautifully uniform crackable crust without overheating the delicate filling below.
Are these the same Mini Crème Brûlée cheesecakes occasionally sold at Costco?
No, this recipe is designed for an artisanal, homemade result focusing on maximum flavor and high-quality vanilla and cream cheese. Homemade versions typically use fewer preservatives and deliver a far creamier texture and fresher taste compared to mass produced, pre-packaged desserts found in large retailers.
Creme Brulee Mini Cheesecakes Recipe

Ingredients:
Instructions:
Nutrition Facts:
| Calories | 331 kcal |
|---|---|
| Protein | 4.0 g |
| Fat | 23.0 g |
| Carbs | 29.0 g |
