The Classic Chicken Parmigiana Crispy Cutlets Gooey Cheese
- Elevating the Beloved: The Ultimate Homemade Chicken Parmesan
- Assembling Your Arsenal: Essential Ingredients and Prep Tips
- Executing the Perfect Crust: From Breading Bowls to Hot Oil
- The Oven Finish: Melting the Mozzarella Masterpiece
- Troubleshooting and Next-Level Enhancements
- Adaptations for Dietary Needs and Time Saving
- Recipe FAQs
- 📝 Recipe Card
Elevating the Beloved: The Ultimate Homemade Chicken Parmesan
The beauty of a classic like Chicken Parmesan lies in its balance: the intense crunch of the exterior giving way to juicy, tender chicken, all smothered in bright tomato sauce and luscious, melted cheese.
While Chicken Parmesan is a mainstay on nearly every Italian American menu, nothing beats the deeply satisfying experience of crafting the Best Chicken Parmesan in your own kitchen.
This detailed guide focuses on technique, ensuring your final product is perfectly textured, deeply flavorful, and far superior to any restaurant version.
A Quick History of Italy's Most Famous Immigrant Dish
While many credit Italian American immigrants for this iconic dish, its roots lie in Southern Italy, specifically the Parmigiana di Melanzane (Eggplant Parmesan). When Italian cooks arrived in the US, the more accessible and affordable chicken breast often replaced the eggplant, giving rise to the now-ubiquitous Chicken Parmesan.
This dish is less a strict historical recipe and more a delicious evolution, marrying Northern and Southern Italian influences (like the use of specific cheeses and slow simmered marinara) into a hearty, comforting staple.
The Crucial Role of Pounding the Cutlets Thin
To achieve that wonderfully tender interior and ensure a quick, even cooking time, preparing the chicken breast properly is non-negotiable. We begin with two large chicken breasts, which are horizontally sliced to yield four thinner cutlets.
Using a meat pounder (or the base of a heavy skillet), gently pound these cutlets between two sheets of plastic wrap until they are uniformly about 1/2 inch (1.25 cm) thick. This crucial step not only tenderizes the meat but guarantees the cutlets cook through simultaneously with the breading achieving a deep, golden color.
Avoiding the Soggy Pitfall: Prepping for Maximum Crunch
The greatest culinary tragedy of this dish is a soggy crust. To ensure you end up with true Crispy Chicken Parmesan , we rely on Panko breadcrumbs (1 cup of Panko mixed with 1/2 cup of finely grated Parmigiano Reggiano).
Panko's flakier texture provides superior crunch compared to traditional breadcrumbs. On top of that,, after coating the four cutlets, placing them on a wire rack and chilling them in the freezer for about 10 minutes helps the breading adhere firmly.
This ensures the coating doesn't separate or steam off during the frying process.
Assembling Your Arsenal: Essential Ingredients and Prep Tips
Successful execution begins with quality components and a streamlined preparation process. For this Homemade Chicken Parmesan Recipe , we focus on maximizing flavor and minimizing the mess.
From Pantry to Plate: Choosing the Right Tomato Sauce
While the breading is the star, the sauce provides the crucial moisture and tang. You'll need about 2 cups of high-quality marinara. Since this dish relies heavily on its underlying tomato flavor, skip thin, watery sauces.
Opt for a hearty, robust store-bought marinara, or better yet, make a quick sauce using crushed San Marzano tomatoes, seasoned simply with garlic and basil. Crucially, the sauce should be warmed gently before assembly; placing cold sauce on hot cutlets creates steam, which is another fast track to sogginess.
The Best Cheeses for the Ultimate Meltdown Factor
A phenomenal cheese pull requires a dual approach. We use 6 oz of fresh, high moisture mozzarella, sliced 1/4 inch thick, for that classic stretchy, gooey texture. However, fresh mozzarella can release a lot of water.
To balance this, we also incorporate 1/2 cup of shredded low-moisture mozzarella, which melts beautifully and offers better coverage and structure. Finally, blending 1/2 cup of high-quality, finely grated Parmigiano Reggiano directly into the Panko mixture imbues the crust with a nutty, salty depth that is indispensable to this dish.
Setting Up Your Breading Station for Efficiency
Efficiency is key when dealing with wet and dry ingredients. Set up three shallow dishes in an assembly line: The first holds 1/4 cup of all-purpose flour, seasoned with salt and pepper. The second contains 2 large eggs whisked with a tablespoon of water or milk for the binding agent.
The final dish contains the Panko, Parmesan, dried oregano, and garlic powder mixture. By employing the "dry hand/wet hand" method using one hand exclusively for the flour and Panko, and the other for the egg wash you keep your station clean and prevent the dreaded gummy buildup on your fingers.
Executing the Perfect Crust: From Breading Bowls to Hot Oil

Once your cutlets are prepped and your station is ready, the next stage is all about control: achieving that perfect golden crust before transferring the masterpiece to the oven.
Uniform Thickness: Preparing the Chicken Cutlets
The four cutlets, now uniformly 1/2 inch thick and seasoned generously with kosher salt and freshly ground black pepper (about 1 tsp salt and 1/2 tsp pepper combined), are perfectly primed to receive their coating.
Their uniform thickness guarantees that no part of the chicken is undercooked while the thicker parts burn.
Maximizing Adhesion: The Triple Dip Breading Method
The breading process must be deliberate. Each seasoned cutlet is first completely dredged in the seasoned flour, shaking off all excess. Next, it moves to the egg wash. Finally, and most importantly, it must be pressed firmly into the Panko/Parmesan mixture.
Do not merely lay the cutlet into the Panko; press down firmly to embed the crumbs deeply. This Simple Chicken Parmesan Recipe technique is fundamental to achieving maximum crunch.
Watch the Sizzle: Frying Until Perfectly Golden
We require about 3/4 cup of neutral frying oil (such as canola or vegetable oil) heated to a precise 350°F (175°C) in a heavy bottomed skillet. An instant read thermometer is helpful here to maintain the temperature; if the oil is too cool, the crust absorbs oil and becomes greasy; if too hot, it burns before the chicken cooks.
Shallow fry two cutlets at a time never overcrowd the pan for about 3– 4 minutes per side, until they are deeply golden brown and the internal temperature registers 165°F (74°C). Immediately transfer the fried cutlets to a wire rack to drain excess oil.
Related Recipes Worth Trying
- Foolproof Creamy Chicken Alfredo Velvety Sauce in 40 Minutes — Stop buying jars Learn how to make Chicken Alfredo sauce thats truly silky and restaurantquality This Creamy Chicken Alfredo recipe guarantees no grainy...
- Foolproof Chicken Alfredo Recipe Smooth Creamy Parmesan Sauce — Master the perfect Chicken Alfredo pasta recipe in under 45 minutes Our technique guarantees a smooth nevergrainy Creamy Parmesan Sauce and juicy Seared...
- Proper Flaky Mini Chicken Pot Pies Muffin Tin Method — These individual Mini Chicken Pot Pies are the ultimate comfort foodrich filling golden flaky crust and perfectly portioned Great Chicken Pot Pie For One
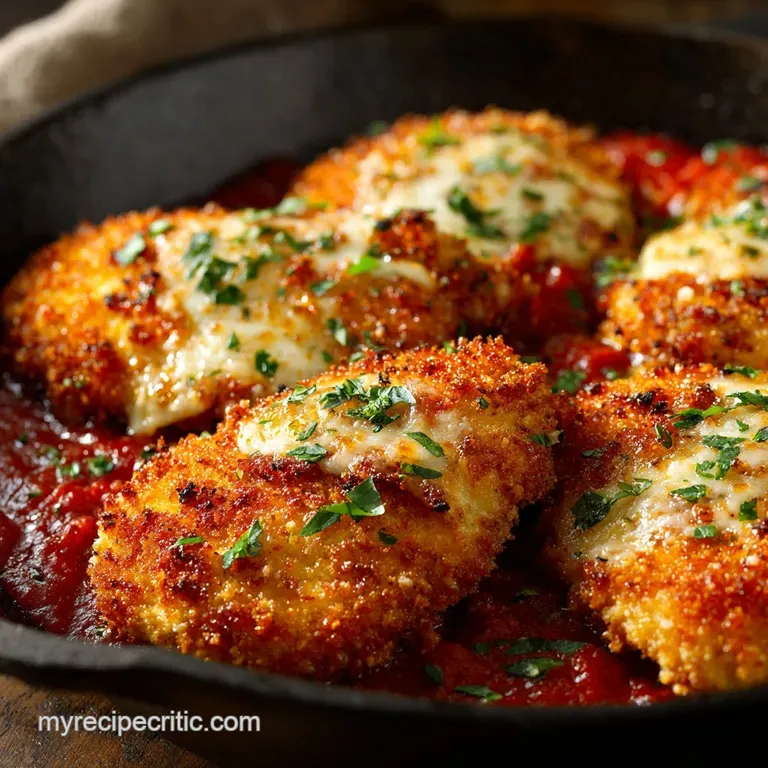
The Oven Finish: Melting the Mozzarella Masterpiece
The final stage is where the individual components marry under heat. Preheat your oven to 400°F (200°C) as the cutlets fry.
Strategic Sauce Placement for Moisture Control
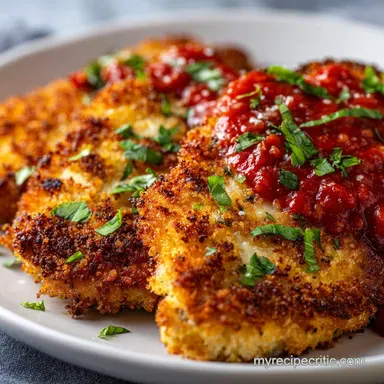
To guarantee those edges remain Crispy Chicken Parmesan , begin by spreading only 1/2 cup of warm marinara sauce across the bottom of the 9x13 inch baking dish. This prevents the underside from drying out. Place the four fried cutlets in the dish.
Then, spoon just 2 3 tablespoons of sauce directly over the center of each cutlet, meticulously avoiding the crunchy perimeter. This moisture control technique is vital for textural success.
Final Assembly: Layering Cheese for the Epic Cheese Pull
Now, it’s time for the cheese. Top the sauced center of each cutlet with slices of the fresh mozzarella, followed by a light sprinkle of the shredded, low-moisture mozzarella for even melting.
Bake the dish in the oven for 10– 12 minutes, or until the cheese is beautifully melted, bubbly, and starting to brown slightly on the edges. Let the dish rest for 5 minutes after removing it from the oven to allow the cheese to settle and solidify slightly before garnishing with fresh basil and serving.
Troubleshooting and Next Level Enhancements
If your crust is falling off, it is almost certainly due to insufficient pressing of the Panko or skipping the chilling step. Always press the Panko vigorously and give the cutlets at least 10 minutes on a wire rack to firm up before they hit the heat.
For next level flavor, remember to always season your flour mixture and your Panko mixture every layer should contribute flavor. Finally, for an extra aromatic pop, always finish your Homemade Chicken Parmesan Recipe with a chiffonade of fresh basil added post bake, ensuring its vibrant aroma is not cooked away.
Adaptations for Dietary Needs and Time Saving
Preventing a Soggy Bottom: Serving Immediately vs. Waiting
Once the cutlets are baked, the residual heat and moisture from the cheese and sauce begin to soften the crust. The best defense against a soggy bottom is to serve immediately after the required 5-minute rest.
If you must wait, keep the cutlets on a wire rack inside a turned off oven (with the door slightly ajar) rather than letting them steam in the baking dish.
make-ahead Prep: Storing Uncooked Breaded Cutlets
This Simple Chicken Parmesan Recipe is perfect for meal prep. Complete Stage 1 (preparing and breading the cutlets). Place the breaded cutlets on a baking sheet lined with parchment paper and flash freeze them for two hours.
Once frozen solid, transfer them to a freezer safe zip-top bag, separated by parchment. They can be shallow fried straight from the freezer (add 1– 2 minutes of cooking time per side) or thawed overnight in the refrigerator.
Going gluten-free: Substitutions That Still Deliver Crunch
Creating a Healthy Chicken Parmesan Recipe that is gluten-free is straightforward. Swap the all-purpose flour for a cup-for-cup gluten-free flour blend. Crucially, replace standard Panko with high-quality gluten-free Panko breadcrumbs.
They retain the essential flakiness needed for the desired crunch, ensuring you don't sacrifice texture for dietary requirements.
Baking vs. Frying: A Healthier But Still Delicious Alternative
While shallow frying yields the ultimate crust, a significantly Healthy Chicken Parmesan Recipe can be achieved using alternative cooking methods. For a fantastic chicken parmesan recipe oven method, skip the oil bath entirely.
Lightly spray the breaded cutlets on both sides with cooking spray or a light olive oil, and bake them directly on a wire rack set over a baking sheet at 425°F (220°C) for about 18 minutes, flipping halfway.
Alternatively, the chicken parmesan recipe air fryer technique works wonderfully; air fry the sprayed cutlets at 375°F (190°C) for 10– 12 minutes until crispy before adding the sauce and cheese for the final oven bake.

Recipe FAQs
Help! My crispy coating goes soggy when I bake it how do I keep that crunch?
Ah, the classic soggy bottom dilemma! The key here is drainage and sauce management. After frying, ensure the cutlets rest on a wire rack not kitchen paper to allow air circulation and prevent steaming.
Crucially, when assembling, only spoon the marinara onto the very centre of the chicken, avoiding the crispy edges, which are your main line of defence against moisture.
I’m trying to cut down on frying. Can I just bake the chicken from start to finish?
Absolutely, old chap! While frying gives you that maximum gold standard crust, you can get a decent result by baking. After breading, mist the cutlets generously with cooking spray or lightly brush with oil, and bake on a wire rack at a high temperature (around 425°F or 220°C) until golden.
This method cuts down on oil absorption dramatically, making it a slightly healthier, albeit slightly less rich, option.
What’s the best way to store and reheat leftover Chicken Parmesan without it turning rubbery?
To preserve the quality, it’s best to store any cooked cutlets separately from the sauce if you have leftovers. When reheating, avoid the microwave at all costs! Preheat your oven or air fryer to 350°F (175°C) and reheat the cutlets uncovered for about 10 15 minutes.
This brings back the crunch and ensures the chicken stays tender and doesn't dry out.
This recipe is gorgeous, but is there a way to make classic Chicken Parmesan a bit healthier?
If you're keeping an eye on calories, swapping the shallow frying for the baking/air frying method mentioned above is the biggest win. You can also lighten the load by using part skim mozzarella instead of fresh buffalo mozzarella, and ensure you use a simple, homemade tomato sauce to avoid hidden sugars and excess sodium often found in shop bought varieties.
It will still be a cracking meal!
Can I prep the breaded chicken ahead of time, or freeze it for later?
Prepping ahead is a doddle! Bread the cutlets completely and keep them tightly covered in the fridge for up to 24 hours this actually helps the coating stick better. For freezing, place the breaded but uncooked cutlets on a baking sheet, freeze until solid, and then transfer to a freezer bag.
They will keep for up to three months; simply fry them directly from frozen, adding a few extra minutes to the cook time.
Classic Crispy Chicken Parmesan Recipe
Ingredients:
Instructions:
Nutrition Facts:
| Calories | 1350 kcal |
|---|---|
| Protein | 42.3 g |
| Fat | 23.5 g |
| Carbs | 96.4 g |
| Fiber | 21.6 g |
| Sodium | 832 mg |
