Ice Box Cake Recipe with Chocolate and Whipped Cream
- Time: Active 15 minutes, Passive 24 hours, Total 24 hours 15 mins
- Flavor/Texture Hook: Shatter crisp chocolate wafers turn into fudgy layers against billowy, cloud like cream
- Perfect for: Summer garden parties, stress free hosting, or beginner bakers wanting a "wow" factor
- Classic Ice Box Cake Recipe with Chocolate and Whipped Cream
- Understanding the Science Behind the Soft Cake Texture
- Essential Ingredients for a Rich and Velvety Finish
- Tools Required to Assemble This Classic No Bake Treat
- Step-By-Step Instructions for Assembling the Perfect Layers
- Troubleshooting Tips for Fixing Common Whipped Cream Problems
- Scaling the Recipe for Large Parties or Small Families
- Debunking Common No Bake Dessert Myths
- Safe Storage Methods and Reducing Kitchen Food Waste
- Unique Serving Suggestions to Impress Your Dinner Guests
- Recipe FAQs
- 📝 Recipe Card
Classic Ice Box Cake Recipe with Chocolate and Whipped Cream
Imagine a dessert that does all the hard work while you sleep. I remember the first time I saw my grandmother stacking plain chocolate cookies with piles of cream, thinking it looked a bit messy.
But the next day, after it sat in the fridge, she sliced into it and revealed these beautiful, zebra striped layers that looked like they came from a high end bakery. Today's recipe features a delicious ice box cake made with chocolate and whipped cream.
The magic here is all about patience. You aren't "cooking" in the traditional sense, but rather allowing a chemical exchange to happen between the dairy and the biscuit. It’s the perfect solution for those days when the house is too hot to even think about turning on the stove.
Honestly, don't even bother with low-fat cream for this, you need the real deal to get that sturdy, sliceable structure we’re after.
We are going to keep things simple and traditional. By using just a handful of high-quality components, we let the dark cocoa and the fresh vanilla bean notes stand out. It’s nostalgic, it’s incredibly creamy, and it will likely become your go to for every potluck on your calendar.
Let’s crack on and see how this works.
Understanding the Science Behind the Soft Cake Texture
The secret to this Ice Box Cake Recipe with Chocolate and Whipped Cream isn't heat, but hydration. When we layer these components, we are initiating a slow motion culinary reaction.
- Moisture Migration: The water content in the whipped cream travels into the dry chocolate wafers, rehydrating the starch. This converts a crunchy biscuit into a soft, sponge like "cake" layer without any baking.
- Fat Stabilization: Cold milk fat in the heavy cream forms a rigid matrix when whipped. This structure supports the weight of the cookies and keeps the cake from collapsing into a puddle.
- Sugar Hygroscopy: The small amount of powdered sugar helps bond the water in the cream. This prevents the cream from weeping (syneresis) over the long 24 hour chilling period.
Chef's Tip: Freeze your KitchenAid mixing bowl and whisk attachment for 10 minutes before you start. Cold equipment keeps the fat globules in the cream from melting, resulting in a much more stable, voluminous foam.
Essential Ingredients for a Rich and Velvety Finish
The quality of your Ice Box Cake Recipe with Chocolate and Whipped Cream depends entirely on the fat content of your dairy. Since there are so few ingredients, each one has to pull its weight.
| Component | Science Role | Pro Secret |
|---|---|---|
| Heavy Whipping Cream | Provides structural fat | Use cream with at least 36% fat for the stiffest peaks. |
| Chocolate Wafers | Absorbs moisture for texture | Use thin, dark wafers like Nabisco Famous Wafers for better layering. |
| Powdered Sugar | Stabilizes the emulsion | Sift it first to avoid tiny lumps in your velvety cream. |
Ingredients List:
- 3 cups cold heavy whipping cream: Why this? High fat content is mandatory for the cake to hold its shape.
- Substitute: Cold coconut cream (full fat) for a dairy-free version, though it adds a tropical nuttiness.
- 1/4 cup powdered sugar: Why this? It dissolves faster than granulated sugar and contains cornstarch for stability.
- Substitute: Equal parts maple syrup, but the cream will be slightly softer.
- 2 tsp vanilla extract: Why this? Adds a floral aroma that cuts through the richness of the fat.
- Substitute: 1 tsp vanilla bean paste for those beautiful black flecks.
- 1 pinch salt: Why this? Sharpens the chocolate flavor and balances the sweetness.
- Substitute: Fine sea salt or pink Himalayan salt.
- 9 oz chocolate wafers: Why this? These specific thin cookies soften perfectly without becoming mushy.
- Substitute: Chocolate graham crackers, though the texture will be slightly grainier.
- 1 oz 70% dark chocolate: Why this? Shaved on top, it provides a bitter contrast to the sweet cream.
- Substitute: A dusting of high-quality Dutch process cocoa powder.
Tools Required to Assemble This Classic No Bake Treat
You don't need an oven, but you do need a few specific items to get those clean, professional layers. I prefer using a stand mixer because it gives you more control over the aeration of the cream.
- KitchenAid Stand Mixer: Using the whisk attachment ensures you get a consistent, airy foam without wearing out your arm.
- Lodge Cast Iron Skillet (optional): If you decide to toast some nuts for a topping, this is the best tool for even browning.
- Offset Spatula: This is non negotiable for spreading the cream smoothly over the fragile wafers without breaking them.
- Large Glass Platter: You want a flat surface so the "log" of cookies doesn't lean or slide as it sets.
- Microplane: Perfect for creating those delicate chocolate shavings that melt on your tongue.
step-by-step Instructions for Assembling the Perfect Layers
Before you begin, ensure your heavy cream is straight from the fridge. Warm cream is the enemy of a successful Ice Box Cake Recipe with Chocolate and Whipped Cream.
Mastering the Whipping Process
- Pour the cream. Place 3 cups cold heavy whipping cream into your chilled KitchenAid bowl.
- Add flavorings. Toss in 1/4 cup powdered sugar, 2 tsp vanilla extract, and 1 pinch salt.
- Whip the mixture. Start on low speed, then increase to medium high. Whip until stiff peaks form.Note: The cream should look thick and hold its shape on the whisk without drooping.
- Check consistency. Stop immediately once the cream looks matte and chunky. If it starts to look yellow or grainy, you've gone too far toward making butter!
Building the Chocolate Foundation
- Start the base. Spread a small dollop of cream on your serving platter to act as "glue" for the cookies.
- Layer the wafers. Spread about 1 tablespoon of cream onto a 9 oz chocolate wafer, then top with another wafer. Repeat until you have a small stack of 5 or 6 cookies.
- Form the log. Lay the stack on its side on the platter. Continue adding cream filled wafers until you have one long, continuous log.
- Cover the exterior. Use your offset spatula to frost the entire log with the remaining whipped cream. Cover every inch of chocolate so the moisture can penetrate from all sides.
- Finish with chocolate. Use a Microplane to grate 1 oz 70% dark chocolate over the top. This adds a beautiful, sophisticated look.
The Critical Chilling Time
- Chill the cake. Place the platter in the fridge for 24 hours. Wait until the wafers are completely soft before attempting to slice. After a heavy lunch of an Air Fryer Hot recipe, this chilled treat is exactly what you'll want.
Troubleshooting Tips for Fixing Common Whipped Cream Problems
Even a Simple Ice Box Cake can go sideways if the dairy doesn't behave. Most issues happen during the whipping or chilling phases.
Fixing Grainy Whipped Cream
If you walked away from the mixer and your cream looks curdled, don't panic. This usually happens because the fat has started to separate. You can often save it by drizzling in a few tablespoons of fresh, liquid heavy cream and folding it in gently by hand with a spatula.
This smoothens out the emulsion and restores that velvety finish.
Handling Sliced Cake Collapse
If the cake falls apart when you cut it, it usually means it didn't chill long enough or the cream was too soft. For the next time, ensure you whip to "stiff peaks" rather than "soft peaks." If you are in a rush and need a savory starter before the dessert, you could whip up a quick Tuna Salad Recipe while you wait for the cake to set.
Troubleshooting Guide:
| Problem | Cause | Fix | Pro Tip |
|---|---|---|---|
| Soggy Bottom | Too much cream at base | Use a thinner "glue" layer | Chill the platter before assembly |
| Hard Cookies | Short chill time | Wait the full 24 hours | Wrap loosely in plastic to trap moisture |
| Cream Weeping | Lack of stabilizer | Add more powdered sugar | Use 1 tsp cream of tartar for extra grip |
Scaling the Recipe for Large Parties or Small Families
This Whipped Cream Ice Box Cake is very forgiving when it comes to size. Because it’s built in a "log" or a stack, you can easily adjust the volume.
- Scaling Down (1/2 size): Use a small loaf pan lined with plastic wrap. Use 1.5 cups cream and 4.5 oz cookies. Reduce the whipping time by about 1 minute as smaller volumes whip faster.
- Scaling Up (2x size): Build two separate logs side-by-side or create a giant rectangular "brick" in a 9x13 dish. Spices/Salt Rule: Only increase the salt and vanilla to 1.5x, as these flavors can become overwhelming in large batches.
- The "Crowd" Method: If you are serving 20+ people, layer the cookies flat in a large glass tray like a lasagna. It’s much faster than building the log.
Debunking Common No Bake Dessert Myths
- Myth 1: You can eat it after 4 hours. The truth is that 4 hours only softens the very edge of the cookie. If you want that true "cake" texture where the fork glides through, you absolutely must wait the full 24 hours.
- Myth 2: Any cookie works. Thin wafers are essential. Thick Oreos or chunky chocolate chips won't absorb the moisture evenly, leaving you with a mouthful of hard biscuit and soft cream.
- Myth 3: High fat cream makes it too heavy. Actually, the air whipped into the fat makes it feel light and airy. Lower fat alternatives often require chemical thickeners that leave a coating on the roof of your mouth.
Safe Storage Methods and Reducing Kitchen Food Waste
Since this is a dairy based dessert, temperature control is your best friend.
Storage and Longevity:Fridge: This Quick Ice Box Cake stays perfect for up to 3 days. After that, the cookies may become overly saturated and lose their distinct layers. Freezer: You can freeze the assembled cake for up to 1 month.
Wrap it tightly in a double layer of plastic wrap. Thaw it in the fridge for 4 hours before serving; it will have a slightly firmer, semi freddo texture.
- Leftover Wafers
- Crush any broken cookies in the bottom of the box and use them as a "dirt" topping for yogurt or ice cream.
- Excess Cream
- If you have leftover whipped cream, dollop it onto a parchment sheet and freeze into small "clouds." Drop these into your morning coffee for a decadent treat.
- Chocolate Scraps
- Save the ends of your chocolate bar for a Caesar Salad Sauce Recipe — wait, no, save them for a different dessert or melt them down for a quick Ganache!
Unique Serving Suggestions to Impress Your Dinner Guests
The beauty of a Chocolate Wafer Ice Box Cake is its simplicity, but a few garnishes can make it look like a masterpiece.
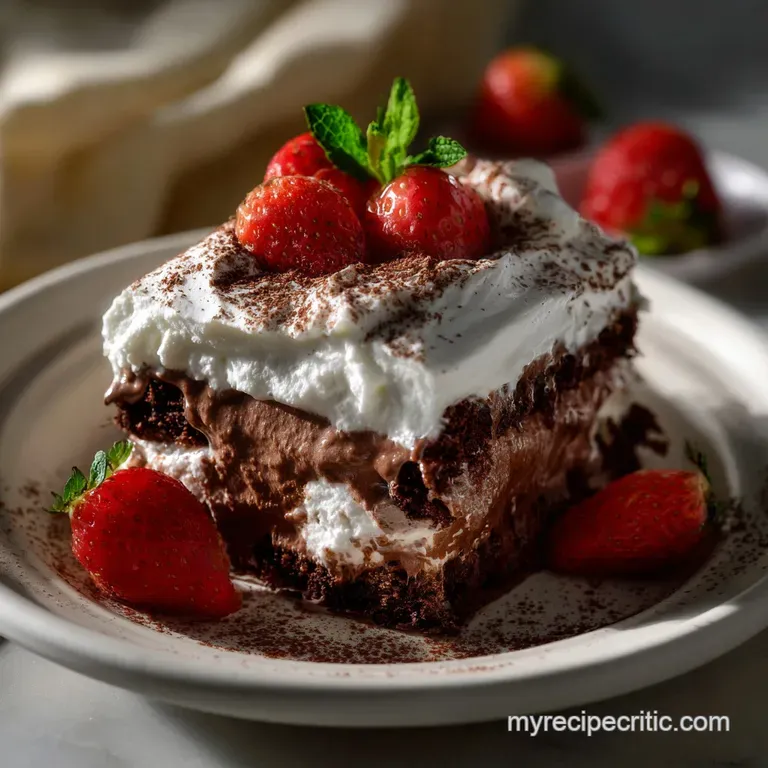
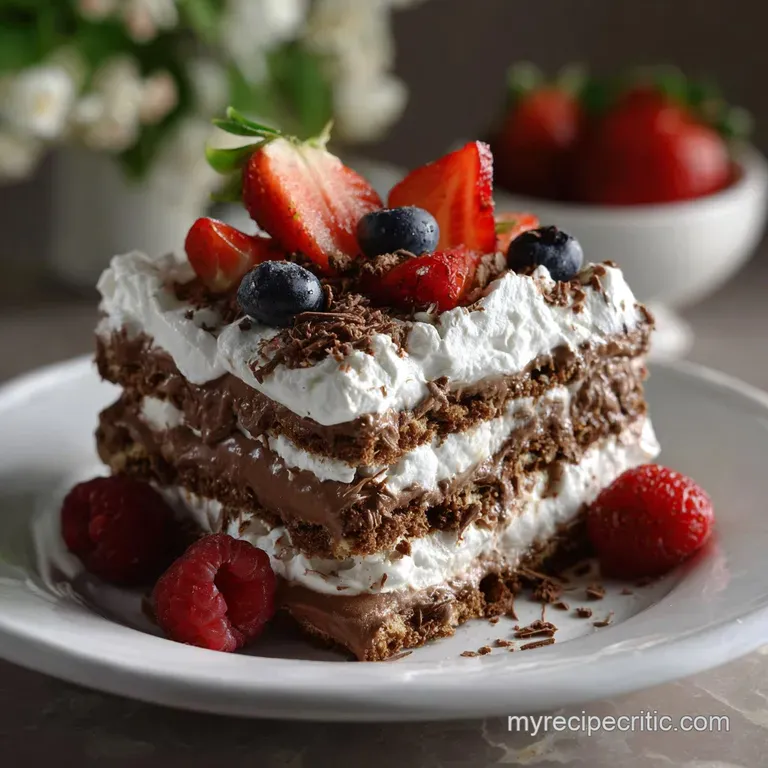
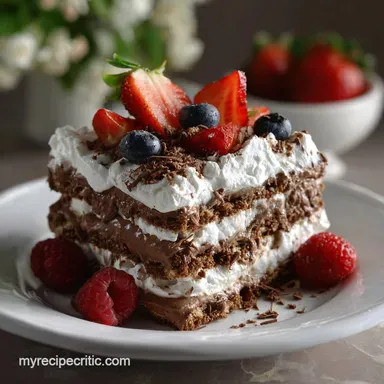
- The Diagonal Cut: Always slice the log on a sharp 45 degree angle. This reveals the beautiful zebra stripes of the cookies and cream, making each plate look architectural.
- Fruit Accents: While the chocolate is rich, a handful of tart raspberries or sliced strawberries on the side provides a necessary acid hit to cleanse the palate.
- Flavor Map List:
- Bittersweet: Dark chocolate shavings.
- Floral: Vanilla bean whipped cream.
- Salty: A tiny hit of sea salt in the cream.
- Creamy: The lush, cold dairy base.
Preparation Comparison:
| Feature | Stovetop Melting | Oven Toasting |
|---|---|---|
| Control | High (Visual) | Low (Timer based) |
| Texture | Silky/Liquid | Crunchy/Dry |
| Risk | Seizing (Water) | Burning (Hot spots) |
Whether you call it a Classic Ice Box Cake or a No Bake Chocolate Cake, the result is the same: pure, unadulterated comfort. It’s a testament to the fact that sometimes, the best things in the kitchen happen when we just step back and let the ingredients behave on their own.
Trust me on this once you see those perfect layers, you'll never want to bake a traditional chocolate cake in the heat of summer again. Right then, let's get that cream whipping!

Recipe FAQs
How long does the ice box cake absolutely need to chill before it's ready to slice?
A full 24 hours is required for the best texture. The cookies need that entire time to fully absorb the moisture from the cream, transforming from crisp wafers into soft, cake like layers.
Can I substitute the chocolate wafers with a different type of cookie?
No, stick to thin wafers for optimal results. Thicker or chunkier cookies will not hydrate evenly, leaving you with dry spots surrounded by soft cream.
What is the secret to getting stiff, stable whipped cream peaks?
Ensure all your equipment is very cold. Chilling your mixing bowl and whisk attachment for 10 minutes beforehand keeps the fat globules from melting, which helps the cream whip faster and hold its sturdy structure.
Can this cake be made ahead of time and frozen?
Yes, freezing is possible for long term storage. Wrap the assembled cake tightly in plastic wrap and freeze for up to a month; let it thaw in the refrigerator for at least four hours before slicing for the best texture.
My cream looked grainy after whipping; can I save it?
Yes, you can usually salvage slightly grainy cream. Drizzle in a few tablespoons of fresh, liquid heavy cream and gently fold it in by hand until the mixture smooths out again.
If I want a brighter flavor profile instead of chocolate, what can I add?
You can introduce a bright, acidic element. If you enjoyed mastering the technique of balancing sweet and tart flavors here, try folding in a tablespoon of homemade lemon curd for a beautiful counterpoint to the rich cream, similar to how we balance acid in our Lemon Curd: The Bright Buttery Classic Recipe.
How do I ensure the layers are visible when I slice the final dessert?
Always slice the log on a sharp diagonal. Cutting at a 45 degree angle reveals the beautiful, wavy zebra stripes of the cream and cookies, making each serving look much more elegant.
Chocolate Whipped Cream Ice Box Cake
Ingredients:
Instructions:
Nutrition Facts:
| Calories | 328 kcal |
|---|---|
| Protein | 2.5g |
| Fat | 26g |
| Carbs | 22g |
| Fiber | 1g |
| Sugar | 12g |
| Sodium | 95mg |
