Chicken and Biscuit Cobbler Recipe
- Time: Active 15 minutes, Passive 45 minutes, Total 1 hour
- Flavor/Texture Hook: Savory, buttery crust with a silky, herb flecked chicken filling
- Perfect for: Stressful weeknights when you need a hug in a bowl
- Mastering the Chicken and Biscuit Cobbler
- Essential Recipe Specs and Times
- Picking Ingredients for Maximum Flavor
- Minimal Tools for Easy Cleanup
- The Step-By-Step Baking Method
- Expert Tips and Common Pitfalls
- Flavor Twists and Ingredient Swaps
- Storage and Reheating Best Practices
- Serving Suggestions and Side Dishes
- Very High in Sodium
- Recipe FAQs
- 📝 Recipe Card
Mastering the Chicken and Biscuit Cobbler
The first time I pulled this dish out of the oven, the sizzle of the butter hitting the glass dish was almost as loud as my kids' cheering. There is something about that specific aroma yeasty biscuit dough mingling with savory thyme and melting cheddar that instantly turns a house into a home.
I remember standing in my kitchen on a particularly gray, rainy Tuesday, staring at a rotisserie chicken and wondering how to make it feel special without spending two hours at the stove. This dish was the answer.
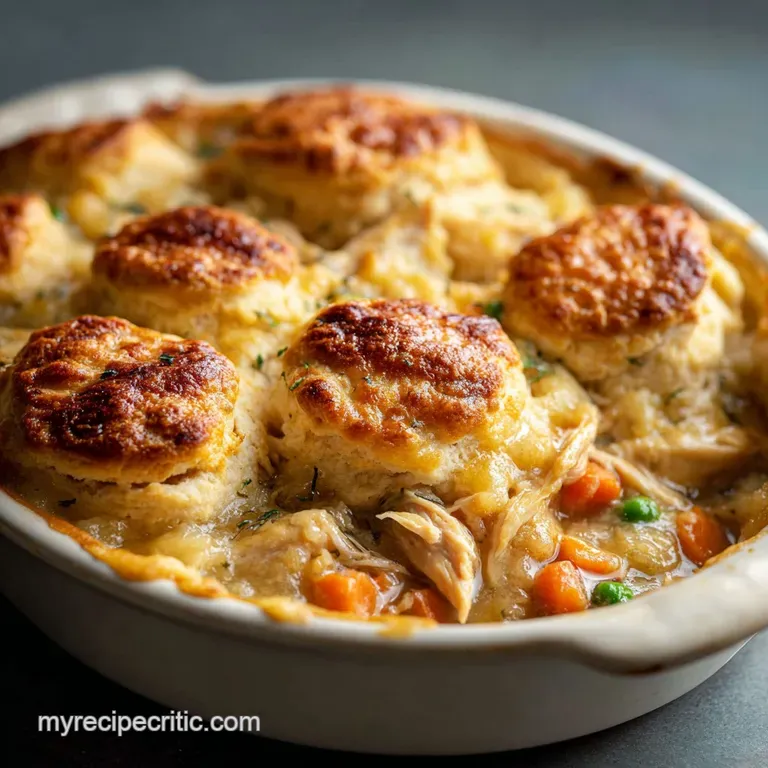
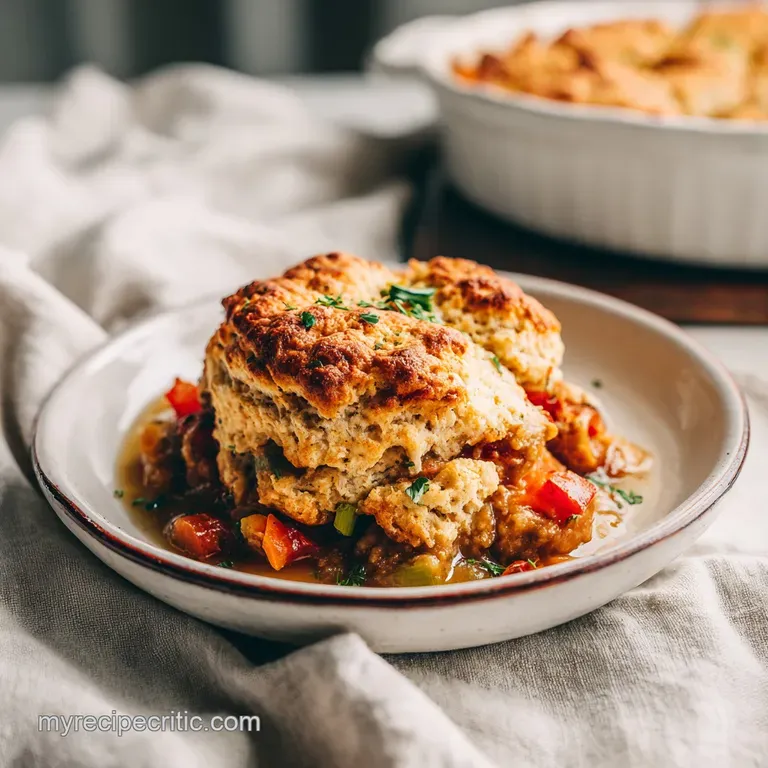
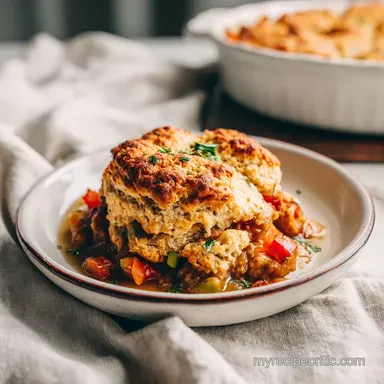
It's not just a meal, it's a bit of kitchen magic. You don't stir it. You just layer it and let the oven do the heavy lifting. I've made the mistake of overthinking it before, trying to whisk everything together, but trust me on this: the beauty is in the "mess." When those layers stay separate, the physics of the bake creates two distinct textures that a standard pot pie just can't touch.
The result is a bottom layer that feels like the richest chicken stew you've ever tasted, while the top becomes a craggy, golden landscape of cheddar infused biscuits. It’s the ultimate comfort food for anyone who loves the flavor of a pot pie but doesn't want to mess with a finicky pie crust.
Right then, let's get into how you can pull this off tonight.
Essential Recipe Specs and Times
Before we get our hands dirty, let's look at the logistics. This is a high yield meal, designed to feed a family of eight without breaking a sweat. It fits perfectly in a standard 9x13-inch baking dish, which is my go to because it maximizes those crispy edges everyone fights over.
The Physics of Thermal Inversion: As the dish heats, the dense milk and biscuit mixture begins to set while the lighter, boiling chicken broth migrates upward through the batter. This movement naturally emulsifies the condensed soup, creating a creamy sauce without any manual whisking.
| Method | Total Time | Texture | Best For |
|---|---|---|---|
| This Cobbler | 1 hour | Fluffy top, creamy base | Busy weeknights |
| Traditional Pot Pie | 2 hours | Flaky, dry crust | Sunday dinner |
| Stovetop Stew | 30 minutes | Liquid only, no crust | Quick lunches |
I usually start my oven preheating to 400°F the second I walk into the kitchen. Since we're using rotisserie chicken and frozen veggies, the prep is mostly just pouring and measuring. If you’re looking for a similar creamy base for other dishes, you might recognize the texture from my Liquid Gold Homemade recipe, which uses similar principles of concentrated flavor.
Picking Ingredients for Maximum Flavor
Success here depends on the quality of your shortcuts. Since we aren't simmering a stock for hours, we rely on the Red Lobster Cheddar Bay Biscuit Mix to bring that punchy, garlic cheese profile. It’s a shortcut I’m never ashamed to take because the seasoning is already dialed in.
For the Savory Base
The foundation starts with 1/2 cup (113g) of unsalted butter melted directly in your pan. Over this, you’ll scatter 3 cups (450g) of shredded rotisserie chicken and 12 oz (340g) of frozen mixed peas, carrots, and corn. Don’t worry about thawing the veggies; they’ll steam perfectly in the oven.
For the Liquid Gold Sauce
The "gravy" comes from a combination of 2 cups (480ml) low sodium chicken broth and 10.5 oz (298g) of canned condensed cream of chicken soup. To keep it from being one note, we add 1 tsp onion powder, 1 tsp dried thyme, 1/2 tsp black pepper, and 1/2 tsp sea salt. This mix ensures every bite has a herbal depth.
The Shattering Biscuit Topping
The star of the show is the batter made from 11 oz (312g) of the biscuit mix and 2 cups (480ml) of whole milk. Using whole milk is non negotiable for me because the fat content is what gives the biscuits that velvety crumb. If you have leftovers from another meal, like some Pulled Chicken in recipe, you can easily swap that in for the rotisserie chicken to give it a smoky vibe.
| Original Ingredient | Substitute | Why It Works |
|---|---|---|
| Whole Milk (2 cups) | Heavy Cream (1 cup) + Water (1 cup) | Maintains fat content for a rich, tender biscuit. |
| Biscuit Mix (11 oz) | Self rising flour + 1/2 cup cheddar | Similar rise. Note: Needs extra garlic powder. |
| Cream of Chicken | Cream of Mushroom | Similar thickness but adds an earthy, umami flavor. |
Using low sodium broth is a smart move here because the biscuit mix and the condensed soup already carry quite a bit of salt. It gives you more control over the final seasoning so you don't end up with a salt bomb.
Minimal Tools for Easy Cleanup
One of the reasons this recipe lives on my "busy night" rotation is that it barely uses any equipment. You don't need a stand mixer or even a rolling pin. We are going for a rustic, home cooked feel that doesn't require a culinary degree to master.
- 9x13 Baking Dish: Glass or ceramic works best for even heat distribution.
- Large Mixing Bowl: For whisking the biscuit mix and milk together.
- Whisk: To ensure the batter is smooth and lump free.
- Measuring Cups: Accuracy is key for the 2 cups of milk and 2 cups of broth.
- Silicone Spatula: Great for scraping every last drop of batter out of the bowl.
Chef's Tip: Grate a little extra fresh sharp cheddar over the top of the biscuit layer five minutes before the timer goes off. It creates a lacy, crispy cheese skirt around the edges of the dish.
Since we are keeping the tools minimal, the order of operations matters. I always melt the butter in the microwave inside the baking dish first. It saves me from washing an extra bowl and ensures the bottom of the pan is perfectly greased for those crispy chicken bits.
The step-by-step Baking Method
The "no stir" rule is the most important part of this process. If you stir the layers, you’ll end up with a muddy, thick paste instead of a beautiful cobbler. Follow these steps exactly to get that professional looking separation.
1. The Foundation Phase
Place your 1/2 cup of butter in the 9x13 dish and melt it. Once melted and sizzling, scatter the 3 cups of shredded chicken evenly over the bottom. Pour the 12 oz of frozen mixed vegetables directly over the chicken. Do not stir.
2. The Topping Application
In a bowl, whisk together the 11 oz of biscuit mix and 2 cups of whole milk. Pour this mixture slowly over the chicken and vegetables. Again, resist the urge to stir! The batter needs to sit on top of the protein.
3. The Liquid Infusion
In the same bowl (save on dishes!), whisk the 2 cups of chicken broth, 10.5 oz cream of chicken soup, onion powder, thyme, salt, and pepper. Pour this liquid very gently over the biscuit batter. Note: This looks like a lot of liquid, but the biscuit mix will absorb a large portion of it while baking.
4. The Golden Finish
Slide the dish into your 400°F oven. Bake for 45 minutes until the top is deeply golden and the gravy is bubbling vigorously.
If you notice the top browning too fast, you can tent it loosely with foil, but I find the 45 minute mark is usually the sweet spot for a firm bake.
Expert Tips and Common Pitfalls
Even with a simple recipe, things can go sideways if you're not careful. The most common complaint is a "soggy" middle. This usually happens because the oven temperature wasn't consistent or the milk was ice cold, which slows down the rising process of the biscuits.
Fixing Soggy Texture Issues
If you pull the cobbler out and the center feels too soft, it’s likely because the liquid didn't reach a full boil to activate the thickeners in the soup. Always check that the edges are bubbling before you call it done. If you've had success with a traditional Chicken Pot Pie recipe, you'll know that the bubbling "lava" look is the sign of a finished sauce.
| Problem | Root Cause | Solution |
|---|---|---|
| Biscuits are flat | Expired mix or cold milk | Check dates and use room temp milk for better lift. |
| Too salty | Full sodium broth used | Switch to low sodium broth or skip the sea salt. |
| Liquid at bottom | Underbaked center | Bake for 5-10 mins longer; ensure oven is at 400°F. |
Avoid the Salt Trap
Between the canned soup and the seasoned biscuit mix, there is already a lot of sodium. I always taste my chicken broth first. If it's already very salty, I cut the added sea salt back to a tiny pinch.
It’s much easier to add a sprinkle of salt at the table than it is to fix a dish that makes you reach for a gallon of water.
Common Mistakes Checklist:
- ✓ Never stir the layers once they are in the pan (this ruins the texture).
- ✓ Use a glass dish if possible to monitor the browning of the bottom.
- ✓ Ensure your oven is fully preheated before the dish goes in.
- ✓ Don't use "light" or skim milk; the biscuits need the fat for structure.
- ✓ Let the dish rest for 5-10 minutes before serving to let the sauce set.
Flavor Twists and Ingredient Swaps
Once you’ve mastered the basic version, you can start playing with the profile. This recipe is incredibly forgiving. If you don't have the Red Lobster mix, any high-quality "just add water/milk" biscuit mix will work, though you might want to add 1/2 cup of shredded cheddar and a dash of garlic powder to mimic that specific flavor.
The Southwestern Twist
Swap the mixed veggies for a can of drained black beans and corn. Add a teaspoon of cumin and some chopped green chiles to the broth mixture. Top the finished cobbler with fresh cilantro and a squeeze of lime for a completely different vibe that still feels like comfort food.
Decision Shortcut: Choosing Your Style
- If you want extra crispy edges, use a metal baking pan instead of glass.
- If you want a thicker gravy, whisk 1 tablespoon of cornstarch into the broth before pouring.
- If you want a lighter meal, use frozen broccoli and cauliflower instead of the pea/carrot mix.
For a smaller family, you can easily halve this recipe. Use an 8x8-inch pan and reduce the bake time by about 10 minutes. However, I usually recommend making the full batch because the leftovers are arguably better the next day once the flavors have had time to fully marry.
Storage and Reheating Best Practices
This cobbler keeps surprisingly well. Store any leftovers in an airtight container in the fridge for up to 3 days. The biscuit topping will soften slightly as it sits in the sauce, but the flavor remains top notch.
Reheating: Avoid the microwave if you can. It tends to make the biscuits rubbery. Instead, put a portion in a small oven safe dish, cover with foil, and heat at 350°F for 15 minutes. This helps the crust regain some of its original texture.
Freezing: You can freeze the baked cobbler for up to 2 months. Thaw it overnight in the fridge before reheating. I don't recommend freezing it unbaked, as the biscuit batter won't rise correctly after being frozen in the liquid.
Zero Waste Tip: If you have leftover scraps of rotisserie chicken that aren't enough for a full serving, throw them into a freezer bag. Once you hit that 3 cup mark, you're ready for another cobbler night! You can also use the leftover carcass to make a quick stock for your next batch.
Serving Suggestions and Side Dishes
Since this is a heavy, "all in-one" meal, I like to serve it with something bright and acidic to cut through the richness of the butter and cream. A simple arugula salad with a lemon vinaigrette is usually my go to. The peppery bite of the greens balances the savory cheddar perfectly.
If you’re serving this for a larger gathering, it pairs beautifully with roasted green beans or a tray of honey glazed carrots. Because it has the bread, protein, and veggies all in one dish, you don't really need much else to make it a complete meal.
Right then, you're ready to tackle the best comfort meal in your repertoire. Just remember: no stirring, plenty of butter, and let those biscuits get nice and golden. Your kitchen is about to smell incredible.
Trust me, once you see those layers bubbling away, you’ll never go back to the frozen pot pie aisle again. Happy baking!

Very High in Sodium
1140 mg mg of sodium per serving (50% % of daily value)
The American Heart Association recommends limiting sodium intake to approximately 2,300mg per day for most adults.
Sodium Reduction Tips for Cheddar Bay Chicken Pot Pie:
-
Broth Swap-30%
Replace the 2 cups of low-sodium chicken broth with unsalted chicken broth or homemade broth. This significantly cuts down on added sodium.
-
Biscuit Mix Tweak-20%
The Red Lobster Cheddar Bay Biscuit Mix is a major sodium contributor. Try using a homemade biscuit recipe with reduced or no salt. Consider adding your own cheddar and seasonings for flavor control. You can reduce sodium levels up to 15% using this tip.
-
Soup Substitute-20%
Canned condensed cream of chicken soup often contains a lot of sodium. Consider making a homemade cream sauce using flour, milk, and seasonings for better control over the sodium content. This can also improve the flavor profile.
-
Salt Reduction-15%
Reduce the amount of sea salt added to the recipe by half or eliminate it altogether. Taste as you go and only add salt if absolutely necessary.
-
Chicken Choice-15%
Rotisserie chicken can be high in sodium. Shred your own unsalted cooked chicken breast or thigh meat instead. This eliminates a significant amount of added sodium.
-
Spice it Up!
Experiment with fresh herbs and spices such as garlic powder, paprika, oregano, or fresh parsley to enhance the flavor of the pot pie without adding extra sodium. These additions may also lessen your perception of the need for salt.
Recipe FAQs
Can I substitute canned biscuits for the dry mix and milk?
No, this will result in a poor texture. The recipe relies on the dry biscuit mix absorbing the liquid from the bottom layer to steam and bake into a fluffy cobbler topping.
How to prevent the bottom chicken and gravy from being too watery?
Bake at the full 400°F until vigorous bubbling occurs. The high initial heat activates the thickening agents in the condensed soup and allows the biscuit batter to absorb excess moisture before the filling completely sets.
What is the most crucial step to achieve the two distinct layers?
Do not stir the ingredients after layering them in the dish. The integrity of the layers batter sitting on top of the broth is what creates the creamy bottom and fluffy top; mastering this is similar to mastering the layering of flavors in our Chicken Gyros Recipe.
Is it true that using skim milk instead of whole milk works fine?
False. Skim milk lacks the necessary fat content to give the biscuit topping the rich, velvety crumb this dish requires.
How can I make this cobbler spicier or more savory?
Whisk in 1/2 teaspoon of cayenne pepper and 1/2 teaspoon of dry mustard powder into the broth mixture. For a deeper savory note, try substituting the cream of chicken soup with cream of mushroom, similar to the technique used for achieving deep umami in a rich sauce.
How long should the cobbler rest after removing it from the oven?
Yes, let it rest for 10 minutes minimum. This short resting period allows the thick sauce to fully set up, preventing it from running all over the plate when you serve it.
Can I make this ahead of time and freeze it for later?
You can freeze the finished, baked cobbler successfully. Thaw it in the refrigerator overnight, then reheat covered in the oven at 350°F until hot throughout to best revitalize the texture.
Chicken Biscuit Cobbler Recipe
Ingredients:
Instructions:
Nutrition Facts:
| Calories | 448 kcal |
|---|---|
| Protein | 21.5 g |
| Fat | 25.2 g |
| Carbs | 33.8 g |
| Fiber | 2.4 g |
| Sugar | 5.6 g |
| Sodium | 1140 mg |
