Blooming Marvelous Airdry Clay Garden Markers
Recipe Introduction
Quick Hook
Ever wondered how to keep track of all your veggie seedlings? These air dry clay garden markers are the answer.
They're a super fun, personalized way to brighten up your garden. Plus, they are much better than those plastic sticks that snap in two seconds!
Brief Overview
These adorable clay garden markers diy hark back to old-school gardening, when everything was handmade. They're easy to make in an afternoon.
The drying time is the real commitment. Aim for a yield of about 6-8 markers. Perfect for labelling all your lovely plants.
Main Benefits
Honestly, the biggest benefit is the sheer joy of making something beautiful with your hands. Besides the crafting experience, these homemade plant labels add a personal, handmade touch to your garden.
They also remind you what you have planted. These make great gifts, too.
Let's dive into the materials you will need, shall we?
Blooming Marvelous: Air-Dry Clay Garden Markers
We're channeling our inner Kirsty Allsopp here. We're getting crafty with these air dry clay garden markers . Perfect for adding a bit of fun and personality to your little patch.
They make your herbs and veggies easy to identify too.
Making these clay plant labels is super easy. You don't need to be Picasso. Trust me, if I can do it, anyone can.
Seriously, rolling out clay is about the height of my artistic ability.
Ready to get your hands dirty (well, clay-y)?
Gather Your Supplies
You'll need 500g of air-dry clay . Brands like DAS or Crayola are perfect. You also need acrylic paint in all the colours of the rainbow.
A waterproof sealer will protect your masterpieces from the elements. Don't forget a rolling pin, cookie cutters (for fancy shapes), and some tools for writing on the clay.
All the best garden marker ideas use all kinds of decorations!
step-by-step Guide to Crafting Your Garden Markers
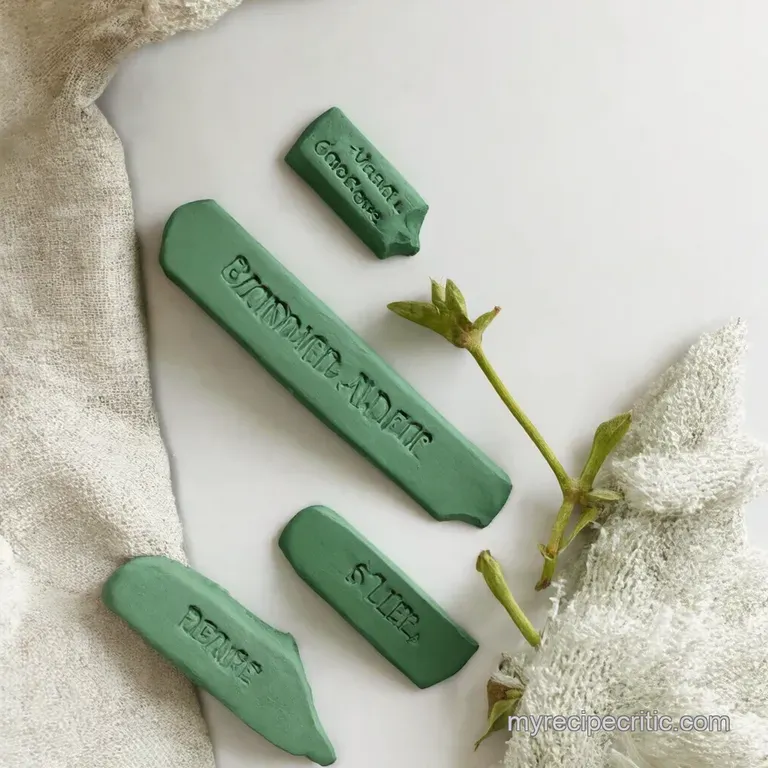
First, knead that clay like you're trying to relieve some stress. Then, roll it out to about 1/4 inch thick .
Use cookie cutters for shapes. Or just go freehand. Write your plant names with a tool or acrylic pen. Leave them to dry for 24- 72 hours .
Finally, paint, seal, and plant! Don't rush the drying. Cracking is a sad business.
Tips and Tricks for Garden Marker Glory
Kneading properly will prevent cracking. Turn the markers while drying for evenness. Sealing is key for weather resistance. Think about your plant names so they fit! Don't be afraid to experiment with glitter or embed seashells.
The sky is the limit! Create your own personalized plant markers. These are a great example of air dry clay crafts garden .
So, there you have it. Your guide to creating your very own easy garden markers ! Time to get crafting and give your garden that handcrafted garden markers touch!
Ingredients & Equipment: Get Your Craft On!
Alright, let's gather our goodies! This ain't rocket science. We are making air dry clay garden markers ! Think "Blue Peter" but for your garden.
Main Ingredients
- 500g (1.1 lbs) Air-Dry Clay. Brands like DAS are great! Quality clay is smooth, no cracks.
- Acrylic Paint: Get a rainbow of colours! Cheap and cheerful is fine.
- Water based varnish or sealer: Protect your creations!
Seasoning Notes
We're not baking, but think of these as flavour enhancers.
- Essential combo: Dark green and white. Perfect for classic plant markers!
- Flavour enhancers: Glitter (because why not?). Small shells add texture.
- Quick sub: Permanent markers work instead of paint. Make sure they're waterproof!
My auntie Mavis always said, "A little sparkle never hurt nobody!". I reckon she'd love these clay garden markers diy .
Equipment Needed
Keep it simple. No need for fancy gadgets.
- Rolling pin: Get that clay flat! Or a wine bottle. Honestly, whatever works.
- Cookie cutters: For fun shapes! Or a butter knife.
- Baking sheet: For drying. Any old tray will do.
- Homemade plant labels are as simple as that!
Honestly? I once tried using wallpaper paste instead of varnish. Big mistake! Everything went sticky. Learn from my pain. These garden marker ideas will make your garden pop.
These diy garden labels will brighten up even a dull day! The beauty of crafting is how you can create wonderfully personalized plant markers to make your garden unique.
These air dry clay crafts garden markers are not just for show either. The whole point is they need to do their job! It's amazing how using easy garden markers and handcrafted garden markers can transform a space.
Even simple clay plant labels will add a sense of creativity. Let's get stuck in and make some!
Blooming Marvelous: Crafting Your Own Air Dry Clay Garden Markers
Honestly, I've always loved the idea of a perfectly organised garden, you know? Like something straight out of "The Good Life," but my handwriting is atrocious! That's where air dry clay garden markers come in.
They're cute, practical, and a total craft therapy session rolled into one. Forget about boring plastic labels let's get creative with some clay plant labels !
Prep Steps: Getting Our Ducks in a Row
First things first, mise en place, darling! It's just a fancy term for getting your stuff together. Grab your air dry clay , paints, and tools.
Cover your workspace trust me, cleaning up dried clay is nobody's idea of fun. And just a heads-up: Always supervise little ones when they're crafting, yeah? Safety first!
step-by-step: From Blob to Blooming Beautiful
- Give your air dry clay a good kneading. This gets rid of any air bubbles that make it less pliable.
- Roll out the clay to about ¼ inch thick. Not too thick, or they'll take ages to dry!
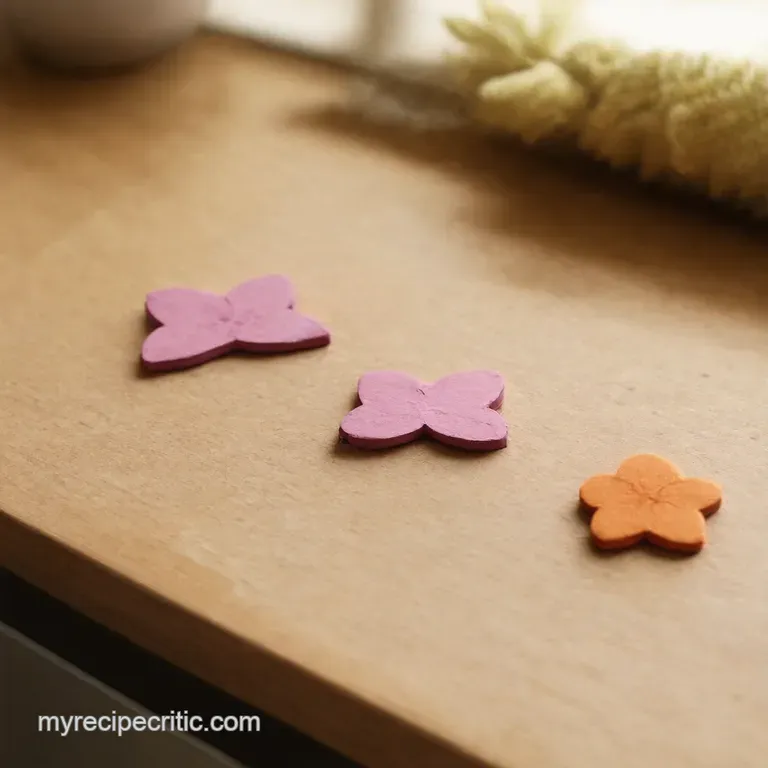
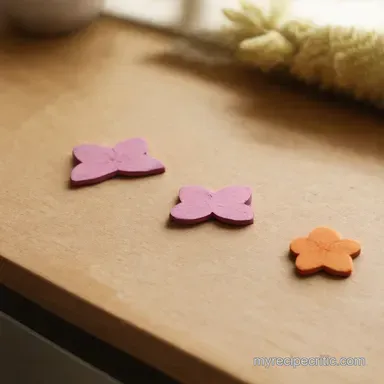
- Cut out your shapes. I'm using a heart shaped cookie cutter for my tomatoes.
- Write the plant names with a pointy tool. Or use some acrylic paint pens for extra flair, I am just the type for that!
- Poke a hole at the top if you want to hang them.
- Let them air dry completely. This can take 24- 72 hours , so patience is key!
Pro Tips: Level Up Your Clay Game
Here's a little secret. Don't be afraid to get messy! If you mess up a letter, just squish it and start again.
Nobody's perfect. Another thing I've learned over the years, apply a waterproof sealer once the paint is dry. This is essential for keeping your garden marker ideas looking tip-top, even when it rains.
Also, consider the length of the plant names when designing your markers. No point in a marker that says "R.
.." for Radish.
These air dry clay crafts garden are a sweet way to jazz up any garden. Plus, making these homemade plant labels is a mindful activity a welcome break from all the madness.
So, go on, give it a go! And remember, even if they're not perfect, they're made with love. You will have the personalized plant markers you have always wanted.
Recipe Notes
So, you're ready to get your hands dirty literally! Making air dry clay garden markers is dead easy, but here are a few extra things I've learned from making these myself.
Consider it the "behind the scenes" of plant labelling!
Serving Suggestions: Presentation is Key!
Think about how you want to show off your creation, these clay plant labels! Plating, in this case, is all about positioning.
I like to stick my clay garden markers diy right next to the plant they're labelling. Gives a proper "this is what you're getting" vibe.
For sides, a nice mug of tea while you admire your handiwork is essential! Or perhaps a cool glass of elderflower cordial.
Storage Tips: They Live Outside, Duh!
Refrigeration? Freezing? You’re avin’ a laugh! Seriously though, these are meant for the garden. Just make sure they're properly sealed! Reheating isn't needed unless you are going to make a diy garden labels pizza with them.
A good waterproof varnish is essential for weather protection. I learnt that the hard way! Trust me, a soggy clay mess isn’t a good look.
Variations: Get Creative!
Want to mix things up? Go wild!. For a seasonal ingredient swaps , Use autumn leaves to texture the clay in fall.
Super cute. And don't worry to create a personalized plant markers , just using any shapes you like
For dietary adaptations, well, they're not edible, so no worries there. But you could use non-toxic paints if you're concerned about little hands getting involved.
Nutrition Basics: Food for the Soul
Okay, these aren’t exactly packed with vitamins. But crafting is totally good for your mental health. It's a relaxing way to unwind.
It is a fantastic air dry clay crafts garden therapy. Plus, knowing where you planted your herbs is super helpful! Think of garden marker ideas as cognitive fuel for your gardening brain.
So, there you have it! All the extra bits to make your homemade plant labels truly shine. Give these easy garden markers a go! Have fun, get creative, and don't be afraid to experiment.
Even if it looks a bit wonky, it's made with love, innit. Now, go get those hands dirty with your handcrafted garden markers !

Frequently Asked Questions
Help! My air dry clay garden markers are cracking! What did I do wrong?
Cracking is usually down to the clay drying too quickly or not being kneaded enough. Make sure you knead the air dry clay really well before rolling it out, almost like you're making bread. Also, try drying them in a slightly cooler, less drafty spot and turning them regularly.
Think of it like proofing dough - slow and steady wins the race!
How do I make my air dry clay garden markers waterproof so they don't dissolve in the rain?
Waterproofing is key unless you want muddy mush! After your markers are completely dry and decorated, apply several coats of a good quality waterproof varnish or sealer. Make sure to let each coat dry fully before applying the next.
Consider it the equivalent of a good wax jacket for your markers they need to be prepared for a bit of drizzle!
Can I use regular paint instead of acrylic paint on my air dry clay garden markers?
While you can technically use other types of paint, acrylic is definitely the best bet for air dry clay. It adheres well, dries quickly, and is relatively water resistant, especially once sealed. Other paints might not stick as well or could run if they get wet.
It’s a bit like choosing the right tool for the job; acrylic is the trusty garden trowel in this scenario!
How long do air dry clay garden markers last outside? Will they fade?
With proper sealing, your markers should last for at least a gardening season, maybe even two or three! However, direct sunlight can cause the colors to fade over time. To prolong their life, consider placing them in areas with partial shade or reapplying a fresh coat of sealer each year.
Think of it like sunscreen for your garden markers!
My clay is too sticky, what can I do to make my air dry clay garden markers easier to create?
If the clay is too sticky, you can try letting it sit out for a bit to dry slightly before kneading. Don't leave it out for too long, though, or it will dry out. You could also dust your work surface and rolling pin with a little cornstarch to prevent sticking.
A bit of elbow grease also helps - the more you knead it, the more pliable it should become!
Can I bake my air dry clay garden markers to speed up the drying process?
No, you should not bake air dry clay! As the name suggests, it's designed to dry naturally in the air. Baking it can cause it to crack or even explode. If you're in a hurry, try placing them in a well ventilated area and turning them frequently.
Alternatively, use polymer clay and follow the manufactures instructions to bake them instead.
Blooming Marvelous Airdry Clay Garden Markers
Ingredients:
Instructions:
Nutrition Facts:
| Calories | 0 calories |
|---|---|
| Fat | 0g |
| Fiber | 0g |
