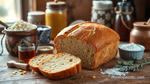
Delicious Squaw Bread Recipe: A Taste of Tradition
Discover a delicious squaw bread recipe with key ingredients, step-by-step instructions, and cultural significance in Native American heritage.
What is Squaw Bread?
Alright, let’s dive into the world of squaw bread! At its core, this bread is a flatbread traditionally made by various Native American tribes. Y’know, it wasn’t just something to munch on—it held cultural significance as well. Rich in flavor and history, squaw bread often features cornmeal and sometimes flour. The textures range from soft and chewy to crispy, depending on how it’s cooked.
Now, if we take a little stroll down history lane, we find that squaw bread has roots in Native American culture. Tribes across the continent embraced corn as a staple. They’d mix the cornmeal with water, and voilà, a nourishing bread was born! Some tribes even used berries or various seeds to spice it up. Quite clever, right? This way, they had a tasty and practical way to utilize their resources.
But how does squaw bread differ from other traditional breads? Let’s think about other breads, like the good ol’ sourdough or even a classic loaf. Those often use yeast, which gives them that nice rise. Squaw bread, though? It usually skips the yeast and relies on the ingredients' natural flavors. This makes it denser but oh-so-satisfying.
In making a squaw bread recipe, you won't need fancy equipment or long waits for dough to rise. Instead, it’s all about quick prep and hearty results. So, gather your cornmeal and some water, and you’re just about ready to join in on this age-old tradition. You see, squaw bread isn’t just about eating; it connects us to a rich tapestry of culture and history.
And let’s not forget—many cultures create their own unique breads based on local ingredients. Squaw bread stands out with its simplicity and connection to the land. So the next time you're about to whip up a traditional bread, think about giving squaw bread a shot. It'll bring a dash of history into your kitchen, plus it’s darn tasty!
Key Ingredients for Squaw Bread
When diving into a squaw bread recipe, the ingredients are where the magic begins. Let’s peel back the layers and see what makes this bread truly special.
First up, we’ve got flour. Most folks lean toward whole wheat or a mix of all-purpose for that hearty texture. Whole wheat gives it that rustic feel, reminiscent of a bakehouse from ages past. Then there’s baking powder—this little guy is the reason your bread rises and doesn’t turn into a doorstop. Without it, we’d be eating dense bricks, and nobody wants that!
Ah, and now we can’t forget about molasses. This golden elixir sweetens the bread and adds a deep, rich flavor. It also brings a touch of nostalgia, harkening back to days when baking meant using what was around. You’ll want to use this in moderation, unless you’re a fan of intense sweetness, which—no judgment—sometimes you need!
Then we’ve got our cornmeal. Here’s where things get interesting. Cornmeal isn't just a supporting player; it’s one of the stars of the show. It gives squaw bread that delightful crumbly texture and a subtle sweetness that keeps you coming back for more. Plus, it adds a touch of color that makes your bread look homemade, not store-bought.
Now, if you’re on the gluten-free bandwagon, fear not! There are solid alternatives you can try. Almond flour or oat flour can replace regular flour in this recipe. Just remember, different flours absorb moisture differently, so you might need to tweak your liquid amounts a bit. Tapioca flour can come in handy if you want that chewy texture, and it's excellent for those who need it gluten-free.
And, let’s not overlook good ol' cornmeal again. It’s naturally gluten-free, so it’s perfect for maintaining that squaw bread soul while keeping it friendly for gluten-free pals. Just be sure to check that your cornmeal is labeled gluten-free—after all, cross-contamination happens more often than you'd think!
In short, whether you’re sticking to tradition or going gluten-free, the ingredients you choose will set the tone for your squaw bread recipe. Mix them with love, and you’re bound to create a loaf that warms the heart and brings folks together—just like good bread should.
Step-by-Step Instructions for Baking
So, you’ve got a hankering for squaw bread? Let’s roll up our sleeves and dive right into this delightful adventure. Trust me, it’s not as daunting as it might seem. In fact, once you get the hang of it, you'll be whipping it up like an old pro. Here's how to get started:
Detailed Preparation Steps for Squaw Bread Recipe
-
Gather Your Ingredients : Grab some whole wheat flour, rye flour, and molasses. Don’t forget the yeast, warm water, and salt! Each ingredient comes together to create magic.
-
Activate the Yeast : In a bowl, mix 1 packet of active dry yeast with 1 cup of warm water (about 110 degrees F) and a pinch of sugar. Let it sit for about 10 minutes. You want those little yeasties to get bubbly and excited.
-
Mix the Dry Ingredients : In a big bowl, whisk together 2 cups of whole wheat flour, 1 cup of rye flour, and a teaspoon of salt. It’s like a puff of earthy goodness!
-
Combine It All : Slowly add the bubbly yeast mix and 1/4 cup of molasses to your dry ingredients. Go ahead and mix until it forms a shaggy dough.
-
Knead Away : Flour your hands and a clean countertop. Turn out the dough and knead it for about 10 minutes. You want it smooth and elastic. If it sticks, sprinkle a bit more flour.
-
First Rise : Put your dough in a greased bowl, cover it with a damp cloth, and let it rise for about an hour. Look for it to double in size. A watched pot never boils, so maybe find a good book or check on your favorite show!
-
Shape the Loaf : Now comes the fun part. Punch down your dough and shape it into a loaf. You can make a round ball or a classic loaf shape.
-
Second Rise : Place the dough onto a greased bread pan. Cover it again and let it rise for another 30-40 minutes. If you’re feeling fancy, you can score the top with a knife for a rustic look.
Baking Time and Temperature for Perfect Results
Preheat your oven to 375 degrees F while waiting for that second rise. Once it’s ready, pop that loaf into the oven. Bake it for about 35 to 40 minutes. You’ll know it’s done when the top is golden brown and when you knock on it, it sounds hollow… just like my buddy Bob’s head!
If you’re not sure, stick a thermometer in the center; it should read 190 degrees F. If you’ve got that golden color and that delightful aroma wafting through your kitchen, you’re right on track!
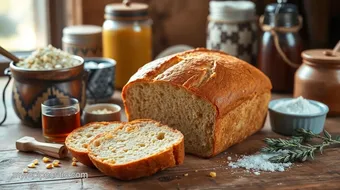
Cooling and Serving Suggestions for Best Flavor
After removing the bread from the oven, let it cool in the pan for about 10 minutes. Then, gently turn it out onto a wire rack. Now, here’s a pro tip: Wait—yes, as painful as it might be—let it cool completely before slicing. This will help set the crumb and let all those lovely flavors unfold.
Once cooled, slice that bread and slather on some butter or homemade jam. It pairs beautifully with hearty stews or simply toasted with a drizzle of honey. You can also make sandwiches that’ll rival your favorite deli. Trust me, this squaw bread recipe is worth every step.
So, there you have it, a straightforward guide to baking squaw bread. Now get to it, and may your kitchen be filled with the enchanted aroma of freshly baked bread!
Tips for Perfecting Your Bread
Making a squaw bread recipe is a delightful journey, but even the best bakers make a few bumps along the way. Let’s dive into some handy tips to help you avoid common pitfalls, achieve that perfect texture, and explore creative twists on this traditional bread.
Common Mistakes to Avoid While Making Squaw Bread
First things first: the dough is your best friend, but it can be a bit moody. One common mistake is overmixing the dough. Trust me, it can lead to a dense loaf that resembles a brick more than bread. Gently mix until your ingredients just come together. Less is more here.
Another rookie error is not measuring your ingredients correctly. A pinch of this and a dash of that might work in some recipes, but with squaw bread, it’s about precision—especially when flour is involved. Use a scale if you can. Oh, and don’t forget about the yeast! Always check that it’s fresh. Expired yeast can leave you with flat bread—yikes!
Lastly, don’t be too hasty when it comes to proofing your dough. Give it time to rise! It’s like waiting for a fine ale to ferment; good things take time. A cozy spot in your kitchen will help your dough get nice and puffy.
Techniques for Achieving the Ideal Texture and Taste
Now that you're avoiding those classic blunders, let’s talk about techniques. You want that perfect balance of crumb and crust. To get there, try using a mix of whole wheat flour and all-purpose flour. This blend gives squaw bread its hearty character without overwhelming bulk.
Don’t skimp on the kneading! This is where you develop gluten, which gives your loaf its lovely structure. A solid 8 to 10 minutes of kneading will work wonders. A tip I found really helps is to stretch the dough; if it doesn’t tear easily, you’re on the right track.
Another little secret? Steam. When you first put the loaf in the oven, toss a few ice cubes in a pan at the bottom. It creates steam, helping a crisp crust while keeping the inside soft and fluffy. It’s kind of like giving your bread a spa day!
Creative Variations and Customizations for Squaw Bread
Feeling adventurous? Squaw bread is like a canvas; you can paint all kinds of flavors on it. For a sweet twist, consider adding honey or molasses to your dough. It not only adds sweetness but also gives a rich color that’s just gorgeous.
Nuts and seeds are another fun addition. Think sunflower seeds or even some chopped pecans for that extra crunch. And if you're a fan of spices, try adding a sprinkle of cinnamon or a dash of nutmeg for a warm flavor that envelops you like a cozy blanket.
You can also play around with the liquids. Swap half of the water for buttermilk or milk to get a softer texture with a bit of tang. The creaminess will surprise you and your tastebuds!
So, there you have it—a guide to mastering your squaw bread recipe! Armed with these tips, you’re ready to bake up something truly special. Happy baking, and remember: the kitchen is a place for experimentation and a bit of fun!
Cultural Significance of Squaw Bread
When you dig into the tasty depths of a squaw bread recipe, you’re not just baking a loaf; you’re stepping into a rich tapestry of history. Squaw bread has roots deeply embedded in Native American culture. It’s more than just a comfort food; it’s a bridge linking generations of indigenous peoples and their way of life.
First off, let’s chat about its role in Native American history. Native tribes across the land relied on locally sourced ingredients. Corn, often ground into meal, formed the base of this beloved bread. Even the name "squaw" has its debates around meaning, but many agree it reflects the nurturing aspect of women in Native communities. They would bake this bread for their families, weaving together the everyday with the sacred. It’s like a hearty slice of life, literally!
Now, let’s pivot a bit. What does squaw bread have to do with us today? For modern cooks, whipping up a squaw bread recipe connects us directly to our roots—whether you’re Native American or just curious about this culinary tradition. Think about it: when you mix those ingredients, you’re not just following a recipe; you’re continuing a legacy. It's a way of honoring those who came before us. It’s like channeling your inner pioneer, right from your kitchen.
Back in the day, preparing squaw bread was not just about baking; it was about stories and traditions. Families gathered around the hearth, sharing laughter and advice while kneading the dough. Grandmothers would pass down their tips—like the perfect ratio of cornmeal to water. Trust me, I learned the hard way that too much water makes it go mushy. In those moments, they’d share tales of the past. Sometimes, it was stories of the first crops or the changing seasons. It’s fascinating how food can encapsulate so much—memories, love, and strength.
Let’s not overlook the ritual aspects of this bread. Many families would make it during special events or gatherings. It’s similar to how we bring out the pie at Thanksgiving. The act of sharing squaw bread over a meal is like giving a nod to unity and community. It’s a delicious reminder that food brings us together—even if we sometimes argue about who makes the best version!
So, if you’re eager to try your hand at a squaw bread recipe, remember this: you’re not just baking. You’re partaking in a cultural celebration, a journey through time and tradition. Embrace it, enjoy it, and maybe even share a story or two of your own while you’re at it!
FAQs about Squaw Bread Recipe
If you’re diving into the world of baking, you might have some questions about that delightful squaw bread recipe. Let’s tackle these FAQs together!
What are the ingredients in squaw bread?
To whip up a great batch of squaw bread, you’ll need a few basic ingredients. Typically, folks use whole wheat flour, honey, and molasses for that rich flavor. You’ll also need yeast, warm water, and a pinch of salt. Some recipes even call for oats or seeds for a nice crunch! It’s all about bringing that healthy goodness to your table.
How long does it take to bake squaw bread?
Now, if you’re wondering about the time commitment, it’s not too bad. Once you’ve mixed your dough, you’ll let it rise for about an hour—this is when the magic happens! After that, it usually takes around 30 to 40 minutes in the oven. Just keep an eye on it—every oven is different. The smell wafting through your home? Well, that’s just a sign that you’re on the right track.
Can I make squaw bread gluten-free?
Absolutely! If gluten's not your friend, you can still enjoy squaw bread. Use a good gluten-free flour blend. Just be aware that the texture might change a bit. Sometimes, adding a bit of xanthan gum helps bind everything together. I’ve tried this a few times, and it worked like a charm. Just remember to adjust your baking time, since gluten-free loaves tend to bake differently.
How do I store leftover squaw bread?
Ah, the age-old question of storage! If you find yourself with leftover squaw bread (which is rare, trust me), let it cool completely first. Then wrap it in a clean kitchen towel or aluminum foil. You can keep it at room temperature for a few days or pop it in the fridge to extend its life. If you want to keep it around even longer, slice it and stash those slices in the freezer. Just toast them up later, and you’ll be in business again!
So there you have it! Baking squaw bread is quite the adventure, and with these answers at your fingertips, you’re ready to get started. Happy baking!
Previous article: Ultimate Guide to Crafting Sea Lanterns
Next article: Make Starbucks Potato Chive Bake Recipe at Home
Delicious Squaw Bread Recipe: A Taste of Tradition: Share, Rating and Comments
0.0 / 5
0 Review